Kale, Leeks, and Chicken

kale, leeks, and chicken

A friend from my church has a very large garden; sharing its bounty is her joy.  Last summer’s series on simplified kale receipts was inspired by her gracious contributions (for recipes, see Cooking with Kale    and  Cooking with Kale Made Extra Easy).

My mind creates recipes according to what is in my larder, which usually boasts of provision supplied by church members.  Lately Goldie has been bringing her organic kale again, as well as leeks and celery; this mouth-watering chicken dish resulted.

For a wedding present last year, I gave a marriage supper, complete with a cooking class, to newlyweds in our congregation (see Thai Coconut Lime Flounder,)  My desire was to release the gift of excellent nutrition in them.  Several weeks ago, we celebrated their holy matrimony again, with a new set of instructions and dinner following, rejoicing over God’s goodness in our lives.

The first time I coached Dina, she exhibited such courage in overcoming her unfamiliarity with food preparation.  Hope, however, grew this recent session, for she has grown exponentially in her eager steadfastness in the kitchen.

This teaching includes my chicken dish, using my recent acquisition of kale, shallots, and leeks.  These steps are straightforward, though they are time-consuming, with the preparation of leeks and kale, but oh the benefits of health and taste!

Leeks are one of the world’s oldest vegetables, which are more delicate in flavor than either onions or shallots; they are considered highly nutritious, with cancer fighting attributes, as well as antiseptic, laxative, and diuretic properties, among many other health-promoting values.  This vegetable is particularly strong in vitamins K and A (when eaten raw, one 3.5-ounce serving contains 52 % daily requirement of vitamin K and more than 29% that of vitamin A).  Though research on this particular Allium is hitherto limited, it can well be assumed that its health benefits are comparable to those proven in its closely related onion and garlic cousins.  Its notable amount of flavonol kaempferol, in its substantial polyphenol content, thereby combats many health problems related to oxidative stress and chronic low-level inflammation; among these are rheumatoid arthritis, obesity, and type 2 diabetes; thus, this recipe is beneficial to Dina, whose husband is presently overcoming diabetes.  For an additional recipe and more on its history, go to Zucchini Chicken with Leeks and Shallots .

Enjoy making today’s clear, detailed chicken recipe for leeks, shallots, and kale; my next entry will expound on the colorful history of leeks, with a delectable soup.

References:

www.foodfacts.mercola.com/leeks.html

www.whfoods.com/genpage.php?tname=foodspice&dbid=26

www.historic-uk.com/HistoryofWales/TheLeek-National-emblem-of-the-Welsh/
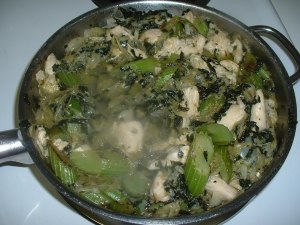
finished product

Kale, Leeks, and Chicken  Yields: 5-6 servings.  Total prep time: 1 1/2 hr (lengthy, but well worth it with these simple, detailed directions).

1 1/2 lbs chicken tenderloins, about 8-10 lg pieces  (Natural is best; available reasonably in Trader Joe’s freezer.)

2 lg carrots, optional

3 lg stalks of celery

1-1 1/2 lbs of kale

chopping leeks

4 leeks, white and light green part, 3/4 lb trimmed  (The best leeks are fresh-not more than a week old-and 1 1/2 “in diameter.)

5 lg cloves of garlic, minced  (3 cubes of frozen garlic from Trader Joe’s is much easier.)

4 tbsp butter

8 tsp oil  (Coconut or avocado oil is best, as olive oil is carcinogenic, when heated to high temperatures.)

1-2 tbsp fresh thyme, removed from stems, and coarsely chopped

Salt  (Himalayan, pink, or Real Salt is critical for optimum health; a fine grind Himalayan salt is available at Costco for $4.99 for 5 lbs.)

Fresh ground pepper

  1. Place chicken in a large bowl of warm water to thaw, set aside.
  2. Spray all vegetables with an inexpensive effective spray, by combining 97% white distilled vinegar and 3% hydrogen peroxide; let sit 3 minutes.  While waiting, if using fresh garlic, mince it now.  Rinse sprayed vegetables in a sink full of water three times.
  3. Cut celery diagonally in 1″ pieces.  Scrape optional carrots with a sharp knife (this preserves vitamins just under the skin); slice thinly at a diagonal.  Set both aside together in a bowl.
  4. Prepare leeks by first discarding outer leaves; cut off the dark green at the top and root hairs on bottom, leaving the white and light green part.  Cut each leek in half lengthwise; rinse well; then, cut each half in 2″ pieces, by placing leek cut-side up on board.  Finally, slice these 2″ lengths, cut-side up on board,

    cutting ribs out of kale

    into thin strips (see photo above).  Place pieces in a large container.  For final cleaning, rinse strips well with water, stirring with hand; then, drain in a colander.  This is known as the chiffonade-cut.

  5. Melt butter over medium heat in a sauté pan; as soon as a small piece sizzles in pan, add half the leeks, coating strips well with the hot butter. Reduce heat to low; cook down in pan, to make room for the rest of leeks, distributing oils well with each addition.  When all leeks are in pan, add garlic and slowly cook, covered, over low heat, stirring occasionally.
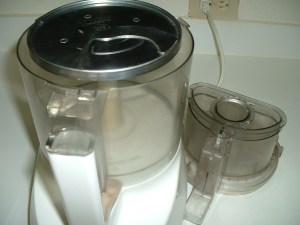
  6. straight-edge blade of food processor for chopping

    Cut ribs out of kale with a sharp knife (see above photo). May chop by hand, or quickly chop greens mechanically, by using the straight-edge blade of a food processor (see photo).  Turn processor on and place kale pieces in feeder tube (see photo below); set aside.

  7. Place thawed chicken on paper towel, salt and pepper GENEROUSLY.  Heat 1 tbsp of oil in a large frying pan over medium heat; when a small piece of chicken sizzles in oil, add the rest of the tenderloins; cook until light pink inside (do not overcook, as these will cook more later); cut tenderloins in bite-size pieces, removing them to a large bowl.  CAREFULLY SAVE JUICES IN PAN.
  8. Add 1 tbsp of oil to these juices; mix in half the kale, distributing oils evenly.  Over medium heat, cook this vegetable down until there is room to add more; mix in oils with each addition, until all is in the pan; cook covered, until limp, about 10 minutes, stirring occasionally.  As needed, deglaze pan (scrape fond, cooked-on juices, off bottom with a spatula, after adding 2 or more tbsp of water).  Remove to bowl of meat when done.
  9. placing kale in feeder tube of processor

    Meanwhile gently peel thyme off stems, chop coarsely with a sharp knife, set aside.

  10. Put last 2 tsp of oil in hot pan after kale is removed; add carrots and celery; mix well; cook until tender, stirring every couple of minutes.  Meantime go to next step.
  11. Blend 1-2 tbsp chopped thyme, 1/2 tsp salt, and 1/2 tsp pepper into leeks; stir in chicken/kale; continue cooking over low heat, until all is hot.  Add this mixture to pan of celery, when tender.  Adjust seasonings.  One final time, scrape bottom to deglaze pan, using the juices from the added leek mixture.  Serve with confidence!

Zucchini Chicken with Leeks and Shallots

zucchini chicken with leeks and shallots

I am still developing recipes for zucchini.  My new creation is enhanced with the rich flavors of leeks and shallots, this week’s offerings at church from a faithful member’s garden; these are of the onion family, but very different from each other in appearance, flavor, origin…

Shallots are mainly of two varieties, which are usually reddish-brown, though sometimes purple; these roots are similar in looks to, but larger than, garlic cloves.  This plant’s flowers primarily bloom in white or violet.

Leeks are big in comparison, looking like huge green onions, with wide flat leaves.  They are best when their stalk formations-long, relatively hard, bundled sheaths-have grown to about 1 1/2 inches in diameter.  Ideally these should be fresh-not more than a week old-and stored in loose plastic bags in the refrigerator.

Shallots taste like a mixture of onions and garlic, though they are milder in flavor and more pungent; they bless exceedingly!  Our worthy leeks are even milder yet, with a mild pungency as well.

Shallots, which are European in origin, are especially associated with French cuisine.  Their roots/cloves can be eaten fresh, or cooked in butter; boiling is also possible.  They are usually sautéed whole; though, halving them is best when large.  Their sweetness is exceptionally delightful!

In the U.S., leeks grow primarily in the northern sections, due to the cooler climates, a requirement wherever they grow worldwide.  They, being so mild, should be simmered slowly, making them ideal for soups and stews; nevertheless, they may be sliced with a chiffonade-cut, as I describe in this recipe, and gently fried in butter, to augment the savor of special food combinations.  This Allium is low in calories and high in nutrients (such as vitamin K, manganese, copper, vitamin B6, folate, vitamin C, iron, vitamin A, fiber, magnesium, calcium, vitamin E, and omega-3 fats), making it a power-packed food.  For additional leek recipes and history go to Kale, Leeks, and Chicken and Leek Soup .

Arrowroot is my choice for thickening the unequaled juices, resulting from simmering these leeks and shallots.  It is a starch from certain plants of the genera Manihot, Curcuma, and Tacca, as well as the tropical American plant Maranta arundinacea.  Its name consequently materialized from our Native Americans use of this root to absorb poison from arrow wounds.  I decided upon it, because I was serving this meal to a diabetic friend: it adds only seven grams of carbohydrates to the entire six servings, which is about two percent of the daily requirement of this chemical compound for the whole recipe.  For these same health reasons, I also selected the diabetic friendly Ezekiel 4:9 Sprouted Grain Pasta.  Our repast was a grand success!

Arrowroot is gluten-free, with twice the thickening power of flour.  It makes smooth sauces, which have remarkable clarity.  Great importance lies in not boiling the liquids you add it to, as this will stop its action.  Unlike a roux made from flour, this thickens very quickly; it is comparable to cornstarch, but lighter and healthier.

The following entrée uses tantalizing rosemary and moist zucchini, of which we have abundance from our gardens right now.  Its accompanying sauce, with the prized leeks and shallots, causes this chicken dish to explode with exciting tastes.  Enjoy!

References:

http://www.differencebetween.net/objects/comparisons-of-food-items/difference-between-leeks-and-shallots/

www.whfoods.com/genpage.php?name=foodspice&dbid=26

https://www.gurneys.com/Differences_between_Onions_Leeks_and_Shallots

chopping leeks with chiffonade-cut

Zucchini Chicken with Leeks and Shallots  Yields: 5-6 servings.  Total prep time: 1 hr.

1 1/4 lb chicken tenderloins, approximately 7 large pieces, thawed  (Natural is best; available reasonably in Trader Joe’s freezer.)

4 leeks, 1 1/2″ in diameter, white and light green part only-about 3/4 lb

1/4 lb shallots

1 1/2 lb zucchini

2 tbsp fresh rosemary, chopped fine

1/4 c butter, preferably unsalted

2 tbsp oil  (Coconut or avocado oil is recommended, as olive oil is carcinogenic when heated to high temperatures.)

Salt and fresh ground pepper  (Himalayan, pink, or Real Salt is critical for optimum health; a fine grind Himalayan salt is available for $4..99 for 5 lbs at Costco.)

1 tbsp arrowroot, dissolved in 1/4 c cold tap water  (May substitute cornstarch; arrowroot, however, is available inexpensively in bulk, at such upscale grocers as New Seasons; also accessible in spice section at local supermarkets.)

Fettuccine pasta  (Ezekiel 4:9 Sprouted Grain Pasta is health-promoting and diabetic friendly.)

  1. rinsing cut leeks

    Start thawing chicken in a bowl of water, set aside.

  2. Clean zucchini with a vegetable spray (combine 97% distilled white vinegar and 3% hydrogen peroxide for an inexpensive effective produce spray).  Let sit 3 minutes and rinse well.  Meanwhile go to next step.
  3. Prepare leeks by discarding outer leaves, cut off green tops and roots, and rinse well.  For chiffonade-cut, slice leeks lengthwise; rinse again; then, divide each half in 2″ portions.  Next cut each 2″ length in thin strips (see photo at top of recipe).  Place in a large container, rinse well with water, drain in colander, and set aside (see photo).
  4. Meanwhile cut zucchini in 2″-long spears, place in a bowl.
  5. Heat butter in a sauté pan over medium heat, until a small piece of leek in pan sizzles; add half the leeks, stirring in butter.  Reduce heat to low.  Cook down enough to fit other half into pan, distributing oils well; cover and cook, stirring occasionally.
  6. Peel shallots, slice large shallots in half (see photo); add to simmering leeks.  Let cook slowly over low heat,

    peeling shallots

    stirring occasionally.

  7. Chop rosemary, measure 2 tbsp, and place in a small container (may use less).
  8. Fill a stock pot 2/3’s full of water; add about 2 tbsp of oil-any kind will do-but no salt; bring to a boil over med/high heat.
  9. Meanwhile place tenderloins on paper towel; GENEROUSLY salt and pepper them.  Heat 1 tbsp of oil-preferably coconut oil-in a large frying pan, over medium heat, until small piece of chicken sizzles; add and cook chicken, until slightly pink in center (do not overcook, as it will cook more later on).  Cut each tenderloin in thirds with a spatula, removing pieces to a bowl; carefully save juices in pan.
  10. Add last tbsp of oil to pan of juices; mix in zucchini, distributing oils evenly.  Cook only until tender, stirring occasionally; watch so it doesn’t get mushy.  While cooking, go to next step.  (Note: may have to add more water to stock pot, so it is 2/3’s full, and boiling.)
  11. Dissolve arrowroot in 1/4 cup cold tap water, set aside.
  12. Place pasta in pan of boiling water; turn down heat to medium.  Cook for 6-7 minutes, until al dente; do not overcook.  Drain and set aside.
  13. Meantime stir chicken, rosemary, and 1/2 tsp salt into leeks/shallots; cook over medium heat until hot.  Add this mixture to pan of tender zucchini, stir together.
  14. finished product

    Turn down heat under zucchini/leek/chicken to insure the juices are not boiling, but hot; this is important for thickening to occur.  Using a wire whisk, blend in small amounts of dissolved arrowroot to the liquids around edges of pan, tilting pan to bring forth juices; in this way, use all the arrowroot.  Adjust seasonings.

  15. Serve over pasta; this is an exceptional treat!

Rosemary Eggs

rosemary eggs

I am creating recipes for an abundance of fresh rosemary, which I recently received; this simple duck egg receipt is among them.  It reminds me that I eat like a queen.  Read on to discover the benefits of duck eggs over those of chickens.

Six years ago my young friend Noah began raising ducks, which he cherishes as if they were his children; each possesses its own personality and carefully chosen name.

Depending on the breed, ducks produce between 150-200 eggs a year, which come in all sorts of colors, varying mostly by genetic strain.  Different colored eggs, however, sometimes occur within the same breed.

Noah has seventeen of these domesticated aquatic birds, with only five of them producing presently.  Later on there won’t be any eggs, for they only lay from early spring, until the winter cold sets in.  We are always sad when their production stops.

For the past half decade, I have been a beneficiary of this treasured delicacy; consequently my baking has excelled.  Pastry chefs prize these ovum of the family Anatidae over chicken eggs, for they contain less water, have firmer whites, and a higher fat content; this makes for moister cakes, breads, and cookies, all of which rise better, due to the additional leavening power found here.

The right balance in the interaction between eggs, flour, sugar, and fat in baked goods is important; your product will be dry if there is either too much or too little of the crucial egg.  In most recipes, “eggs” is a reference to large-sized chicken eggs, of which the equivalent of three is 2/3’s cup of duck eggs; therefore, I always measure these for an accurate agreement in any given recipe.  Note: whipping duck whites takes longer because of their firmness; thus, the recommendation is to beat them at room temperature, adding a little lemon juice; older eggs are preferable to fresh, as they aren’t as firm.

Duck eggs are up to 50% larger than those of their chicken cousins, with more yolk than white.  They are higher in protein and creamier, making great omelettes and quiches; crème brulee is unforgettable when made with these!  Nevertheless, my favorite way to eat them is over-easy, with the rich, smooth, orange yolk dripping all over the plate, which I sop up with my homemade toast.  Be sure to not overcook them, as they become rubbery.

Exponents of eggs propound that-among many benefits-they help prevent breast cancer, because of their high choline content; their abundance of the antioxidants lutein and zeaxathin fights mascular degeneration and cataracts.  Their beneficial blend of omega-3 fatty acids, zinc, B vitamins, and iodine feeds your brain, thus enhancing your mood.  They are an ideal, low-caloric, muscle-producing protein.

USDA has the same regulations for chicken, duck, quail, and ostrich eggs.  Their farmers and fans proclaim that duck eggs are less susceptible to diseases and parasites, making them safer, as well as healthier with a higher concentration of nutrients.  It is believed that their thick shells give them a longer shelf life than chicken eggs.

Eggs in general have gotten a bad rap in recent years; many feel they contribute to heart disease.  This is far from the truth, as they contain mostly monounsaturated and polyunsaturated fats, which actually lower heart disease risk.  Harvard health experts say healthy people can eat an egg a day; others believe you can eat even more.

These special duck eggs are popular in Asian cuisines, especially Chinese and Vietnamese, where they are frequently cured in brine; this draws out moisture and preserves them, altering their texture.  I fell in love with these pickled eggs while living in Tokyo!

My facile receipt blesses, for it enhances eggs with rosemary.  If possible, use these superior duck eggs, available at local farms and upscale grocers, where they range from $6 to $12 a dozen.  My young friend, however, sells his for the low price of $6/doz.  (Noah resides near the Tualatin high school here in Oregon; go to Cynthia Powell link on my Facebook page.)

References:

www.rodalesorganiclife.com/food/chicken-eggs-vs-duck-eggs-which-is-healthier

www.hgtv.com/outdoors/gardens/animals-and-wildlife/duck-eggs-411

https://www.tyrantfarms.com/5-things-you-didn’t-know-about-duck-eggs

https://pastrychefonline.com/2015/03/14/how-do-eggs-function-in-baking/

www.modernfarmer.com/2015/06/everything-you-need-to-know-about-duck-eggs/

chopping rosemary with a sharp knife

Rosemary Eggs  Yields: 1 serving.  (May multiply this, using a large non-stick pan.)  Total prep time: 15 min.

1 tsp fresh rosemary, minced  (1 1/3 tsp will be needed, if using duck eggs, which are considerably bigger than chicken eggs.)

1 small tomato, chopped

2 large chicken eggs  (May substitute duck eggs.)

1 tsp butter

Salt, to taste  (Himalayan, pink, or Real Salt is important for health reasons; a fine grind Himalayan salt is available at Costco for $4.95 for 5 lbs.)

Fresh ground pepper, to taste

  1. cooking liquid out of tomatoes

    Chop rosemary fine with a sharp knife; set aside (see above photo).

  2. Chop tomato and place in a dish.
  3. Beat eggs in a bowl, set aside.
  4. In a small non-stick omelette pan, heat butter over moderate/med heat; add rosemary; and cook for about 20 seconds.  Stir in tomato and cook for 2-3 minutes.  There will be juice from the tomatoes at first (see photo); cook until most of this liquid is evaporated.
  5. Pour in eggs; salt and pepper the top.  Gently fold in the firm egg on the bottom of pan (see photo); cook until egg is not runny any longer, but still quite moist.  Do not overcook, as this makes duck eggs, in particular, rubbery and dry.
  6. folding in cooked egg

    Serve hot, with homemade zucchini bread (2017/07/24), or better yet my rosemary bread toasted, which I will publish in several weeks.

Spicy Cold Noodles made w/ Ezekeil 4:9 Sprouted Grain Pasta

spicy cold noodles

This is one of my all-time favorite recipes, which I have been making every summer for 35 years.  It first blessed me, when I taught it to my students in Billings, Montana, during one of my plentiful cooking classes in the 1980’s.

I don’t exactly remember where I got it, but believe it came in a newspaper clipping sent by my mother, for she was good at supplying me with quaint receipts from the media, during my early catering/teaching career.  Many choice dishes were thus provided, which still grace my table today.  This specific one highly pleases the palate, though it deviates slightly from its authentic roots.

Korean vs Chinese Spicy Cold Noodles

There are both Korean and Chinese spicy cold noodles; both nationalities use sesame and chili oils, soy sauce, vinegar, garlic, and sugar in their mixes.  The Korean variation includes gochujang, a spicy pepper paste.  The Chinese sauce differs in that it calls for sesame paste and peanut butter, giving it an emulsified effect; it is tart, fiery, and slightly sweet.

My particular 1980’s account is from China, though it is Americanized with red wine vinegar instead of rice vinegar, which wasn’t readily available in Montana during the 1980’s.  This version doesn’t have the ever-present peanut butter and chili oil, but is still spicy hot with an abundance of garlic.  It is a memorable burst of flavors.

Spicy Cold Noodles from Szechuan

China is a vast land of varying cuisines.  Just before I left Billings, one of my students, a travel agent, was engaging me to teach these regional culinary truths, while accompanying her on a tour of a number of China’s leading provinces.  My sudden move to Portland, Oregon, in February of 1986, interrupted those plans to go abroad; nevertheless that early research still rests with me.  One of the provinces, which I was studying, was Szechuan-the home of this post’s recipe.

Various Types of Noodles throughout China

Noodles are common throughout this vast country; among the many variations are Chongquing hot noodles, Wuhan hot and dry noodles, Henan stewed noodles, and Beijing style Zhajiang noodles.  The latter dish reaches far beyond the Hebei Province; it is made with pork gravy, which varies greatly from southern to northern China.

The cuisine of Szechuan, also known as Chuan or Sichuan, not only produces these spicy cold noodles, but is famous for dandanmian-dandan-noodles as well; they too have a spicy sauce, and also contain preserved vegetables.  Both these dishes are street foods in Sichuan; they are served everywhere, even in small food stands on the street.

Low Glycemic Ezekiel 4:9 Sprouted Grain Pasta

I used poetic license, in that I chose pasta that is a complete protein and a natural, low glycemic food; thus, these delicious noodles are diabetic friendly.  This brand “Ezekiel 4:9 Sprouted Grain Pasta” contains the six grains and legumes, which are mentioned in this Old Testament scripture.  As published on their box, these half-dozen organic foods are germinated in pure filtered water; therefore, beneficial enzymes are activated, causing sprouting and releasing powerful nutrients, which otherwise would lay dormant.  Diabetics who can’t tolerate carbohydrates have reported good luck with this pasta, which makes this rich repast possible for them (be sure to consult with your doctor).

Join me on a trip to China with this select, health-promoting receipt!

ingredients for spicy cold noodles

Spicy Cold Noodles  Yields: 4-5 servings.  Total prep time: 30 minutes, plus several hours for chilling.  Note: may omit the chicken for a vegan recipe.

1 1b chicken, or 5 tenderloins, thawed  (All natural is best; available reasonably at Trader Joe’s.)

10 oz dry pasta  (Ezekiel 4:9 Sprouted Grain Fettuccine is a complete protein pasta, which is low glycemic, diabetic friendly, and high in fiber; may choose to use a spaghetti pasta.)

1 1/3 tbsp sesame oil

2 tbsp garlic, chopped

1/4 c sesame paste, or tahini  (Trader Joe’s makes a good organic one.)

3 tbsp hot brewed tea

3 tbsp soy sauce  (Organic tamari is best for your body.)

3 tbsp red wine vinegar  (May also use rice vinegar.)

2 tsp sugar

Salt to taste  (Himalayan, pink, or Real Salt is critical for optimum health; an inexpensive fine grind Himalayan salt is available at Costco.)

  1. Thaw chicken in a bowl of warm water.  Fill a stock pot with 4 quarts of water; bring to a boil over med/high heat.
  2. Meanwhile peel garlic cloves; cut cloves in halves or thirds; measure 2 tablespoons worth of pieces.  (This amount gives a lot of

    emulsifying tahini and tea

    bite, may use more or less to taste.)  Place garlic in a food processor and press the pulse button repeatedly, to form a med/coarse grind; stop and scrape down sides once; set aside.  (May also chop with a sharp knife, if you don’t have a processor.)

  3. Place tenderloins in boiling water; turn down heat to medium; do not add salt.  Cook for about 4 minutes, or just until pink is gone; do not overcook.  Remove from water when done and place on a plate in refrigerator.  SAVE BROTH.
  4. Brew tea.  Place sesame butter in a large bowl, add hot tea, stir until emulsified, or smooth and creamy (see photo).  Blend in garlic, soy sauce, vinegar, and sugar; set aside.  (If chicken is finished cooking while you are preparing sauce, proceed to step 5, and then come back to sauce.)
  5. Bring broth-to which you have added 1 tsp of sesame oil-to a rapid boil over med/high heat in the stock pot.  Add pasta and turn down heat to medium (do not add salt, as this toughens the noodles).  Stirring occasionally, cook for approximately 6-7 minutes, or until al dente-slightly chewy.  Drain pasta and immediately submerge in cold water to stop cooking process, set aside.
  6. Cut chicken in bite-size pieces, add to sauce, and season with salt.  Toss together with pasta.
  7. Serve chilled.  Yum!


Roasted Beet and Balsamic Chicken Salad

roasted beet and balsamic chicken salad

Both this salad’s balsamic chicken and the balsamic vinaigrette (see vinaigrette recipe at 2016/08/22) may be made with real balsamic, which originated in Modena, Italy about 900 years ago.  We, however, without knowing it often use a cheaper, imitation version of this.  I will teach the difference here, so you can shop wisely, if you want to invest in the best.

Wikipedia defines the aceto balsamico (balsamic vinegar), guarded by European agencies, as a very dark, concentrated, intensely flavored vinegar made wholly or partially from grape must.  The word aceto balsamico is unregulated, but there are three of these protected balsamic vinegars; it is required that they come from the province of Modena and the wider Emilia region surrounding it.  The two best of these always have the word tradizionale, traditional, in their names: Aceto Balsamico Tradizionale di Modena and Aceto Balsamico Tradizionale di Reggio Emilia; both are made from reduced grape must and aged for numerous years in a series of wooden barrels.  The third Aceto Balsamico di Modena is also made from grape must, but only partially, as it is blended with wine vinegar, making it less expensive.

The HuffPost explains how to discern these authentic versions, by looking for their place of origin and the words: grape must, aged grape must, Mosto d’Uva, or DOC in the list of ingredients.  Without one of these words you will be getting imitation wine vinegar with coloring added to it.

The first two mentioned above, known as balsamico tradizionale, are dark in color and very costly, because they are aged to syrupy perfection for 12-100 years, under rigid restrictions.  Expect to pay up to $400 a bottle.   This traditional balsamic is not vinegar made from wine, but rather it is made from grape pressings that have never been permitted to ferment into wine.  It begins with boiling down sweet white Trebbiano grape pressings to dark syrup, which is aged in an oaken keg with a vinegar “mother”.  Over the years it graduates to smaller and smaller kegs of different kinds of wood, as moisture evaporates from it, further thickening the vinegar and concentrating the flavor; the varying woods, chestnut, cherry wood, ash, mulberry, and juniper, provide its great character.  The result is extravagant taste.  As with the world’s most expensive spice saffron, a little goes a long way.

Aceto Balsamico di Modena, the other regulated balsamic, is partially made with grape must and blended with wine vinegar, making it less costly.  Its restrictions are that it has to be from the Modena or Emilia regions and carry a Protected Geographical Indication status, which comes from a different agency than that protecting the balsamico traditzionale.

Like with good wine, price often dictates quality.  Surprises, however, sometimes occur: this authentic blended vinegar, complete with the authorized seal, is available at Trader Joe’s at a very moderate cost, as their excellent buyers shop globally, negotiating low prices, for the large quantities they are obtaining.  This label is good, but even better may be experienced.

Explore the exciting world of vinegars; make this dressing with a high quality aceto balsamico, or get Trader Joe’s Balsamic Vinegar of Modena (aged 10 years at $3.99 for 8.5 ounces), which is also delicious.  As a result, this salad will tantalize your taste buds.

The healer Jeanette-referred to in my 2016/09/05 post Sprouted Quinoa and Yam Salad-emphasizes the importance of color in her life-giving diet.  I kept her instructions in mind as I chose this produce; thus, I included purple beets as opposed to multi-colored ones, which are light in pigment when cooked; bright yellow peppers provided a health-promoting, visual contrast.

The inspiration for this salad came when I needed one for a ladies tea at my church.  Since then I have used it to bless several large crowds; thus, it is written for ten servings which I in turn multiply; in this way, chefs write their recipes for restaurant use.  You, however, may choose to prepare half this receipt.  Don’t miss its simple pleasure!

References:

https://en.wikipedia.org/wiki/Balsamic_vinegar

www.huffingtonpost.com/2014/06/09/balsamic-vineger-fraud_n_5459425.html

https://www.thespruce.com/about-balsamic-vinegar-1808088

cooking tenderloins in balsamic vinegar

Roasted Beet and Balsamic Chicken Salad   Yields: 10 servings (may make half this recipe).  Total prep time: 2 days (for sprouting quinoa)/  active prep time: 3/4 hr/  baking time (for beets): 1 hr.

Note: may substitute ready-made versions, or using my recipes, you may prepare ahead, for keeping on hand at all times: balsamic vinaigrette (2016/08/22), croutons (2016/08/15), and agave roasted nuts (2016/08/15).

1/2 c quinoa, sprouted 1-2 days in advance  (Directions are below.)

2 lg purple beets

1 tbsp oil  (Coconut or avocado oil is best; olive oil is carcinogenic when heated to high temperatures.)

1 lb chicken tenderloins, about 5 pieces

1/3 c balsamic vinegar

3 med/lg cloves of garlic, minced  (Better yet, use 1 cube of frozen garlic from Trader Joe’s.)

1 yellow bell pepper  (Organic is important, as bell peppers readily absorb pesticides.)

12 oz greens of your choice

8 oz feta cheese, crumbled  (Do not use pre-crumbled feta, as it is treated with preservatives, and is neither tasty or healthy.)

Agave-roasted nuts, purchased or made ahead  (See Healthy Green Salads, 2016/08/15.)

Croutons, purchased or made ahead  (See Healthy Green Salads, 2016/08/15.)

Balsamic vinaigrette, purchased or made ahead  (See 2016/08/22.)

  1. Using either a sprouting jar or a bowl, sprout quinoa 2 days in advance, by first soaking it in water for 6-8 hours (may make extra quinoa); then, draining off water well, let it sit for 1-2 days until sprouted, rinsing about every 12 hours.  Store extra in refrigerator.  For more detail on sprouting, see Sprouted Three Bean Dip (2019/05/13) and Sprouted Quinoa and Yam Salad (2016/09/05).
  2. If chicken is frozen, thaw in water.
  3. Preheat oven to 375 degrees.  Wash and lightly oil beets; wrap in aluminum foil, leaving closure upright to keep juices from spilling out; bake on cookie sheet for 3/4–1 1/4 hours, depending on size of beets.  Open foil and cool in wrap for 10 minutes; peel skin off by rubbing with hands; cut in 1/4″ julienne slices; set aside.  Meanwhile go to next step.
  4. Chop garlic, if using fresh, set aside.
  5. Heat tablespoon of oil in large skillet; place thawed tenderloins on paper towel, salting and peppering them extra well before cooking; when tiny piece of chicken sizzles in oil, add the rest.  Pour balsamic over meat and add garlic; immediately turn tenderloins over in vinegar.  Let cook for 2-3 minutes, turning over once mid-way.
  6. Starting with the smallest tenderloin, cut each piece in thirds with a spatula; as they are cooked, remove pieces to a bowl.  Do not overcook-the meat will just be turning white inside when done.  Pour juices from pan into bowl of meat, set aside.
  7. Wash and cut bell pepper in small strips.
  8. Place greens in a serving bowl; add chicken, with half the liquid, quinoa, beets, peppers, feta cheese, and nuts; toss with balsamic vinaigrette; serve with croutons. Delicious!

1960’s Portuguese Pork

Portuguese pork roast

My gift of hospitality was birthed during my youth in the mid-twentieth century, for then I watched my mother host elaborate dinner parties.  As an excellent cook, she prepared glorious feasts, often with international themes; this 1960’s recipe for Portuguese pork blessed guests repeatedly.  While in college, I meticulously copied her treasured receipts and began my own journey, fostering nourishment of body and soul.

In 1982, God converted this inherent gift into my lifetime work.  Then I began catering meals and teaching a profusion of cooking classes, utilizing researched historical recipes.  One of these classes was on my mother’s Portuguese foods, on which I expanded, incorporating the salad Ensalada Iberica and dessert Figos Recheados, my next weeks’ posts.

Slowing down, smelling the roses, feeding ourselves and others are important traits. In doing such, let us choose pleasure in even the simplest of foods.  These pleasures seem amplified. when someone else prepares the meal; thus, their charity reaches our hearts regardless of what is served.  Macaroni and cheese can thrill us, when made with love by a friend.

There is an element of courage, which results in unexpected joy, when we graciously receive ailments we aren’t sure of.  While living in Billings, Montana, a friend invited me to celebrate Easter with her.  Upon arrival I discovered we were partaking of rabbit; I was challenged in eating this, especially on this holiday!  Expressing gratitude, I bravely proceeded and found it palatable, as long as I didn’t concentrate on it being Easter.  Though I have never again experienced this meat, fond memories flood my mind whenever it is mentioned.

Let us be strong in both giving and receiving benevolent fellowship; use my series of proven receipts to host this cultural affair for your loved ones, or better yet invite someone newly acquainted.

In Culinary Artistry, Andrew Dornenburg and Karen Page note strong compliments to pork; among the most vibrant are vinegar, garlic, black pepper, oranges and onions-all of which are present in this detailed dinner.   Enjoy my creative repast!  1

  1. Andrew Dornenburg and Karen Page, Culinary Artistry (Hoboken, NJ: John Wiley & Sons, Inc., 1996), p. 159.

chopping jalapeno peppers

Portuguese Pork  Yields: 8-10 servings.  Inactive prep time for marinating: 1 day/  active prep time: 30 min/  cooking time: 3 1/2 hr.

4 lb pork loin roast

1 1/3 c water

1 c cider vinegar  (Trader Joe’s carries an inexpensive raw version, which has great health benefits.)

5 med/lg cloves of garlic, minced

3 tepino peppers  (If desired, use jalapeno peppers, which are milder.)

Salt and pepper  (Himalayan, pink, or Real Salt is critical for optimum health; a fine grind is available at Costco for $4.95/5 lb.)

1 c sliced green olives  (May serve additional in a bowl at table.)

Baked yams  (Yams and sweet potatoes are different varieties of the same vegetable, they are interchangeable.)

  1. Place water and vinegar in a 9 1/2″ x 7 1/2″ x 3″ pan, or 3-quart baking dish).
  2. Mince garlic, add to vinegar mixture.
  3. Cut peppers in half lengthwise, scoop out seeds with a spoon, chop fine, and add to vinegar mixture (see photo).  Note: be sure to wash hands thoroughly, as burning will result from touching eyes, if you don’t.
  4. Place pork in marinade and marinate in refrigerator for at least 24 hours, turning roast halfway through, at about 12 hours.
  5. Preheat oven to 300 degrees.  Before placing in oven, turn roast again, salting and peppering the top well.  Bake for 1 3/4 hours.  Proceed immediately to next step.
  6. Wash yams and pierce several times with a fork.  Cover with foil; place top of foil on potato, where sealed, face-up in the oven while baking; this keeps juices from leaking out.  Start baking these at the same time you begin roasting the meat; bake for about 3 hours, as the oven is only set at 300 degrees.
  7. After baking for first 1 3/4 hours, turn roast for the last time.   Once more, salt and pepper the top well.  Bake for another 1 3/4 hours.
  8. When cooking is complete, remove roast from oven, cool for 15 minutes.  Toward the end of this time, take yams out of oven and place on plates; next, cut pork in thick slices and arrange on dishes; top with sliced olives.  (It is good to serve additional olives in a small bowl at table.)
  9. This pork is superb with the Portuguese salad Ensalada Iberica and dessert Figos Recheados, my next weeks’ posts.

Red Sauce for Pasta or Spaghetti Squash

simmering red sauce with splash shield

A beloved friend gave me a Valentine’s present of heart-shaped pasta; immediately I created this red sauce so I could enjoy my new treasure, resulting in this excellent covering for either pasta or spaghetti squash.

Follow these easy instructions for substituting the squash, if your dietary needs call for a vegetable rather than a starch with this piquant accompaniment.

Gifts promote well-being in both the giver and receiver.  My mother’s favorite language of love was that of gift giving; thus, I learned at an early age the power of contributions from the heart.  As a result I love to shower favor upon others, as well as graciously receive their inspired kindnesses.

This same act of generous sacrifice plays a lively part in my relationship with my Father in heaven, for I constantly seek to offer myself to him.  In doing so, it is important to slow down, move forward cautiously, relax, and especially, trust the process.  In this way, we proffer our lives to our Maker moment by moment.  However this process often brings tension, for resistance arises.

We see an explicit example of this opposition in our practice of eating: here polarity is experienced between a desire to quietly absorb pleasure and a friction arising out of our need to resolve storms present in our beings.

Taut emotions can result as we struggle to calm overactive minds, so we can enjoy our food; this dichotomy in our bodies can be countered with prayer.  Great grace is needed, however, if heightened feelings cause us even to miss the opening blessing over our nutriments.

When the above happens to me while eating, I immediately search my heart for honest moves of gratitude, which usually include my two favorite gifts from God: I have vibrant health, with my acquired ability to eat sanely, and an immense supply of resources, including the highest quality of food.

These two endowments were not always present with me, for I knew excessive physical and financial poverty in the past.  At one point I had a 226 pound body, that couldn’t stop eating compulsively; now it is clothed better than Solomon in size petite.

All devouring of my economic supply has likewise ended.  An apt example of this is the recent demolition of my computer, at which juncture I stood, looked out my window at the river below, and spoke the word: all things come together for good for those that love God and are called according to his purpose.  Joyful faith rose in me, I was convinced that increase was on its way.

Indeed it was!  For after waiting patiently six weeks, I now publish my blog with the fastest of computers, an I-7 laptop equipped with a new wireless keyboard, mouse, printer, and monitor setup.

In addition to the outstanding quality of these, I have a fiber optic internet connection-instead of DSL-with 90 times more power and a monthly fee that is slightly less!

This unheard of upgrade-a sign of the Father’s immense love-was further outdone by the monetary provision for this loss.  First, great deals gave me $700 worth of equipment for $280.  Next, three separate parties were moved to help me with this.  This was outdone even further, however, with this full amount being exceeded by half again as much, or $140 was left over in gift monies!

This is just one simple example of how my needs are always met today.  God, who owns the cattle on a 1000 hills, indeed showers us with blessings, if we but believe.

He loves each and every one of us!  Right now, his heart is reaching out, to set us free from all wounds that hinder his glory from manifesting in our lives.  He is only about goodness, as my testimony proves.  Let’s receive his blessings; begin by enjoying this red sauce recipe.

sweating onions

Simple Red Sauce for Pasta or Spaghetti Squash  Yields: 2 qt.  Total prep time: 1 hour/  active prep time: 30 minutes/  cooking time: 30 minutes.   (Spaghetti squash requires approximately 1 1/2 hr to bake.)

4 tbsp oil  (Coconut oil is best for flavor and quality here; avocado oil will also do; olive oil is carcinogenic, when heated to high temperatures.)

1 med/lg yellow onion, chopped

1 lb ground beef

1 lb romanesco or 3/4 lb mushrooms  (I like to use romanesco for variety’s sake; it is a green variant of cauliflower, which is available in the organic section at better supermarkets; may also use a combination of both.)

3 tbsp butter, if using mushrooms

2-15-oz cans of tomato sauce  (Hunt’s and Simple Truth-at our local Fred Meyer’s-make inexpensive organic tomato sauces.)

1-15-oz can of water

2 tsp dried oregano  (Trader Joe’s carries a superb, organic dried oregano for $1.99!)

1 tbsp dried basil  (Also available inexpensively at Trader’s.)

1 tsp sugar  (I prefer organic; available at Trader’s and also in a more economical 10 lb bag at Costco.)

2 1/2 tsp salt, more to taste  (Real Salt is important for optimum health, available in nutrition section at local supermarket.)

1/2 tsp fresh ground pepper, more to taste

5 extra-large garlic cloves, minced  (3 cubes of Trader’s frozen garlic is better here.)

1/4 c tomato paste  (Open a 6-oz can and freeze individual 1/4 cup servings in small plastic bags, to be thawed as needed.)

Pasta or 4.5 lbs spaghetti squash  (This spaghetti squash yields 4-6 servings.)

Parmesan cheese, grated or shaved

  1. If using spaghetti squash, preheat oven to 375 degrees; pierce squash with a fork multiple times; place on side on foil-covered cookie sheet, and bake for approximately 1 1/2 hour, turning halfway through, at 3/4 hour.  Cool for at least 10 minutes before handling, cut lengthwise, take out seeds, and scrape out “noodles” with a fork, when ready to serve.
  2. Heat 2 tbsp oil in a 3-quart saucepan over medium heat; add a small piece of onion; when it sizzles, add rest of onions and sweat (cook until translucent); see photo.
  3. Fry beef in sauté pan; salt and pepper generously before cooking; drain fat if there is a great deal of excess, when finished.  Proceed to next step, while meat is cooking.
  4. If using romanesco, clean and cut into very small pieces, add to translucent onions, and cook until somewhat soft, about 4-5 minutes, stirring frequently.
  5. Add the cooked beef to onion mixture, along with tomato sauce, water, herbs, sugar, 1/2 tsp salt, pepper, and garlic.  Blend well.  Set aside sauté pan.
  6. Cover saucepan with a splash shield, which is available at Bed, Bath, and Beyond (see top photo); bring to a boil over medium heat; reduce heat to med/low and simmer for 30 minutes.  Go to next step.
  7. If you are using mushrooms instead of the romanesco, clean them by brushing off dirt with a mushroom brush, cut into small chunks.  Heat butter in the sauté pan, cook mushrooms in hot butter for several minutes, until slightly limp, stirring constantly.  Add mushrooms and juices to sauce.
  8. Meanwhile if serving with pasta, boil a large pot of water, to which 2 tbsp oil and 2 tsp salt are added.
  9. When sauce has simmered for 30 minutes, blend in tomato paste; cook for several minutes, or until thickened, stirring constantly.
  10. Adjust seasonings to taste.
  11. Boil pasta 10 minutes before serving, or if using spaghetti squash, split baked squash in half lengthwise, take out seeds, and scoop out noodle-like membrane with a fork.
  12. Pour hot sauce over noodles and top with Parmesan cheese.  Serve immediately.
  13. Note: may freeze small individual containers of leftover sauce, to be conveniently thawed for future use.  This is dynamite!

Parmesan Dover Sole

pan of baked Dover sole

Joy found in my gift of hospitality and fine food exploded when I was celebrating a belated Christmas get-together with Carol, a friend of 31 years.  Our time in each other’s company is always rich; my desire for our merrymaking was that my food would give honor, blessing our long-term bond.  This delicious dish answered this ambition beyond my expectations.  I share it here for your use with those close to you.

Friendship and food are both treasured gifts.  When we mix the two together, life pours forth.  I always endeavor to meet my guests’ particular needs, thus making each dinner engagement unique and exceptional.

For instance Carol doesn’t like hors d’ouvres, as they were never served in her family of origin; for her they take away from an acute appetite for the main meal.  Consequently, we just partake in tea and conversation for the first half hour of our gathering.

This sensible person has a heightened awareness of taste.  She knows good food and eats with purpose, maximally enjoying each bite.  This takes concentration; my friend allows herself this luxury; thus, we spend much of our repast in silence, focusing on gastronomic pleasures.

This discipline was first displayed to me when I was 20 years old, while waiting on table in my father’s restaurant.  (Joy unspeakable happened to me then, as I served the public with our exceptional ailments.)

My About Page on this website notes that which is true for each of us: it details the unfolding of my destiny, which has been happening throughout my entire life-I was born a food historian.  An excellent example of this destiny-making process is what I learned about the gift of hospitality, while serving the public in my youth; during that instructive time, a young couple showed me what a treasure stillness brings to eating.

Tourists peopled my family’s eatery in Glacier National Park and this unique pair was probably there on their honeymoon.  I initially approached their table with rousing emotion, my usual display of a genuine heartfelt welcome.  My spirit, however, was quickly corrected.  This excitable enthusiasm, which was normally highly pleasing to those on holiday, was not appropriate in their presence, for there was a holy reverence about them.  My sensitive response was an immediate change of demeanor.

Throughout their lengthy feast, I watched them with awe, as they indulged in each other’s company and our kitchen’s delights, in their unparalleled way.  I intuitively knew how to respect them with a quiet spirit.  This, however, was so foreign to me that I felt like I was walking on egg shells.  But oh the glory of it all!

Since then, God has given me a friend with whom I can practice what these two taught me, forty odd years ago.  Carol and I uphold veracity in all of life’s dealings; thus, even our eating is veracious.  Because of the honesty in our souls, we engage in veneration to God as we consume food; therefore, you can see my need for a dish that would rise to our integrity, which I knew would be present at this gathering.

My heart’s desire was met in this Parmesan Dover Sole recipe; how facile and pleasing it is beyond words.

sauce cooking

Parmesan Dover Sole   Total prep time: 1 1/3 hr/  active prep time: 50 min/  baking time: 30 min.  Yields: 3-4 servings.  Note: you may double this recipe, leftovers are great, however fish only keeps for 3 days.

1/2 tsp oil  (Coconut oil is best here for flavor and quality; you may also use avocado oil; olive oil is carcinogenic, when heated to high temperatures.)

1 med yellow onion, halved at the root and cut in even 1/8 inch slices

5 med cloves garlic, minced  (May substitute 2 cubes frozen garlic from Trader Joe’s for easy prep.)

1 lb Roma tomatoes, chopped small  (Organic is best; the organic Roma variety is not that much more expensive than regular tomatoes.)

1/2 tsp sugar, optional  (This brings out the flavor in the tomatoes.)

1/2 tsp salt, or to taste  (Himalayan, pink, or Real Salt is critical for optimum health; a fine grind Himalayan salt is available at Costco for $4.95/5 lb.)

1/4 tsp fresh ground pepper, or to taste

1/2 tsp Better Than Bouillon  (This soup base, in either chicken or vegetable flavor, will do; available at most grocery stores.)

3/4 c boiling water

Spray oil  (Pam coconut spray oil is ideal, available more reasonably in our local Winco brand.)

1 lb Dover sole fillets, or other type of whitefish, such as flounder  (Dover sole is a type of sole that has very thin fillets, which is ideal for absorbing sauces; see Thai Coconut/Lime Flounder, 2016/12/05.)

1 c Parmesan cheese, grated or shaved

Rice, steamed according to directions on package

  1. Preheat oven to 350 degrees.  (If you prepare dish ahead of time, do steps 2 through 9 before hand; then, begin preheating oven 1 hour before serving.)
  2. beginning stages of caramelization

    Heat oil in a large sauté pan over med/low heat; add onions and caramelize, by stirring every several minutes until color starts to form (see photo); then, stir every minute until dark brown (see photo below). Do not crowd onions in pan, or they will sweat, taking much longer to cook.

  3. If using fresh garlic, chop and set aside.  Spray tomatoes with an inexpensive, effective vegetable spray, a mixture of 97% distilled white vinegar and 3% hydrogen peroxide; let sit for 3 minutes; rinse well.
  4. Meantime dissolve Better Than Bouillon in the hot water, set aside.
  5. Chop tomatoes in small pieces and place in another frying pan; add garlic, bouillon mixture, sugar, salt, and pepper, stirring well.  Bring to a boil over medium heat; then, turn heat down to med/low; simmer gently for about 20 minutes, or until a sauce is formed, with the tomatoes somewhat chunky (see above photo).  Adjust seasoning when sauce is complete. (For tips about cooking properly with garlic, see Tomato/Feta Chicken, 2016/07/25.)
  6. onions nearing finish

    Begin steaming the rice while tomatoes are cooking.  (If you are preparing this ahead of time, start this starch when you put cold fish dish in preheated oven, 50 minutes before serving.)

  7. For a single recipe, spray with oil a 9 1/2″ x 7 1/2″ x 3″ pan or 2 1/2-quart baking dish (for a double recipe, use a 9 1/2″ x 13″ x 2″ pan).  Place fish fillets in bottom of pan.
  8. Pour prepared sauce over raw fish and sprinkle with Parmesan cheese, see top photo.  (If preparing this ahead, refrigerate fish dish at this point.)
  9. Bake in preheated 350 degree oven for 30 to 50 minutes-time varies if fish is cold from the refrigerator.  Fish is done when its center is opaque and it flakes with a fork.
  10. Enjoy this incredibly good dish!  Leftovers are also delicious.

Thai Coconut/Lime Flounder

Salad with leftover Thai flounder

salad with leftover chilled Thai flounder

This delicious white fish dish resulted from a long-awaited-for marriage, which took place in my church in October.  A feast at my bountiful table was part of my wedding present to our venerated couple.

Our bride Dina was particularly interested in learning how to cook, with ease, for her new groom.  My bright idea was to begin my dinner gift in the kitchen with teaching her how to make the meal.  I prepared all the steps, just like you might see on a cooking show: the ingredients were set out in small individual dishes, along with the corresponding pans and utensils. All was in place for the lesson to flow naturally.

My priceless inheritance from my parents was a gene that “knows” food. Therefore I intuitively conceived this delicious dish, which was specifically geared for her husband’s dietary needs.  An exquisite, ultra simple recipe resulted.

Surprise and hesitancy occurred upon my friends’ arrival, as I informed Dina that she was going to make dinner, under my close direction.  She, being true to form, rolled up her sleeves with courage.  Her nervousness soon dissipated, for the facility of my simple instructions comforted her.  Joy unspeakable resulted: a chef was born! I have observed, as an aside, that this woman approaches all of life’s challenges with this same spirit.

Are you timid about stepping into the unknown, either in or out of the kitchen? May you receive encouragement to advance in faith; start by trying my recipes. They look lengthy at times, but are effortless!  The cause for this seeming protractedness is my inclusion of practical details, which make food preparation easy and enjoyable.  You’ll sense that you are in  cooking school, when you use my receipts, as I teach at every point.  Rest assured-I will educate you for the joy of cooking.

My favorite way to serve this smooth flounder, with its slight bite, is over a good pasta (however I used rice for my newly weds); either will bless the taste buds. Also, cold leftovers of this fish top off a salad superbly.

This feast pleased Dina and Dale; and me as well!

Thai coconut lime flounder dinner

Thai coconut/lime flounder dinner

Thai Coconut/Lime Flounder  Yields: 4 servings.  Total prep time: 40 minutes.

Note: flounders closely relate to soles; thus, you may substitute any sole here (also see Parmesan Dover Sole, 2017/03/27).

1 tsp coconut oil  (Other oils will do, but coconut is best for flavor and quality here.)

1 med yellow onion, halved at the core, and cut in even 1/8 inch slices

1 lime, juiced

7 oz Extra Thick Coconut Cream, or half of a 14 oz can  (This is available at Trader Joe’s.)

3/4 tsp dried, crushed red pepper  (Save spice jars and refill yearly with fresh, inexpensive “bulk’ spices.)

1/4 tsp salt

4 fillets of flounder, approximately 1 pound  (Wild-caught is best; may substitute a pound of sole, which is a close relative to flounder.)

Steamed rice or pasta, regular or gluten-free

  1. beginning stages of caramelization

    Start cooking rice, according to directions on package.  If using pasta, begin boiling water in a big pot; to which you add 2 tsp salt and 2 tbsp oil-any kind of oil will do.

  2. Place 4 individual dinner plates in oven; set the temperature on warm.
  3. Heat oil in a large sauté pan over med/low heat; stir in onions well; caramelize, by stirring every several minutes until they start to turn color (see photo); then, stir every minute until dark brown (see photo below); watch carefully while going to next steps.  (Do not crowd pan with onions, or they will sweat, taking much longer to cook.)
  4. Meanwhile roll lime on counter; press down hard with your hand, until the meat of the fruit is broken down and softened; juice lime; set aside.
  5. Place whole can of coconut oil in a small storage container; be sure first to gently stir milk and cream together thoroughly in can (this prevents a mess when emptying the can).
  6. Add half of the coconut cream (7 oz), lime, red pepper, and salt to caramelized onions.  Stir well and slowly bring to a soft boil over medium heat.  If preparing for guests, you may choose at this point, to set aside coconut/onion mixture and heat it 15 minutes before serving.  If you are waiting, be sure to have the plates warm, rice cooked, or water boiling when you start to cook the flounder.  (Note: you can freeze leftover coconut cream, or use within a week.)
  7. caramelized onions approaching finish

    Start cooking pasta in boiling water about 10 minutes before dinner time. Boil until it is al dente, about 7 minutes, do not over cook. Drain and place on heated dinner plates when done.

  8. Meanwhile add two fillets of flounder (more if using smaller sole) to hot coconut cream/onion mixture, which has been heated over medium temperature.  Poach briefly on each side, only until color in center is opaque.  Do not overcook.  Remove to heated dinner plates, on which you have placed pasta or rice.  Repeat this step with the remaining fillets.  Cover with sauce.
  9. Serve it forth!

A Simple “Frittata”

dinner with Dave

dinner with Dave

My pastors provide our congregation with fruits of their labors during the harvest season; this year’s bumper crop of tomatoes and zucchini inspired Pastor Dawn to create this frittata-like dish, which I have expanded on here. It boasts of these rich autumn vegetables. The receipt is so easy that it cries out for many encores.

The traditional frittata, or Italian omelette, has a two-stage cooking process.  You normally begin making this egg dish on the stove top and finish it in the oven. One may even purchase special pans for preparing this.  However my simplified version is made in a frying pan, solely on top of a burner.

The original frittata is a cross between an omelette and quiche, which is comprised mostly of eggs with some vegetables.

"frittata"

“frittata”

On the contrary, my “frittata” is mostly vegetables with several eggs scrambled in.  There is no guessing with these easy steps of preparation. The result is intense flavor, good protein, and creative cooking with fall produce.

My beloved cousin and his wife, whom I hadn’t seen since 1995, were here for dinner several weeks ago.  We indulged in this European creation and my honeyed-lime kale with turkey. (See Cooking with Kale, 2016/09/07.) The presence of God and this delicious food nourished our souls during our lavish repast.

You will relish this “frittata”-it is so good!  Enjoy.

A Simple “Frittata”  Yields: 4-6 servings.

1 tbsp oil  (Coconut or avocado oil is best.)

1 med yellow onion, halved at the core and thinly sliced

3 med/large tomatoes cut in eighths

2 med/small zucchinis, thinly sliced

½ tsp dried oregano  (A great, inexpensive, organic variety is available at Trader Joe’s.)

3/4 tsp dried basil

4 lg cloves of garlic, minced  (May use 2 cubes of frozen garlic from Trader’s.)

Salt and pepper to taste  (Real Salt is best, available in health section of local supermarket.)

4 lg white mushrooms, brushed, with mushroom brush, and sliced

3 oz good quality cheese, grated

3 lg eggs, beaten  (I like to use duck eggs, which are creamier and higher in protein.)

  1. Heat oil in a large frying pan over medium heat. Place a small piece of onion in hot oil. When it sizzles, add the rest of the onions.  Cook until golden brown; stir occasionally.
  2. Add chopped tomatoes, zucchini, herbs, garlic, salt, and pepper. Reduce heat to med/low. Cook vegetables about 40 minutes, or until liquid is gone and sauce is thick. Be sure to stir occasionally. Watch carefully toward the end of cooking, so vegetables don’t burn.  (May set aside at this point and reheat, to finish recipe, just before serving.  Watch carefully when reheating, so as not to burn the sauce.)
  3. Add mushrooms and cheese to hot sauce. Stir well.
  4. Add eggs to vegetables; stir gently several times, as they cook. Cook until eggs are done. Mixture will be soft.
  5. Adjust seasonings.
  6. This is delicious served hot, room temperature, or ice cold.  Leftovers are great!