Blum’s Coffee Toffee Pie

Blum’s Coffee Toffee Pie

The following is the colorful story of the arrival of Blum’s Coffee Toffee Pie in my family’s history; more over it marks the beginning of the hand of Providence saving me for my work as a food historian.

Multiple Variations of this Pie

This recipe served as the basis for numerous delightful variations, which we served in our family restaurant in Montana’s glorious Glacier National Park (see Nutty Coconut Pie and Chocolate Mint Pie).

Blum’s Background

It all started with my need for a unique eye operation in San Francisco in 1968.  As we walked these lively streets, we witnessed our nation’s struggle to discover love through the hippie movement.  We, however, nurtured our hungry souls at the beloved Blum’s everyday.

This confectionery, bakery, and restaurant began charming San Francisco in the 1950’s; it closed in the 70’s.  There we devotedly indulged in its famous Coffee Toffee Pie; my strong mother bravely asked for the recipe, which they gave her.  (They must have given it to many others as well, for numerous recipes of this are now available on-line.)

Over the decades through my family’s development of it, this receipt has emerged in ways that are outstanding, making its preparation simply foolproof.  Among many improvements, we freeze this pie for long-term use, preferring it only partially thawed, which gives it an ice cream-like texture.  Numerous tips make this dessert a pure joy, to be made with ease.

My Destiny as a Food Historian

Without any doubt, our lives have purpose, for we are created to fulfill specific works that only we are equipped to do.  My calling, as a writer of food history, has taken shape over my entire life.  Many times death has tried to steal this precious gift from me.  My mother’s prayers, however, have covered me with the required protection, for without prayer God’s hands are tied.

My first monumental memory of our Father’s intervention was in 1967, when I incurred a near fatal concussion from a car accident.  Mom’s simple faith brought me back from what spelled destruction: I was neither dead nor a vegetable, as doctors were declaring.  Though I didn’t yet know Jesus personally in 1967, Mom’s steadfast heart acted as my shield and miracles occurred.

The preservation of my life was the first wonder, but another ensued.  Due to the concussion, the part of my brain that controlled my oblique eye muscle was severely damaged, resulting in intense double vision.

Unique Eye Operation Taking Us to San Francisco

At that time, there were only three doctors in the U.S. that could perform the needed operation, then with only a 50% chance of any correction.  Thus in the spring of 1968, we were off to San Francisco, where Dr. Paul at University Hospital perfected my sight completely!  As always, Mom’s prayer life brought rich dividends.

This surgeon took my eye out of my head to shorten the errant muscle, so I saw this lively city with only half my vision, as a patch covered the deep blood-red of that, where his skillful hands had been.  Nevertheless, San Francisco charmed me.

Celebration Then and Now

Celebrate, with me, God’s good and entire provision for our lives; receive this outstanding historical receipt, with its foolproof directions!

Blum’s coffee toffee pie

Blum’s Coffee Toffee Pie  Yields: 1-10″ pie.  Total prep time: 1 1/2 hr, plus 1/2 hr for cooling/  active prep time: 1 1/4 hr/  baking time: 15 min.

1 c flour  (Optional: may grind 1/3 c organic hard red spring wheat berries and 1/3 c organic soft winter white wheat berries to make a total of 1 c of fresh ground flour.)

1/2 tsp salt  (Himalayan, pink, or Real Salt is important for optimum health; an inexpensive fine grind Himalayan salt is available at Costco.)

3/4 c butter, softened

1/4 c brown sugar, packed down  (Organic is best; available sometimes at Costco and always at Trader Joe’s.)

3/4 c walnuts, chopped fine

2 oz Baker’s unsweetened chocolate, plus extra for garnish

1 tbsp water

1 tsp vanilla extract

3/4 c cane sugar  (Organic is ideal, best buy is at Costco, also available in a smaller quantity at Trader’s.)

2 lg eggs, at room temperature  (If sensitive to raw eggs, may use pasteurized eggs for extra safety, which are available at some grocery stores.)

8 tsp instant coffee

2 c heavy whipping cream

1/2 c powdered sugar  (High quality organic is available at Trader’s.)

  1. grating of chocolate

    IF grinding fresh flour, do so now.

  2. Preheat oven to 375 degrees.  Place a bowl in freezer for whipping cream (the whipping of cream is greatly facilitated when utensils are ice cold).
  3. Combine flour and salt; blend in a scant 1/4 c butter with a fork until mealy in texture.
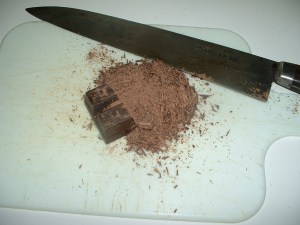
  4. Mix in brown sugar, walnuts, and 1 oz chocolate, grated with a sharp knife (see photo); add water and vanilla; blend well.
  5. Butter a pie plate generously; press pie dough in pan firmly with fingers. Bake for 15-18 minutes, or until light brown; begin cooling on a rack, for about 10 minutes, finish cooling in freezer.
  6. While crust is cooling, melt 1 oz chocolate over med/low heat, watching carefully as not to burn. Set aside and cool.
  7. Beat 1/2 c butter in a large bowl with an electric mixer until creamy.  Gradually add 3/4 c cane sugar, beating well with each small addition.
  8. Add 1 egg; mix on medium speed for 5 minutes.  (The following makes this preparation foolproof.  It is so important to have ingredients at room temperature; if your kitchen is either really hot or cold, this mixture may curdle.  You can easily correct this: if it curdles or breaks because it is too hot, make the addition of the second egg a cold one, directly out of the refrigerator, to bring the filling back to its full volume.  If the butter/sugar/egg combination is too cold and curdles, warm the chocolate a little and mix this in before adding the second egg; then, follow the directions for beating.  Ideally when done, this mixture should be like fluffy whipped butter or soft whipped cream, providing ingredients are room temperature, in a moderate kitchen.  In this way, you will never fail with this recipe!)
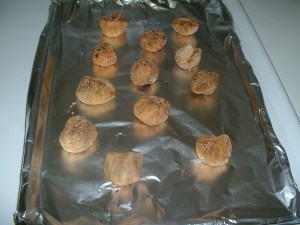
  9. assembling of pie

    Blend in cooled chocolate and 2 tsp of coffee into whipped filling.

  10. Add second egg and beat for 5 minutes more.
  11. Wash beaters and put in freezer, for whipping cream.
  12. Place filling in cold pie crust; put in freezer for 30 minutes, for filling to set up.
  13. With ice cold bowl and beaters, beat cream until it starts to thicken.  Add powdered sugar and 2 tbsp coffee; continue beating until stiff.  Cover pie with whipped cream and garnish with chocolate curls.  See photo at top of recipe.
  14. May eat now, or for long-term use return to freezer; when frozen, cover well with plastic wrap, to cut pieces as needed.  Serve partially thawed for optimum pleasure.

Spicy Cold Noodles made w/ Ezekeil 4:9 Sprouted Grain Pasta

spicy cold noodles

This is one of my all-time favorite recipes, which I have been making every summer for 35 years.  It first blessed me, when I taught it to my students in Billings, Montana, during one of my plentiful cooking classes in the 1980’s.

I don’t exactly remember where I got it, but believe it came in a newspaper clipping sent by my mother, for she was good at supplying me with quaint receipts from the media, during my early catering/teaching career.  Many choice dishes were thus provided, which still grace my table today.  This specific one highly pleases the palate, though it deviates slightly from its authentic roots.

Korean vs Chinese Spicy Cold Noodles

There are both Korean and Chinese spicy cold noodles; both nationalities use sesame and chili oils, soy sauce, vinegar, garlic, and sugar in their mixes.  The Korean variation includes gochujang, a spicy pepper paste.  The Chinese sauce differs in that it calls for sesame paste and peanut butter, giving it an emulsified effect; it is tart, fiery, and slightly sweet.

My particular 1980’s account is from China, though it is Americanized with red wine vinegar instead of rice vinegar, which wasn’t readily available in Montana during the 1980’s.  This version doesn’t have the ever-present peanut butter and chili oil, but is still spicy hot with an abundance of garlic.  It is a memorable burst of flavors.

Spicy Cold Noodles from Szechuan

China is a vast land of varying cuisines.  Just before I left Billings, one of my students, a travel agent, was engaging me to teach these regional culinary truths, while accompanying her on a tour of a number of China’s leading provinces.  My sudden move to Portland, Oregon, in February of 1986, interrupted those plans to go abroad; nevertheless that early research still rests with me.  One of the provinces, which I was studying, was Szechuan-the home of this post’s recipe.

Various Types of Noodles throughout China

Noodles are common throughout this vast country; among the many variations are Chongquing hot noodles, Wuhan hot and dry noodles, Henan stewed noodles, and Beijing style Zhajiang noodles.  The latter dish reaches far beyond the Hebei Province; it is made with pork gravy, which varies greatly from southern to northern China.

The cuisine of Szechuan, also known as Chuan or Sichuan, not only produces these spicy cold noodles, but is famous for dandanmian-dandan-noodles as well; they too have a spicy sauce, and also contain preserved vegetables.  Both these dishes are street foods in Sichuan; they are served everywhere, even in small food stands on the street.

Low Glycemic Ezekiel 4:9 Sprouted Grain Pasta

I used poetic license, in that I chose pasta that is a complete protein and a natural, low glycemic food; thus, these delicious noodles are diabetic friendly.  This brand “Ezekiel 4:9 Sprouted Grain Pasta” contains the six grains and legumes, which are mentioned in this Old Testament scripture.  As published on their box, these half-dozen organic foods are germinated in pure filtered water; therefore, beneficial enzymes are activated, causing sprouting and releasing powerful nutrients, which otherwise would lay dormant.  Diabetics who can’t tolerate carbohydrates have reported good luck with this pasta, which makes this rich repast possible for them (be sure to consult with your doctor).

Join me on a trip to China with this select, health-promoting receipt!

ingredients for spicy cold noodles

Spicy Cold Noodles  Yields: 4-5 servings.  Total prep time: 30 minutes, plus several hours for chilling.  Note: may omit the chicken for a vegan recipe.

1 1b chicken, or 5 tenderloins, thawed  (All natural is best; available reasonably at Trader Joe’s.)

10 oz dry pasta  (Ezekiel 4:9 Sprouted Grain Fettuccine is a complete protein pasta, which is low glycemic, diabetic friendly, and high in fiber; may choose to use a spaghetti pasta.)

1 1/3 tbsp sesame oil

2 tbsp garlic, chopped

1/4 c sesame paste, or tahini  (Trader Joe’s makes a good organic one.)

3 tbsp hot brewed tea

3 tbsp soy sauce  (Organic tamari is best for your body.)

3 tbsp red wine vinegar  (May also use rice vinegar.)

2 tsp sugar

Salt to taste  (Himalayan, pink, or Real Salt is critical for optimum health; an inexpensive fine grind Himalayan salt is available at Costco.)

  1. Thaw chicken in a bowl of warm water.  Fill a stock pot with 4 quarts of water; bring to a boil over med/high heat.
  2. Meanwhile peel garlic cloves; cut cloves in halves or thirds; measure 2 tablespoons worth of pieces.  (This amount gives a lot of

    emulsifying tahini and tea

    bite, may use more or less to taste.)  Place garlic in a food processor and press the pulse button repeatedly, to form a med/coarse grind; stop and scrape down sides once; set aside.  (May also chop with a sharp knife, if you don’t have a processor.)

  3. Place tenderloins in boiling water; turn down heat to medium; do not add salt.  Cook for about 4 minutes, or just until pink is gone; do not overcook.  Remove from water when done and place on a plate in refrigerator.  SAVE BROTH.
  4. Brew tea.  Place sesame butter in a large bowl, add hot tea, stir until emulsified, or smooth and creamy (see photo).  Blend in garlic, soy sauce, vinegar, and sugar; set aside.  (If chicken is finished cooking while you are preparing sauce, proceed to step 5, and then come back to sauce.)
  5. Bring broth-to which you have added 1 tsp of sesame oil-to a rapid boil over med/high heat in the stock pot.  Add pasta and turn down heat to medium (do not add salt, as this toughens the noodles).  Stirring occasionally, cook for approximately 6-7 minutes, or until al dente-slightly chewy.  Drain pasta and immediately submerge in cold water to stop cooking process, set aside.
  6. Cut chicken in bite-size pieces, add to sauce, and season with salt.  Toss together with pasta.
  7. Serve chilled.  Yum!


Creative Caesar Salads

creative Caesar salad topped with serungdeng kacang

When I was growing up, we lived in the small resort town of East Glacier Park, Montana, which is the east entrance to Glacier National Park; there were only 250 residents at the foot of these glorious Rocky Mountains.  Because of our town’s minuscule size, it was necessary to travel to larger cities to take care of our major shopping needs, such as school clothes every late summer.  Usually we traveled within our State, 150 miles east to Great Falls; on special occasions, we ventured as far away as Spokane, Washington.  I can still feel the thrill as we prepared, in the early morning dark, to leave on these revered journeys.

Memories of Ridpath Hotel in  Spokane, WA during  the 1950’s

During the extra special trips to Spokane, the Ridpath Hotel captivated me; we ate many dinners in its plush dining room, often partaking in their Caesar salad, which came with the pomp and flair of table-side service.  My young heart was even then preparing for my career in food history, for I was fascinated by the coddling of the egg, with the torch used for that purpose; in like manner, I rhapsodized over the delight of the powerful garlic on my tender tongue.

To this day I love Caesar salad; I share a recipe here that lives up to this enduring mental monument.  Be prepared to enjoy.

Origins of Caesar Salad

There are several accounts of how this famous dish began.  After much research, I chose to attribute its origin to the Italian chef Caesar Cardini (1896-1956), who created this American classic at his well-known restaurant in Tijuana, Mexico.  There in 1924, he was serving an unusual number of Californian visitors, escaping for the Fourth of July weekend during prohibition.  This original production was served table side, without anchovies, and included whole lettuce leaves, which were eaten by the stems, using one’s fingers.

Caesar salad enhanced with beans

Are Coddled Eggs Safe?

There are numerous opposing views on the safety of coddled eggs.  Some profess that they are not a threat: it is adequate to place the eggs in rapidly boiling water, remove the pan from the heat, and then allow the eggs to cook for 60 seconds; indeed, this technique provides the best taste.

Others propound that holding eggs at 140 degrees F (60 degrees C) for five minutes kills potential contaminants, such as salmonella; this can also be achieved instantly by heating them to 160 degrees F (71 degrees C).

Still others declare that uncooked and under-cooked eggs are not safe at all; they rigidly promote the use of either hard-boiled or pasteurized eggs; the latter are available in some grocery stores.  Note: it is important to use caution in highly susceptible populations, such as small children, pregnant women, the elderly, and those with health problems.

Two Resolutions to Problem

Here I cover this dilemma with two good solutions: my favorite version of this dressing is made with coddled eggs, which have been cooked for 60 seconds; nonetheless, for times when extra special care is needed, I provide a method of heating the prepared dressing to 160 degrees; this last procedure, however, thickens our treasured concoction quite a lot.  With both of these two options, the powerful recollected taste from my youth is maintained, which is heightened even further with strong combinations of foods in my creative Caesar salads.

References:

https://whatscookingamerica.net/CaesarSalad.htm

www.reluctantgourmet.com/caesar-salad/

www.foodandwine.com/fwx/food/we-can-thank-tijuana-and-prohibition-caesar-salad

www.ochef.com/447.htm

https://en.wikipedia.org/wiki/coddled_egg

www.safeeggs.com/blog/will-the-real-safe-caesar-salad-recipe-please-stand-up/

finished Caesar dressing (feeder tube in lid at right side)

Caesar Salad Dressing  Yields: about 1 1/2 cups.  Total prep time: 30 min.  If cooking the dressing, total prep time is 45 min.

3 fresh, free-range eggs, at room temperature  (Place in warm water for 10-15 minutes.)

2 tbsp fresh garlic

1 tbsp cider vinegar  (Raw is best; available inexpensively at Trader Joe’s.)

1 scant tbsp Dijon mustard  (Aioli Garlic Mustard from Trader’s is also excellent.)

2 small lemons, juiced

3 dashes of Tabasco

3 dashes of Worcestershire

1/4 c grated Parmesan cheese

1 anchovy, optional

3/4 tsp salt, or to taste  (Himalayan, pink, or Real Salt is critical for optimum health; an inexpensive fine grind Himalayan salt is available available at Costco for $4.95 for 5 lbs..)

1/2 tsp freshly ground pepper, or to taste

3/4 c olive oil  (Personally I prefer a light olive oil for flavor; Trader Joe’s brand, fruity Extra Virgin Olive Oil or Bel’Olio, from Costco, are both great.)

  1. Use room temperature eggs, by placing them in warm water for 10-15 minutes.  For health reasons, it is important that they are washed, free-range, and fresh.  I feel comfortable with coddled eggs, which makes the best dressing.  If, however,  you are sensitive to them (or storing this dressing for more than 4-5 days), take the extra precaution of cooking it as described in step 6, or better yet use pasteurized eggs, which are available in some grocery stores.
  2. coddling eggs

    For coddled eggs, bring a small pan of water to a boil over high heat; prepare an ice bath, using a bowl of cold water with ice cubes.  Place eggs in rapidly boiling water; quickly remove from heat; let them sit for 60 seconds; then, immediately transfer to the ice bath, to the stop cooking process.  Crack them on side of bowl, scooping coddled egg out of shell with a spoon, set aside (see photo).

  3. Meanwhile mince 2 tbsp of garlic: peel cloves, cut in halves; then, chop this in a food processor by repeatedly pressing pulse button; measure 2 tbsp of chopped garlic and place this back in processor.  Set aside.  (TO MAKE DRESSING BY HAND: chop the garlic with a sharp knife; mix all ingredients, except the oil, in a med/small bowl; then, beat in the oil SLOWLY, to emulsify the dressing.  May also make this in a VitaMix or blender.)
  4. Juice the lemons, set aside.
  5. Add all ingredients, except the oil, to the garlic in the processor.  Turn on machine and blend; place oil in the feeder, which is located on the top (see this feeder in above photo of finished product); thus, oil will drip in slowly for an emulsified dressing.  Adjust seasonings.  This will keep in the refrigerator for 4-5 days; for longer storage, go to the next step.  Serve on the creative salads given lastly.
  6. For cooked dressing, prepare an ice bath, using a large bowl with a smaller one inserted in center (see photo).  Prepare Caesar dressing as described in steps 2-

    cooked dressing cooling in ice bath

    5; transfer this mixture to a small, heavy-bottomed saucepan; cook dressing over low heat, stirring constantly, until this egg mixture reaches 160 degrees F (71 degrees C); immediately place in the ice bath to cool, adding more ice as needed.  Note: the dressing will thicken as it cooks. Serve on salads described below.

  7. I like to be creative with my Caesar salads; here are two suggestions for using foods that highly complement this excellent dressing.  First: mix greens, sweet onion, avocado, Parmesan cheese, and homemade croutons (2016/08/15); then, top this with serungdeng kacang, which is crispy coconut chips and peanuts sautéed with a garlic/onion puree (2017/01/09).  Second: mix greens, Parmesan cheese, homemade croutons, and beans; legumes really accentuate the flavor of this dressing!  Enjoy.

The Best Zucchini Bread

zucchini loaves

It’s that time of year again for our proliferate zucchini.  Cucurbita pepo, a member of the cucumber/melon family, originated in Mexico; this was not only grown by Central and South Americans, but also by our own  Native Americans, long before the Europeans arrived.  Nonetheless, the version we know in the U.S. today is a variety of summer squash developed in Italy.

In actuality this is a fruit, not a vegetable, as it contains seeds.  While usually the male and female counterparts are present in one plant, these components in this fruit exist in separate plants.  In the biological world, the female produces ovules, the equivalent of eggs, while the male produces pollen, which is like sperm in the animal kingdom.  Birds and especially bees transfer this pollen from the individual male to the female zucchini plants, producing abundant fruit, providing both these individual organisms reside together in any given garden.

I have a proven recipe to make use of this fertile squash, in which I suggest utilizing the health-promoting ingredients grapeseed oil and coconut sugar.  Grapeseed oil, along with coconut and avocado oils, can be heated to high temperatures without producing carcinogens.  It is mild in flavor; thus, it is ideal for baking.

Comparing refined with coconut sugar, we see very little difference in their nutritional profiles on the surface; their caloric and carbohydrate content is very similar.  Such figures, however, don’t tell the hidden benefits of this healthier coconut sweetener which is barely processed; it is obtained by heating the sap of the coconut flower until most of the liquid is evaporated.

This alternative has a little more nutrition, as it contains small amounts of zinc, iron, calcium, and potassium, where the refined version holds empty calories.  More importantly, coconut sugar possesses a much lower glycemic index; this greatly reduces any tendency to spike the blood sugar, making it a possible substitute for those dealing with milder forms of blood sugar problems.  Always be sure to check with your healthcare specialist concerning your own personal diet!

I use this “healthy” substitute in both my zucchini and banana breads; see Banana Bread (2017/05/29).  My larder perpetually boast of one or the other of these, both of which I make with flour from freshly ground, organic, hard red spring wheat berries.  These specific berries contain a variety of nutrients including vitamin E, calcium, B vitamins, folate, and potassium.  One serving also provides 20% of the daily value of dietary fiber, 8% of needed iron, and the same amount of protein as found in an egg, or 6 grams.  Breads last for lengthy periods of time, when made with this fresh ground flour.

To easily bake these perfect zucchini loaves in the off-season months, I encourage you to freeze plenty of this grated “fruit/vegetable” in 1-cup packages, while the abundance lasts.

References:

https://www.thespruce.com/history-of-zucchini-1807689

http://www.motherearthnews.com/organic-gardening/all-about-zucchini-zbcz1405

biologicalthinking.blogspot.com/2011/07/birds-do-it-bees-do-iteven-zucchinis-do-it.html

optional grinding of flour, with attachment for Kitchen Aid

Zucchini Bread  Yields: 2 loaves.  Total prep time: 1 1/2 hr/  active prep time: 30 min/  baking time: 1 hr.

3 c flour  (Fresh-ground provides the highest quality; use 2 c organic, hard red spring wheat berries to make 3 c freshly ground flour; see photo.)

3 lg eggs

2 1/4 c sugar  (Coconut sugar is best-always available at Trader’s and at times Costco, or an organic coconut sugar can be found inexpensively in bulk at our local Winco.)

1 c oil  (Grapeseed  or avocado oil is important here; these may be heated to high temperatures without damage.)

3 tsp vanilla extract  (Ask vacationers to bring a liter-bottle back from Mexico; this is of the highest quality and dirt cheap.)

1 tsp salt  (Himalayan, pink, or Real Salt is critical for optimum health; an inexpensive fine grind Himalayan salt is available at Costco.)

1 tsp baking powder

1 tsp baking soda

4 tsp cinnamon  (Our local Fred Meyer’s has an excellent, organic Korintje cinnamon in bulk inexpensively.)

thawing individual frozen zucchini packages

2 c zucchini  (If using frozen zucchini, remove 1 tbsp of liquid from each thawed 1c package; be sure to thaw in a dish to catch juices; it is best to freeze these ahead, while zucchini is available; see photo.)

1 c nuts, optional

Spray oil  (Coconut spray oil is best; Pam is available in most supermarkets; our local Winco-brand, however, is far less expensive.)

Flour for dusting pans

  1. Preheat oven to 325 degrees.
  2. If grinding fresh flour, do so now; see above photo.
  3. Beat eggs in a large bowl, add sugar, blend until creamy.  Beat in oil and vanilla well.
  4. Place flour in a large bowl; stir in salt, baking powder, baking soda, and cinnamon with a fork vigorously, or shake all well in a sealed gallon-size storage bag.
  5. Mix flour mixture into egg/sugar/oil; when adding flour, do not over beat, as this toughens the bread.
  6. Fold in zucchini and optional nuts.  Note: if using frozen zucchini, remove 1 tbsp of liquid from each 1 c package, which has been thawed in a bowl to preserve juices.
  7. Spray and lightly flour two 8 x 4 inch loaf pans (coconut spray oil is important for quality and flavor).  Pour batter into prepared pans.
  8. cooling zucchini loaves in pans for 15 minutes

    Bake for 60 minutes, or until the loaf responds when pressed with finger; may also test with a toothpick, which will come out clean when done.  Do not over-bake, as this will continue to cook some, while cooling for 15 minutes in the pan, set on a rack; see photo.

  9. This is magnificent, health-giving bread!

Borscht (Beet Soup)

a bowl of borscht

This borscht recipe and its history have been with me since my catering days, during the early 1980’s in Billings, Montana.  Then I was preparing soups for a café in an art gallery; now it graces my table every summer.  A particular prayer partner claims my version is far better than that which she had in Russia.  Indeed, this chilled soup is a beautiful offering on a hot summer day!

This delicacy has been long popular in Eastern European countries under the following names: borscht, borsch, borshch, and bosht.  Over time it has spread from these nations to other continents, as their people emigrated.  In North America, it is commonly linked with the Jews and Mennonites that came from these European areas.  The common name borscht is derived from the Russian borsch meaning cow parsnip, which was an original recipe ingredient of the Slavs.

The most familiar American adaptation of this soup, which is made with beetroot, is of Ukrainian origin.  With its first record being in the 12th century, this dish subsequently emerged from a wide variety of sour-tasting soups present in the Eastern European section, such as rye-based white borscht, sorrel-based green borscht, and cabbage borscht.  Our well-known Ukrainian recipe was originally inspired by the addition of leftover beetroot pickling; thus, its brilliant color and tart flavor.

There are as many different preparations for this beet soup as there are homes in which it is consumed; they may include the additions of meat, fish, cabbage, carrots, tomatoes, and potatoes.

Spanish conquistadors brought potatoes and tomatoes from America to Europe in the 16th century; these vegetables, however, weren’t a common part of the Eastern European peasants’ diet until the 19th century, at which time they found their way into the Ukrainian and Russian borscht-food of both poor men and princes.  As a result of emigration, tomatoes and potatoes are a part of borscht recipes around the world, but my version has neither of these.

Still other variations occur with this renowned soup involving its garnishes and side dishes.  Smetana, or sour cream, is its most common topping; chopped herbs, hard-boiled eggs, bacon, and sausage may also be utilized.  There are plentiful side dishes; among them are pampushky (Ukrainian garlic rolls) and treasured pirozhki (individually sized pastries or dumplings filled with meat and onions).

You can see that despite its centuries-long-history there is no consistent receipt for this sustaining chilled delight, for even this latter characteristic may vary, and it may be served hot.  My borscht is a cold, meatless, summer soup adorned with sour cream and eggs; for the benefit of added protein make this recipe with bone broth (see its benefits and easy recipe at my post on Tortellini Soup, 2016/10/10).  This is a treat!

References:

https://en.wikipedia.org/wiki/Borscht

https://www.britannica.com/topic/borsch

www.dictionary.com/browse/borscht

easy mincing of onion

Borscht (Beet Soup)  Yields: 4-5 servings.  Total prep time: 1 hr/  active prep time:30 min/  cooking time: 30 min

1 tbsp oil  (Coconut or avocado oil is best; olive oil is carcinogenic when heated to high temperatures.)

1 med/lg yellow onion

3 lg purple beets, a little less than 2 lbs trimmed

1 qt broth  (Beef broth is good; I, however, prefer bone broth; for recipe and powerful health benefits, see Tortellini Soup, 2016/10/10.)

1 c water

2 small lemons, juiced  (Use half of this to start; then, adjust with more to taste.)

1 tbsp honey, or to taste  (Local raw honey is always best, for its localized bee pollen is known to relieve allergies naturally, through the concept of immunotherapy.)

1 tsp Better than Bouillon, or to taste

1/2 tsp salt, or to taste  (Himalayan, pink, or Real Salt is critical for optimum health; an inexpensive fine grind Himalayan salt is available at Costco.)

1/2 tsp freshly ground pepper, or to taste

sweating onions

Sour cream

3 eggs, hard-boiled and chopped  (I prefer duck eggs; see Rosemary Eggs, 2017/08/21, for their information.)

  1. Chop the onion in small pieces the easy way.  Peel it leaving the root on; next, score this by cutting slices close together across the top one way, going 3/4 of the way down into the onion; then, turn it and cut slices the opposite direction.  When onion is thus prepared, shave the small pieces off the end with a sharp knife (see photo in list of ingredients).  May discard root end; set aside chopped vegetable.
  2. Heat oil in a stock pot over medium heat; add piece of onion; when it sizzles, add remaining onion; sweat, cook only until translucent (see photo above).  Set aside, go to next step.
  3. Spray beets with an inexpensive, effective vegetable spray; mix 97% distilled white vinegar with 3% hydrogen peroxide in a spray bottle.  Let sit for 3 minutes and rinse well.
  4. Peel and cut beets in 1/4″ dice; add to cooked onions.
  5. Cover with broth and water; bring to a boil over med/high heat; reduce heat and simmer for about 30 minutes, or until beets are soft.
  6. borscht cooking in pot

    Add half the lemon juice and honey.

  7. Stir in Better than Bouillon; then, add salt and pepper.
  8. Adjust lemon juice, honey, Bouillon, salt, and pepper to taste.
  9. Chill for 4 hours or overnight.  Serve topped with sour cream and chopped hard-boiled eggs.
  10. This freezes well.  I love this summer soup!

Roasted Beet and Balsamic Chicken Salad

roasted beet and balsamic chicken salad

Both this salad’s balsamic chicken and the balsamic vinaigrette (see vinaigrette recipe at 2016/08/22) may be made with real balsamic, which originated in Modena, Italy about 900 years ago.  We, however, without knowing it often use a cheaper, imitation version of this.  I will teach the difference here, so you can shop wisely, if you want to invest in the best.

Wikipedia defines the aceto balsamico (balsamic vinegar), guarded by European agencies, as a very dark, concentrated, intensely flavored vinegar made wholly or partially from grape must.  The word aceto balsamico is unregulated, but there are three of these protected balsamic vinegars; it is required that they come from the province of Modena and the wider Emilia region surrounding it.  The two best of these always have the word tradizionale, traditional, in their names: Aceto Balsamico Tradizionale di Modena and Aceto Balsamico Tradizionale di Reggio Emilia; both are made from reduced grape must and aged for numerous years in a series of wooden barrels.  The third Aceto Balsamico di Modena is also made from grape must, but only partially, as it is blended with wine vinegar, making it less expensive.

The HuffPost explains how to discern these authentic versions, by looking for their place of origin and the words: grape must, aged grape must, Mosto d’Uva, or DOC in the list of ingredients.  Without one of these words you will be getting imitation wine vinegar with coloring added to it.

The first two mentioned above, known as balsamico tradizionale, are dark in color and very costly, because they are aged to syrupy perfection for 12-100 years, under rigid restrictions.  Expect to pay up to $400 a bottle.   This traditional balsamic is not vinegar made from wine, but rather it is made from grape pressings that have never been permitted to ferment into wine.  It begins with boiling down sweet white Trebbiano grape pressings to dark syrup, which is aged in an oaken keg with a vinegar “mother”.  Over the years it graduates to smaller and smaller kegs of different kinds of wood, as moisture evaporates from it, further thickening the vinegar and concentrating the flavor; the varying woods, chestnut, cherry wood, ash, mulberry, and juniper, provide its great character.  The result is extravagant taste.  As with the world’s most expensive spice saffron, a little goes a long way.

Aceto Balsamico di Modena, the other regulated balsamic, is partially made with grape must and blended with wine vinegar, making it less costly.  Its restrictions are that it has to be from the Modena or Emilia regions and carry a Protected Geographical Indication status, which comes from a different agency than that protecting the balsamico traditzionale.

Like with good wine, price often dictates quality.  Surprises, however, sometimes occur: this authentic blended vinegar, complete with the authorized seal, is available at Trader Joe’s at a very moderate cost, as their excellent buyers shop globally, negotiating low prices, for the large quantities they are obtaining.  This label is good, but even better may be experienced.

Explore the exciting world of vinegars; make this dressing with a high quality aceto balsamico, or get Trader Joe’s Balsamic Vinegar of Modena (aged 10 years at $3.99 for 8.5 ounces), which is also delicious.  As a result, this salad will tantalize your taste buds.

The healer Jeanette-referred to in my 2016/09/05 post Sprouted Quinoa and Yam Salad-emphasizes the importance of color in her life-giving diet.  I kept her instructions in mind as I chose this produce; thus, I included purple beets as opposed to multi-colored ones, which are light in pigment when cooked; bright yellow peppers provided a health-promoting, visual contrast.

The inspiration for this salad came when I needed one for a ladies tea at my church.  Since then I have used it to bless several large crowds; thus, it is written for ten servings which I in turn multiply; in this way, chefs write their recipes for restaurant use.  You, however, may choose to prepare half this receipt.  Don’t miss its simple pleasure!

References:

https://en.wikipedia.org/wiki/Balsamic_vinegar

www.huffingtonpost.com/2014/06/09/balsamic-vineger-fraud_n_5459425.html

https://www.thespruce.com/about-balsamic-vinegar-1808088

cooking tenderloins in balsamic vinegar

Roasted Beet and Balsamic Chicken Salad   Yields: 10 servings (may make half this recipe).  Total prep time: 2 days (for sprouting quinoa)/  active prep time: 3/4 hr/  baking time (for beets): 1 hr.

Note: may substitute ready-made versions, or using my recipes, you may prepare ahead, for keeping on hand at all times: balsamic vinaigrette (2016/08/22), croutons (2016/08/15), and agave roasted nuts (2016/08/15).

1/2 c quinoa, sprouted 1-2 days in advance  (Directions are below.)

2 lg purple beets

1 tbsp oil  (Coconut or avocado oil is best; olive oil is carcinogenic when heated to high temperatures.)

1 lb chicken tenderloins, about 5 pieces

1/3 c balsamic vinegar

3 med/lg cloves of garlic, minced  (Better yet, use 1 cube of frozen garlic from Trader Joe’s.)

1 yellow bell pepper  (Organic is important, as bell peppers readily absorb pesticides.)

12 oz greens of your choice

8 oz feta cheese, crumbled  (Do not use pre-crumbled feta, as it is treated with preservatives, and is neither tasty or healthy.)

Agave-roasted nuts, purchased or made ahead  (See Healthy Green Salads, 2016/08/15.)

Croutons, purchased or made ahead  (See Healthy Green Salads, 2016/08/15.)

Balsamic vinaigrette, purchased or made ahead  (See 2016/08/22.)

  1. Using either a sprouting jar or a bowl, sprout quinoa 2 days in advance, by first soaking it in water for 6-8 hours (may make extra quinoa); then, draining off water well, let it sit for 1-2 days until sprouted, rinsing about every 12 hours.  Store extra in refrigerator.  For more detail on sprouting, see Sprouted Three Bean Dip (2019/05/13) and Sprouted Quinoa and Yam Salad (2016/09/05).
  2. If chicken is frozen, thaw in water.
  3. Preheat oven to 375 degrees.  Wash and lightly oil beets; wrap in aluminum foil, leaving closure upright to keep juices from spilling out; bake on cookie sheet for 3/4–1 1/4 hours, depending on size of beets.  Open foil and cool in wrap for 10 minutes; peel skin off by rubbing with hands; cut in 1/4″ julienne slices; set aside.  Meanwhile go to next step.
  4. Chop garlic, if using fresh, set aside.
  5. Heat tablespoon of oil in large skillet; place thawed tenderloins on paper towel, salting and peppering them extra well before cooking; when tiny piece of chicken sizzles in oil, add the rest.  Pour balsamic over meat and add garlic; immediately turn tenderloins over in vinegar.  Let cook for 2-3 minutes, turning over once mid-way.
  6. Starting with the smallest tenderloin, cut each piece in thirds with a spatula; as they are cooked, remove pieces to a bowl.  Do not overcook-the meat will just be turning white inside when done.  Pour juices from pan into bowl of meat, set aside.
  7. Wash and cut bell pepper in small strips.
  8. Place greens in a serving bowl; add chicken, with half the liquid, quinoa, beets, peppers, feta cheese, and nuts; toss with balsamic vinaigrette; serve with croutons. Delicious!

Ahi Tuna with Black Bean & Eggplant Dish

When I require a firm fish for creating recipes, I prefer ahi tuna over halibut, as the later tends to be drier.  I discovered in Culinary Artistry, by Andrew Dornenburg and Karen Page, that the excellence of tuna steaks is enhanced by both eggplant and black beans; lemon and garlic also compliment ahi.  It took courage for me to experiment with blending all the above together in a dish needed for a special occasion, during which I honored the Lomilos from Uganda.  1

Cooking takes risks, as life does; nothing comes automatically.  A patient, pressing-in is required to foster creative mastery.

I learned an important lesson in my early thirties when I moved to Portland, for then I was struggling to overcome an addiction to alcohol.  In the process of sobering up, I was taught to trust in the history of old-timers in areas that I didn’t yet have enough victory of my own.  As a result, I listened carefully to my elders’ testimonies, holding fast to their professed truths.  The pay-off was great, for I haven’t had a drink since 02/06/86.

In like manner, I have reached out to experts in the culinary field over the years; thus, amplifying my own inherent strengths.  The outcome is an acquired proficiency in successfully combining foods, as exemplified here.

I see parallels between skills gained in cooking and those procured in living.  Continuing with these teachings in my blog holds promise that ability, in both these areas, will be attained.

I can’t stress enough that patience and trust are essential elements, as we walk in the light each of us has, taking baby steps of courage to rise to our next level.

True to form, I sought help from experts in writing this recipe and its history.  For instance, I needed to know more about not overcooking tuna.  Harold McGee teaches about the meat-red-color of certain tunas in On Food and Cooking; it is caused by the oxygen-storing pigment myoglobin, which is needed for this fish’s nonstop, high-velocity life.  This deep red color is lost, if this fish is not frozen well below minus 22 degrees F, which helps explain the brownish color of some frozen tunas.  When cooked, it looses this blood red color at about the same temperature that beef does, between 140-160 degrees F.  2

It is best to under cook this food, or dryness will result.  If you like your meat rare, you will probably also like rare tuna; thus, be careful to check for color during its preparation.

Let’s humbly learn from the masters, purposing to keep all seeds of knowledge protected in fertile soil.

Eat hearty, this is a delicious fish!

  1. Andrew Dorenburg and Karen Page, Culinary Artistry (Hoboken, N.J.: John Wiley & Sons, Inc., 1996), pp. 187, 273.
  2. Harold McGee, On Food and Cooking (New York: Scribner, 1984, 2004), p. 194.

finished black beans and eggplant

Ahi Tuna with Black Beans and Eggplant Dish  Yields: 4 servings.  Total active prep time: 1 1/4 hr.

6 tbsp oil  (Avocado oil is best, coconut oil will do; olive oil produces carcinogens when heated to high temperatures.)

1 med yellow onion, halved and cut in 1/8 inch slices

1 lb eggplant

1/4 c water

3 tbsp lemon juice, fresh squeezed  (2 small lemons needed.)

4 tsp salt, or to taste  (Himalayan, pink, or Real Salt is critical for optimum health; a fine grind Himalayan salt is available at Costco for $4.95 for 5 lbs.)

2 tsp fresh ground pepper, or to taste

5 lg cloves of garlic, minced  (3 frozen cubes of garlic from Trader Joe’s makes preparation easier.)

1-15 oz can of black beans  (Organic is best; Simple Truth brand at our local Fred Meyer’s is very economical.)

2 tsp crushed dried red pepper

2 tsp garlic powder

2 tsp dried ginger

2 tsp dried oregano  (Organic is available for $1.99 at Trader’s!)

4 ahi tuna steaks, or about 1 1/3 lb

1 tsp sesame oil

  1. fond on bottom of pan of eggplant

    For caramelizing onions, halve onion and cut into even 1/8″ slices.  Heat 1/2 tsp oil in a large sauté pan over medium heat; place a small piece of onion in oil; when it sizzles, add rest of onion and turn heat down to med/low (do not crowd your pan with too many onions, or they will steam, producing water, and it will take longer to cook them). Cook, stirring about every two minutes, until color begins to change.  At this point, stir every minute, until dark brown in color.  Onions should cook long enough to stick to the pan, in order to brown, but not be left so long that they burn; you may have to lower temperature and add a little more oil.  When cooking is complete, deglaze pan with a little water, stock, wine, or vinegar.  Meanwhile go to next step.

  2. Cut eggplant in small 1″ cubes, set aside.
  3. Roll lemons on counter, pressing down hard with your hand to loosen juices.  Juice lemon and set aside 3 tbsp.
  4. If using fresh garlic, mince now.
  5. In another large pan, heat 1 1/2 tbsp oil in pan; place piece of eggplant in oil; when it sizzles, add rest of eggplant.  Cook until soft, stirring frequently; then, add 1/4 cup of water and deglaze pan (scrape bottom with a wooden or heat resistance plastic spatula to loosen cooked on fond, see photo).  Cook until water is evaporated; this vegetable will be rather mushy.
  6. Stir in onions, lemon juice, and garlic; salt and pepper to taste.  If garlic is fresh, cook only until you can smell it; see Tomato/Feta Chicken-2016/07/25-for tips on cooking with garlic.  If using the frozen cubes, cook just until melted and blended in well.
  7. Gently stir in the can of black beans, which has been drained; do not over-stir, as this breaks down beans.  Adjust seasonings.  May set aside to finish just before serving.  If serving immediately, proceed to step 8, in which case turn down heat to med/low under eggplant (see photo at top of recipe for finished product).
  8. If finishing later, began this step 15 minutes before serving time, otherwise proceed now.  Blend together 4 tsp salt, 2 tsp fresh ground pepper, dried red pepper, garlic powder, ginger, and oregano; rub seasoning into tuna steaks.  (If bean mixture is cold, begin reheating it for 8-10 minutes over medium heat before sautéing tuna, stirring occasionally.)
  9. Melt 4 tbsp oil and 1 tsp sesame oil in a large sauté pan over med/high heat (this must be a heavy-bottom pan).  When oil is sizzling hot, sear steaks 2 minutes per side for med/rare, give or take 1/2 minute for rare or medium.  The time may need adjusting as thickness of steaks varies; you can check the color of tuna, by piercing thickest part of fish with a sharp knife to check for doneness (it should be somewhat red for med/rare).  The color will also show on the sides of the steak.  Do not overcook tuna.
  10. Serve with caramelized onions and carrots (next week’s post).  Enjoy!

1970’s Whole Wheat Banana Bread

cooling bread in pan for 5 minutes

I became a vegetarian during college in the early 1970’s.  When I moved to Tokyo six years later, I gave up this proclaimed role, because of my need to be open to all foods proffered by my Japanese hosts.


While abstaining from meat and fish, I searched for healthy alternatives in an array of natural food cook books.  There I found treasured recipes which I still use today; one was this powerfully good, whole wheat banana bread.

Bananas Date Back to 2000 B.C.

Bananas have a long history.  Alexander the Great discovered them growing in the Indus Valley in 327 B.C.; they had been cultivated, however, in India since 2000 B.C.  1

Background of Bananas in the Time after Christ

Documentation dated in the 7th century shows that China was using them in abundance also.  Portuguese explorers reported this same fruit in western Africa in 1482, where it probably had been grown for a long time; these Europeans adopted its local name Musa sapientum, which was originally given this fruit by Alexander the Great.  In 1496, Spanish conquerors found an intense cultivation of bananas in Tenerife in the Canary Islands.  2

The Emergence of Bananas in the U.S.

Nevertheless, the United States didn’t experience this tropical fruit until 1804, and then only in a limited way for the next 50 years; this delectable was imported infrequently, in such relatively small quantities as 300 stems, by sailing ships coming from the Caribbean or Central American ports.  3

In 1830, during this early inactive period, Capt. John Pearsall brought the first full cargo of bananas, 1500 stems, to New York.  This man later became a N.Y. commission agent, specializing in the import of this prized fruit.  In the mid-nineteenth century, he went bankrupt when his shipment of 3,000 stems arrived too ripe to sell; big money was tied up in each of these loads, for then a “finger” sold at the exorbitant price of 25 cents wholesale.  4   This was at a time when factory workers, consisting of women and children, were making between 25-50 cents per day.  5

More and more, cargoes from Honduras and Costa Rica were reaching New Orleans, New York, and Boston during the two decades before 1870, the year when large-scale banana traffic really began.  As the 70’s opened, the now more abundant bananas were sold, foil-wrapped, at a fair in Philadelphia for 10 cents a stem; it was the first time many of these fair goers had ever indulged in this delight.  6

Popularity of Bananas Established in United States

By 1885, 10,000 stem cargoes were being shipped from Jamaica in 10 to 12 days. Next, just prior to the turn of the century, this exotic fruit spread to inland America by rail express.  7

Now, however, bananas are common and cheap; every American has experienced them, along with this familiar sweetbread.

This 45-year-old banana bread recipe is one of the best among thousands.  Here I have included grams, as someone recently requested this most accurate of measurements, for my baking receipts; measuring in grams insures foolproof baking.

Nevertheless I can’t express how easy and certain this preparation is, even with cup measurements, for I could make it with my eyes closed.  Receive!

  1. James Trager, The Food Chronology (New York: Henry Holt and Company, Inc., 1995), pp. 18, 9.
  2. Ibid., pp. 41, 78, 18, 81.
  3. Ibid., p. 196.
  4. Ibid., pp. 217, 234.
  5. Stanley Lebergott, Chapter: Wage Trends, 1800-1900, The Conference on Research in Income and Wealth, The Trends in American Economy in the Nineteenth Century (Princeton, New Jersey: Princeton University Press, 1960), pp. 449-500.
  6. James Trager, The Food Chronology (New York: Henry Holt and Company, Inc., 1995), pp. 283, 301.
  7. Ibid., pp. 320, 360.

wheat grinding attachment on a kitchen aid

Whole Wheat Banana Bread  Yields: 1 loaf.  Total prep time: 1 hr & 25 min/  active prep time: 25 min/  baking time: 1 hr.   This is adapted from Jean Hewitt’s The New York Times Natural Foods Cookbook (New York: Avon Books, 1971), p. 235.

1 c (136 grams) whole wheat pastry flour  (Bob’s Red Mill is high quality.)

1/2 c (64 grams) unbleached white flour  (May grind 1 c organic, hard red spring wheat berries to make total 1 1/2 c-204 grams-flour.)

1/4 c (60 grams) cream*, or milk, soured with 3-4 squeezes of juice from lemon ball

1/2 c (113 grams) butter, softened

3/4 c (165 grams) brown sugar, packed  (Organic brown sugar is preferable, which is available at Trader Joe’s, or may substitute a healthier 3/4 c-95 grams-coconut sugar.)

1 lg egg (51 grams)

1 tsp (7 grams) baking soda

3/4 tsp (4.26 grams) salt  (Real Salt is important for optimum health; available in health section of local supermarket.)

2 lg or 3 small ripe bananas, (375 grams), 1 1/4 c  (May ripen these overnight by gently, but firmly, squeezing the whole banana, until meat is mushy under the skin; let sit at least 8 hours.)

1 tsp (4.2 grams) vanilla

1/2 c (62 grams) nuts, optional

Spray oil  (Pam coconut spray is best for taste and quality; our local Winco brand, however, makes this preferred spray for less than half the expense.)

Flour for dusting sprayed pan

  1. Preheat oven to 350 degrees.
  2. If using fresh ground flour, begin grinding 1 c hard red spring wheat berries now (this berry makes a dense, nutritious bread, which is extremely high in protein-one serving has the protein of an egg or 7 grams).  See photo.
  3. Measure cream, which is preferable, or milk in a med/large bowl; squeeze 3-4 squirts of lemon juice from a ball over surface; let sit until soured, about 10 minutes.
  4. Beat butter in a large bowl until light and fluffy; mix in sugar thoroughly; add egg, beating well; set aside.
  5. In storage bag, with a seal, shake together flour, baking soda, and salt; set aside.
  6. When cream/milk is soured (cream will appear curdled more than milk), add bananas, and mash well with a fork.  Blend in vanilla, set aside.
  7. Alternately add flour and banana mixture to butter mixture.  When all is incorporated, mix in optional nuts.  Beat only until all is incorporated, as over beating toughens baked goods.
  8. Spray a 9″ x 5″ loaf pan, lightly dust with flour, pour batter in prepared pan.
  9. Bake for 55-60 minutes, or until bread responds, bounces back, when pressed with finger.  May also test with a toothpick; it is done when toothpick comes out clean, from the soft area in crust.  Do not over bake.
  10. Cool in pan for 10 minutes; then, remove and finish cooling on rack; see top photo.  Keeps well in refrigerator, wrapped in paper towel, and sealed in gallon-size storage bag.
  11. This is a staple in my home!

Portuguese Figos Recheados

figos recheados

This is the third and last of my Portuguese recipes for this great ethnic meal; I, however, serve this candy/fruit figos recheados with many other meals as well.

When I entertain, I always serve homemade candies along with the dessert.  Usually these are my Peruvian bolitos de chocolat y coco (see 2016/11/28) and the treasured national candy of India barfi; this recipe will follow in the future.  Lately, however, Portuguese figos recheados (figs stuffed with chocolate and almonds) are the final inspiration at my dinners.  Such was the recent case with my beloved missionary friends Val and Waffle Lomilo.  I take a tangent today into their world, so we can learn better to eat with reverence.

My relationship with Val goes back 22 years.  Our mutual friend Kelly, who now resides in heaven, introduced us to each other in 1995, over slides in her basement of Val’s mission work in Uganda.   My heart had just been softened, by my asking Jesus to live in it; thus, my supple emotions were mesmerized by this people and especially their food.

I learned that the meager diet of these poorest of poor, which are in my friends’ arid, mission region, consists primarily of foraged herbs and a bitter fruit with its nut, which is boiled three times to make it palatable; garden vegetables are available only as the frequent droughts allow; maize (cooked corn mush) and beans are also a luxury, which they can’t always afford.

The diet of the wealthier, in Uganda’s more lush areas, has a greater amount of organic garden vegetables, along with such fruits as mangoes and papayas, and ample beans and maize.  Also to my delight, it includes the ceremonial slaughter of a chicken for honored guests.

This nourishment of these better-off is simple and pure, making it healthier than ours with all our fast foods and altered ingredients, such as added hormones in meat/dairy products, foods with GMO’s, etc.  (Note: in this poor country genetically moderated organisms being added to their crops is just now becoming a controversy; they have already lifted the ban for GMO’s in the banana crop, due to its recent huge failure.)

In America food is so available that obesity is a major problem.  Our countrymen are often thrilled with weight loss when they visit Africa.  On the other hand, Africans are overjoyed with the compliment ‘you look so fat’, and gratitude is expressed after a meal with ‘thank you for increasing my volume’.

At present there is a famine in Uganda’s arid region, which hurts the children and elderly the most.  We in this country can’t comprehend such food shortage and its effect on the human spirit.  According to my friends, it produces a sense of deep community, in those that withstand it, as they share each other’s pain.   These humble people know the true meaning of God’s grace that keeps them alive in stark adversity.

Waffle and Val, who experience a heart for the broken, feed these hungry souls the word of God, which is also known as the bread of life.  This proven substance, in turn, can provide them with answers to their natural needs, for this is what our gracious Father does best.

We are grateful for our vast provision here in America, as we strive to honor our bodies with healthy eating.  At the same time, our faithful prayers move mountains as we intercede for those less-fortunate.

Now, may we take courage to experience moderate, joy-filled pleasure in this incredible dessert: be blessed by these simple figos recheados, the last recipe in my Portuguese series.

shaving chocolate

figs ready for baking

Figos Recheados (dried figs stuffed with almonds and chocolate)  Yields: 12 large stuffed figs.  Total prep time: 35 min.

Note: these are best served hot, but they are also great at either room temperature or cold.


1/4 cup almonds, plus 12 extra almonds (18 extra almonds will be needed for topping smaller figs, such as mission figs.)

12 large figs   (Turkish figs are best for size and quality; 18 figs will be needed, if using the smaller mission fig.)

1/2 ounce (1/2 square) semi-sweet chocolate, finely grated

  1. For hot figs at the end of a meal, do steps 2-9 ahead; then, set aside.  Twenty minutes before serving, preheat oven to 350 degrees and bake as directed in step 10-11.
  2. Preheat oven to 350 degrees.
  3. Place almonds on a cookie sheet and bake for 15 minutes in middle of oven; go to next step.
  4. With a sharp knife, finely grate the chocolate, place in a small bowl, set aside (see photo above).
  5. Cut off stems of figs; make a careful, but deep, indentation in the opening of each with the tip of your finger; set aside.
  6. After nuts are toasted, remove from oven, and take off pan to cool quickly.  Set aside 12 almonds (18 for smaller figs) and pulverize the other 1/4 cup in a food processor, by repeatedly touching the pulse button.  (May use a blender or Vita Mix.)
  7. Add almond meal to grated chocolate; mix well.
  8. Using a spoon and your finger, press this mixture in the hollow of each of the figs; pinch openings together firmly (see above photo).  Place stuffed figs, stem side up, on a foil-lined baking sheet.
  9. Bake in middle of an oven, preheated to 350 degrees, for 5 minutes; then, turn figs upside down and bake for an additional 5 minutes.
  10. Gently, but firmly, press a whole toasted almond in top of each hot fig.
  11. May keep leftovers in refrigerator for future use  (cold figs are also excellent).

Ensalada Iberica

ensalada Iberica

Ensalada Iberica is the perfect accompaniment to last week’s Portuguese pork, because of its sweet base of oranges and dates, along with an abundance of piquant onions and lemon-vinaigrette.  This quick salad pleases our palettes.  Its strong combination of complimentary foods is additionally enhanced with the spice coriander, which is also a “seasoning match made in heaven” for pork, as noted by Andrew Dornenburg and Karen Page in Culinary Artistry.  Thus these two dishes balance each other, resulting in excellent flavors and joy unspeakable.  1

During the 1980’s, my extensive cooking classes in Montana included a group of twelve professionals, all of whom were friends.  For years they came monthly for each new theme I presented.  We grew to love each other, as I taught them easy steps in making glorious food.  A grieving took place at our parting, brought on by my decision to move to Portland in February of 1986.

My strongest fan among them, Larry, organized a going-away party for me.  He chose an upscale Chinese restaurant, since a travel agent in the group had hoped to take me to China, to teach native foods on one of her tours.  At our celebration, they graciously presented me with a restaurant-caliber, 15 ½” x 10 ½” cake pan and a stock pot, as seen in my photos; how these have blessed my work.

At one of our classes, someone encouraged me to consider the then new concept of computers for my work.  I responded that I will never do that, for it was beyond me.  Technology, however, has enabled the expansion of my endeavors beyond my imagination.

Back then I wrote everything out by hand, as I constantly discovered new themes from various cultures and ages.  All my research came from hard copies of books and publications; I searched for the sources of my inspiration at the local library, in an array of cook books, and in such publications as Montana newspapers, the New York Times, and numerous fashionable magazines.  My existence was marked by creativity, as I developed my faculty for research.  This skill was further sharpened by my graduate work at Portland State University, 1988-91.

Discovering truths in food history is what I do; it is essential that I know their validity.  As a result, to this day, I prefer to obtain my information from actual books, which possess a soundness that I trust, over that of internet.

Both this and its subsequent post, on Portuguese foods, are from that early application of my studies in Montana.  These entries provide exceptional taste treats.  Enjoy!

  1. Andrew Dornenburg and Karen Page, Culinary Artistry (Hoboken, N.J.: John Wiley & Sons, Inc., 1996), pp. 159, 160, 268.

chopping orange segments

Ensalada Iberica  Yields: 5-6 servings.  Total prep time: 25 min.

Note: best to make and chill several hours before serving.

2 lg oranges  (Organic is best for flavor and quality, as orange skins readily absorb pesticides; these are often available at a good price at Trader Joe’s.)

1 small/med red onion, thinly sliced  (May use 2 small, organic cipollini onions; they are expensive, but so good!)

1 small can sliced ripe olives, net dr. wt. 2.25 ounces

1/2 c pitted dates, packed down, cut in halves lengthwise  (About 1/3 lb is needed.)

1/4 c olive oil

1/4 c lemon juice  ( 2-3 small lemons are needed.)

3/4 tsp salt, or to taste

1/4 tsp fresh ground pepper, or to taste

1/4 tsp ground coriander

Bed of spinach leaves or lettuce

  1. easy juicing of lemons

    Peel oranges, divide them in half, cut each half cross-wise in half again, so it is easy to separate segments (see photo above).

  2. Peel and slice onions thinly.
  3. In medium bowl, combine oranges, onions, olives, and date halves.
  4. Juice lemons with a hand-held juicer, watch market for this marvelous tool (see photo).
  5. Combine olive oil, lemon juice, salt, pepper, and coriander in a small sealed jar; shake vigorously; adjust seasonings.
  6. Pour over fruit, mix well, and refrigerate until serving time-preferably for several hours-so flavors can meld.
  7. Serve on a bed of spinach leaves or lettuce.
  8. This is a favorite of mine, which I have made since the early 1980’s.