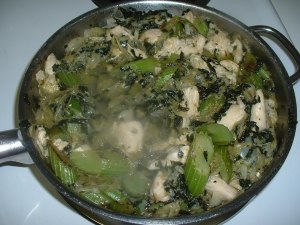
cream of broccoli soup
Let’s examine the benefits of low-carb diets, utilizing real food, as well as low-protein diets, recommended for those with kidney disorders. In addition, experience this healthy cream of broccoli soup, rich in bone broth and eggs.
Real-Food-Low-Carb Diet
Personally, my approach to food is summed up with the word balance, for this best fits my individual health requirements. Today there are many diets available to meet people’s varying needs. With our diverse health challenges, we must seek that which is suitable to our unique bodies.
As an example of the often stark opposition in these approaches, two such recommendations for nutrition stand out. Recently I ran across a low-carb diet that promotes using real food; among its standard suggestions are high quantities of meat, fish, eggs, nuts, seeds, as well as high-fat dairy, calling for whole milk yogurt and heavy whipping cream. I too utilize these high caloric dairy foods, accepting the proposal of some experts that low-fat foods and artificial sweeteners can actually cause weight gain, rather than loss; also such whole foods satisfy the body, with a need to eat less of them.
Dietary Recommendations for Those with Kidney Disorders
Directly opposed to this proclaimed low-carb diet is one limiting protein, due to the special requirements of those dealing with kidney disease and kidney stones; it holds that too much of high protein foods may interfere with the body’s ability to eliminate, through one’s urine, the resultant large quantities of the waste products urea and uric acid.
These two by-products are produced by the breakdown of proteins and nucleic acids respectively. When their levels are too high, urea and uric acid cause significant stress on one’s kidneys; thus, those facing kidney problems must eat meal plans exactly opposite to those of the low-carb dieters. (See Healthy Date/Apricot Bars, for additional information on low-carb diets.)
May I encourage us to patiently listen to our bodies, by seeking trusted expert medical help, in discerning our individual physical make-ups. In this way, we each may discover our ideal plan for nourishment.
My Inspiration for this Healthy Soup
A beloved one from my church was just pronounced cancer-free; it has been my heart to minister to her during this trial; in doing so, I have made this broccoli soup several times, hoping to please her palate.
It is our joy to touch each others lives, with the bounty with which we are supplied. For some this means material blessings, for others it is the labor of their hands. My number one gift, which is always at my disposal, is feeding my friends with food; I also love to exercise my limbs-actually the Lord’s hands and feet-with cleaning. These two offerings thrill me, and I have used both in helping this friend.
Sometime ago, Toni’s husband mentioned her preference for cream of broccoli soup. Though the vicious enemy cancer tried to steal this chemo patient’s taste buds, I and many others at our church have encouraged resurrected life in her tongue, with the recalling of her soft memories for fond foods.
This High Protein Broccoli Soup Meets Needs
Soups have gone down the easiest for her, but they often don’t have enough required protein. The inspiration for this particular broccoli soup resulted from Toni’s needs for this compound, as this recipe is fortified with added protein, utilizing bone broth and eggs; I also find it beneficial for my diet, with my preference for meatless dishes.
With my proclivity toward vegetables, fruits, grains, beans, seeds, and nuts, like my recovering sister, who can only tolerate soups presently, I must watch my protein intake carefully, neither getting too little, nor too much of it. Indeed, this broccoli soup fits the prescription for both Toni’s and my needs.
Together We Stand!
Our church body and the McFaddens have stood unified as one in her fight against cancer; as a miraculous result, Toni has overcome it; this is what belonging to the Christ’s glorious Church is all about. May we all humble ourselves, by accepting each others proffered blessings; thus, we receive our Father’s abundant grace.
References:
https://www.healthline.com/nutrition/low-carb-diet-meal-plan-and-menu
https://articles.mercola.com/sites/articles/archive/2016/02/15/foods-for-kidney-health.aspx

ingredients for soup
Power-Packed Cream of Broccoli Soup Yields: 2 1/2 quarts. Total prep time: 1 hr/ active prep time: 20 min/ cooking time: 40 min.
2 tbsp oil (Coconut or avocado oils are best; olive oil is carcinogenic when heated to high temperatures.)
1 lg yellow onion, chopped
2 celery stalks, cut in small 1/4″ dice
24 oz frozen broccoli florettes (Best thawed ahead of time for faster preparation; SAVE JUICES.)
5 tbsp parsley, minced (Organic parsley is only slightly more expensive; so much healthier.)
2 c chicken broth (Bone broth is best; for its benefits and easy recipe, see Tortellini Sausage Soup.
1 qt whole milk

sweating onions and celery
5 lg chicken eggs, beaten (May substitute 3 duck eggs, which are bigger; for facts about eggs, go to Rosemary Eggs.)
3 tbsp butter
3 tbsp flour
1 tbsp Chicken Flavored Better than Bouillon, or to taste
1 1/2 tsp salt, or to taste (Himalayan, pink, or Real Salt is critical for optimum health; an inexpensive fine grind Himalayan salt is available at Costco for $4.95/5 lbs.)
1 tsp white pepper, or to taste
- Spray celery and parsley with a effective, inexpensive produce spray: combine 97% distilled white vinegar with 3% hydrogen peroxide in a spray bottle. Let sit for 3 minutes, rinse well.
- Heat oil in a stock pot over medium heat; sweat chopped onions and celery, or cook until translucent, for about 10 minutes, stirring occasionally (see above photo).
-

cooking roux
Mince parsley, set aside.
- Add broth and milk to onions/celery; stir in thawed broccoli, its juices, and parsley. Cover pot and bring to a soft boil, over medium heat, watching closely; then, uncover, reduce heat, and simmer softly for 20-25 minutes; check to be sure soup is simmering gently.
- Meantime make roux by melting butter in a small sauté pan; blend in flour; cook until golden brown, about 2 minutes, stirring constantly (see photo above). Set aside.
- After soup has cooked for nearly 25 minutes, beat eggs in a large bowl; mix 1 c of hot broth into bowl of eggs; stir in a second cup of broth; blend this egg mixture into soup, using a wooden spatula or spoon.
- Season with Better than Bouillon, salt, and pepper; continue to simmer for 15 minutes, stirring occasionally.
-

finished product
Finally thicken soup, by beating in the prepared roux with a wooden spoon; cook until desired consistency. Adjust seasonings.
- Serve immediately, or let sit for a day to meld flavors; if reheating soup, avoid boiling, as this will cause it to separate. This dynamite soup is packed with protein!