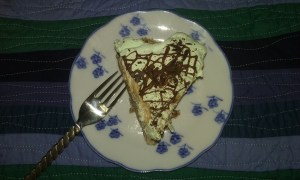
Chocolate Mint Pie, Another Variation of Blum’s Famous Pie

chocolate mint pie

Let’s journey back to the mid-nineteen hundreds, with another variation of Blum’s coffee toffee pie.  My sister Maureen, who is a kitchen genius, created countless desserts, with this famous pie’s receipt as a basis; we served these in our family restaurant high in the Rocky Mountains, at the east entrance to Montana’s Glacier National Park, during its 50-plus years of operation.

While in San Francisco for my rare eye operation in the late 1960s, my bold mother asked Blum’s for their coffee toffee pie receipt (see 2017/08/21), which my sister expanded on over and over again; this exceptional mint pie is just one of the exquisite results of her ingenuity.  She made it with crème de menthe for the extensive dessert bar in our dining room; I, however, employ peppermint essential oil, which is healthier and more economical.

Many visitors arrive at my blog in search of information pertaining to Blum’s, which left its indelible mark on the history of San Francisco and American cuisine.  Before it closed in the 1970s, it was an upscale restaurant, serving exquisite desserts, candies, and lunch items.  I recall being fascinated with a pin-wheel sandwich there, which I saw with my one unbandaged, post-operative eye.  The swirling of white and dark bread was new and stunning to me back then.

The early ‘60s saw the ushering in of high-end cuisine for the growing middle class; this was introduced by Julia Child, teaching French cooking techniques; she became established in the kitchens of America, due to Jacqueline Kennedy’s placing a French chef in the White House.  This decade’s middle class had the money, as well as the developed acumen, to learn involved French cooking from Child, with all its vast richness-butter and more butter, cream, eggs, cognac.  1

My mother, however, was busy following Time-Life Books Foods of This World, creating foods of France and many other countries (see my 1960s French dinner, 2016/05/30).  This extensive sequel came out in 1968, as a result of the changes that Child had produced in the American palette.

Other food movements were rising along with this adoption of the gourmandise; one was the growth of fast food.  While we were spending three winters in Tucson in the early part of this decade, my parents took us kids out for hamburgers on their nights out with friends; we always preferred the burger at JB Big Boy-founded in 1961-over that of McDonald’s.  2

McDonald’s first opened its simple hamburger restaurant in 1948; nevertheless, it was with a building renovation in 1952 that they created the concept of fast food.  3  Likewise in 1962, their openness to change brought about fast seafood; this transpired when franchise owner Lou Groen creatively placed a Fillet-O-Fish sandwich on his Cincinnati menu.  He had a desperate need to increase his dwindling business, due to the meatless practices during the 40-day Lenten period, of the this Catholic-heavy population in southwest Ohio.  With this innovative addition being accepted by headquarters, a new era of experimentation and menu expansion took place for McDonald’s, as well as fast food as a whole.  4

Yet another trend in food was birthed in the 1960s; social unrest was on the rise, which my family was highly aware as we walked the streets of San Francisco, during my eye operation.  This brought about a generation devoted to Birkenstocks and bean sprouts that popularized vegetarianism and cooked-from-scratch foods.  (I, myself, produced much homemade granola in the late ’70s, during my personal reliving of the hippie movement.)  5

There seemed to be an apparent schism take place with the birthing of both gourmet and hippie food in America-while fast food was also growing ever predominant during these tumultuous years.  Nevertheless, all three of these food trends are still found to be thriving in our present day society, which has witnessed even greater diversity and imagination in its ever expanding movement of food, in the years leading to 2019.  American ailment, which was previously boring, is extremely exciting presently!  6

References:

  1. https://leitesculinaria.com/10348/writings-100-years-american-food.html
  2. https://en.wikipedia.org/wiki/JB%27s_Restaurants
  3. https://en.wikipedia.org/wiki/History_of_McDonald%27
  4. https://www.thrillist.com/eat/nation/most-important-dishes-food-that-changed-america#slide24
  5. https://leitesculinaria.com/10348/writings-100-years-american-food.html
  6. Ibid.

Chocolate Mint Pie, a variation of Blum’s Coffe Toffee Pie  Yields: 1-10″ pie.  Total prep time: 1 1/2 hr, plus 1/2 hr for cooling/ active prep time: 1 1/4 hr/ baking time 15 min.

Note: this is best kept in the freezer for long-term use, cutting off pieces as needed; serve partially thawed for a favored ice cream-like texture.

1 c flour  (Bob’s Red Mill organic unbleached white flour is high quality.)

1/2 tsp salt  (Himalayan, pink, or Real Salt is critical for optimum health; an inexpensive fine grind Himalayan salt can be purchased at Costco.)

3/4 c butter, softened

1/4 c brown sugar, packed down  (Organic is best; available sometimes at Costco and always at Trader Joe’s.)

3/4 c walnuts, chopped fine

2 oz Baker’s unsweetened chocolate, plus extra for garnish

1 tbsp water

1 tsp vanilla extract

3/4 c cane sugar  (Organic is ideal, best buy is at Costco, also available in a smaller quantity at Trader Joe’s.)

2 lg eggs, at room temperature  (If sensitive to raw eggs, may use pasteurized eggs for extra safety, which are available at some grocery stores.)

Peppermint essential oil, or mint flavoring of your choice

2 c heavy whipping cream  (Must be heavy, to whip properly.)

1/2 c powdered sugar  (High quality organic is available at Trader’s.)

1/2 tsp vanilla extract

Few drops of green food coloring

Ganache

1 c heavy whipping cream  (Organic is important for health; available for $3.29/pint at Trader’s.)

8 oz (1 1/3 c) semi-sweet chocolate chips  (Trader’s carries some of high quality.)

1 tsp vanilla extract

  1. baked pie crust

    Preheat oven to 375 degrees.

  2. Combine flour and salt; blend in a scant 1/4 c butter well with a fork until mealy in texture.
  3. Mix in brown sugar, chopped walnuts, and 1 oz chocolate, grated with a sharp knife.  Add water and vanilla; blend well.
  4. Butter a pie plate generously; press pie dough in a well-greased pan firmly with fingers. Bake for 18 minutes, or until light brown; begin cooling on a rack, for about 10 minutes, finish cooling in freezer (see photo above).
  5. Chill a bowl in the freezer for whipping the cream (the whipping of cream is greatly facilitated when utensils are ice-cold).
  6. Melt remaining 1 oz of chocolate over med/low heat, watching carefully as not to burn. Set aside and cool to room temperature.
  7. ganache

    Make ganache, by bringing 1 c heavy cream to a very low simmer, over med/low heat (should be very hot-steaming-not boiling).  Add 8 oz chocolate pieces and continue to cook, beating with a wire whisk, until mixture is glossy/shiny.  Remove from heat, add vanilla, set aside.  See photo.

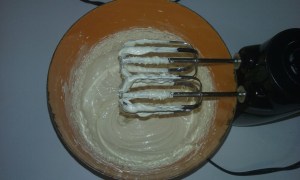
  8. Check to make sure 1 oz melted chocolate (above) is still in liquid form; if hardened, gently add a little heat, being careful to melt it only, but not get it very warm. Beat 1/2 c butter in a large bowl with an electric mixer until creamy.  Gradually add 3/4 c cane sugar, beating well with each small addition.
  9. Add 1 egg-must be room temperature-mix on medium speed for 5 minutes.  (The following makes this preparation foolproof: it is important to have ingredients at room temperature, for if your kitchen is either really hot or cold, this mixture may curdle.  You can easily correct this: if it curdles or breaks because it is too hot, make the addition of the second egg a cold one, directly out of the refrigerator, to bring the filling back to its full volume.  If the

    filling

    butter/sugar/egg combination is too cold and curdles, warm the chocolate a little and mix this in before adding the second egg; then, follow the directions for beating.  Ideally when done, this should be like fluffy whipped butter or soft whipped cream, providing ingredients are room temperature, in a moderate kitchen.  In this way, you will never fail with this recipe!)

  10. Add second egg and beat for 5 more minutes, see above photo.
  11. Blend in cooled chocolate and several drops of peppermint essential oil, or to taste.
  12. Clean and place beaters in freezer for ease in whipping the cream.
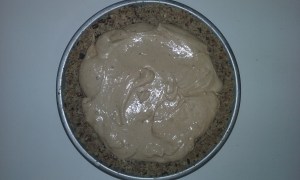
  13. Fill the bottom of the cold pie crust with a layer of ganache, freeze ganache in shell for 10 minutes, see photo above. (May have to slightly warm ganache at this point, for easy pouring.)
  14. Meantime using frozen bowl and beaters, beat cream until it starts to thicken; add powdered sugar and several drops of peppermint essential oil, or to taste, and few drops of green food coloring.  Continue beating until stiff; set aside.
  15. Place filling on top of chilled ganache in pie shell; return to freezer for 30 minutes; see photo.
  16. Cover pie with whipped cream and garnish with drizzled ganache-may have to warm slightly for easy drizzling.  Top with chocolate curls, made with a sharp knife.
  17. May serve now, or freeze for future use.  When frozen, cover well with plastic wrap for storing; cut pieces as needed.  Serve partially thawed for optimum pleasure.

Struan Bread, a Powerful Loaf

struan loaf

This incredible bread recipe came to me through Baking with the American Harvest, a beautifully laid-out baking journal, published bi-monthly by Cindy Mushet, during the early to mid-nineties.  This was before the popularity of blogs and what internet now offers with its vast information on food.  1

Background of Baking with the American Harvest

Back then, she originally mailed out a one-year subscription (six issues) from her base in Santa Monica, California, for $24/year; later it became four issues for $18 a year.  Each of these editions came printed on stiff, rich Manila paper with snippets of historical images scattered throughout; the recipes were tried and true, written in their timely context.  (While this creative lady was publishing this unique newsletter, I was placing food in the midst of its social/cultural history for popular magazines and educational journals.)

Correspondence with Cindy Mushet in the 1990’s

When examining my files recently, I discovered two letters from Ms. Mushet, dated the winter of 1994-95, in which she was responding to my request for her back issues, featuring a two-part review of chocolate (for my inspired version of one of these recipes, see Chocolate Scones).

This correspondence delighted me, for she was congratulating me on finding a fun and unique niche in the food industry, with my catering of events featuring historical foods.  This is my version of dinner theatre, in which the audience partakes, by eating the documented ailments, while I dressed in period costume use third-person to relay the full impact, of what Ms. Mushet refers to as “anthropological adaptations”.  (For more on my early business, see About, Serungdeng Kacang, Bolitos de Chocolat y Coco, Scottish Oat Scones, and Cocoa Bread,)

History of Blogging

Blogging changed the world!  On-line publishing replaced hard-copy journals and newsletters, such as the above.  After a slow start, blogging spread rapidly during 1999 and the years following.  Wikipedia states that the early part of the second millennium marked the role of blogs becoming increasingly more main stream; it was then that politicians, political consultants, and news services began using them as tools for outreach and opinion forming.  (Many believe that Watergate played the initial role in this development.)  Today, blogs are used effectively in many diverse fields, with food not being least among these.  2

Three “Generations” of Struan Bread: Reinhart’s, Mushet’s, and Mine

In my blog entry today, I share Ms. Mushet’s struan bread, which she declares is legendary Scottish harvest bread, originally published by Peter Reinhart.  In my version of this, I like to use freshly ground flour which greatly enhances this staff of life, but is totally optional.  I also give detailed, foolproof instructions for the mess-free mixing of the dough in a food processor, followed by the kneading of it by hand, with little or no flour on a counter top.  Clean, clean, clean!

This bread is a winner, with everything but the kitchen sink in it; for among its grains, it calls for cooked brown rice, uncooked polenta, oats, and wheat bran, along with much more.  It often graces my larder, which is always stocked with fresh, homemade bread.  Enjoy!

References:

  1. Cindy Mushet, Baking with the American Harvest, 5 volumes (Santa Monica, CA: Cindy Mushet, 1992-1997).
  2. https://en.wikipedidia.org/wiki/Blog#Origins
  3. https://www.amazon.com/Cindy-Mushet/e/B001JSDHFW

optional grinding of flour with a Kitchen Aid attachment

Struan Bread  Yields: 1 loaf or 20 small rolls.  Total prep time: 3 hr/  active prep time: 30 min/  baking time: 30 min/  inactive prep time: 2 hr.

3 1/2 tsp active dry yeast  (Costco carries 2 lb packages of Red Star Active Dry Yeast; this keeps a long time in a sealed container in the freezer; it’s best when warmed to room temperature.)

1/4 tsp sugar

1 3/8-1 1/2 c tepid water, 110-115 degrees

2 1/2 c whole wheat flour  (Bob’s Red Mill is high quality.)

1 c unbleached white flour  (Optional: may grind 2 1/3 c organic hard red spring wheat berries to make the total 3 1/2 c fresh flour.)

1/4 c uncooked polenta

1/4 c rolled oats (Organic is only slightly more expensive in bulk; best price is at our local Winco.)

1/4 c brown sugar, packed

1/6 c wheat bran

1 tbsp poppy seed

2 tsp salt  (Himalayan, pink, or Real Salt is critical for optimum health; a fine grind Himalayan salt is sold cheaply at Costco.)

1/4 c cooked brown rice  (May freeze individual 1/4-c baggies of leftover rice ahead of time, to thaw as needed.

Spay oil and oil, of your choice, for oiling a 13-gal plastic bag, used in raising bread

  1. proofed yeast

    If grinding your own flour, begin to do so now (see above photo).

  2. Place 1/4 c lukewarm water (110-115 degrees) in a small bowl; stir in yeast and 1/4 tsp sugar.  Let sit in a warm place, until creamy, foaming, and nearly double in size, for about 10 minutes (see photo).
  3. When yeast is proofed, place flour and all dry ingredients, as well as rice, in an 11-cup-or-larger-food processor; blend well.
  4. Add proofed yeast and 1 1/4 c tepid water to flour mixture. (Fresh-ground flour, however, only calls for 1 1/8 cups of water, as this is a coarser grind, not absorbing as much moisture.)  Turn machine on and

    dough after initial kneading by food processor

    knead for 35 seconds; turn off and let dough rest for 4 minutes (see photo).  This resting period cools dough, which is essential as processing increases heat, and too much heat will kill the yeast.

  5. After resting for 4 minutes, turn on the processor again; knead dough for 35 seconds more (see photo below). Take out and knead by hand for about 8 minutes, or until satiny smooth, minus the lumps from the grains; see

    dough after second kneading by food processor

    bottom photo for dough before and after kneading by hand.  (As wet dough readily sticks to hands, rinse and dry them as needed to facilitate easy kneading.  Store-bought flours are a finer grind; therefore they absorb the moisture more readily and won’t be so sticky.  Much moisture is absorbed while kneading by hand-this is especially true with freshly ground flour.  Ideally it should be firm, but supple when finished.  These instructions should be foolproof, but IF needed, do the following: if dough remains quite wet and sticky, after kneading by hand for several minutes, slowly add more flour to your board as you knead.  If, however, it is very stiff-too stiff to knead easily-place it back in processor, and knead in 1 tbsp water.

    dough before and after final kneading by hand

    If called for, which is unlikely, repeat this step until severe stiffness is gone, it is flexible, and kneading by hand is facile; CAREFULLY rest dough, so as not to overheat.  When hand-kneading is finished, it should be firm, smooth, not sticky.

  6. Place prepared dough in a 13-gal plastic bag, in which several tbsp of oil have been evenly distributed; let rise in a warm place for 60 minutes. (Only if using freshly ground flour, punch dough down and let rise it for an additional 30 minutes, to make lighter bread with this coarser flour).
  7. Punch dough down and form loaf-or rolls-and place in a bread pan sprayed with oil.  Loosely cover with a piece of plastic wrap, which has also been sprayed with oil.
  8. Let rise until doubled, for about 50-60 minutes.  Important: 30 minutes into the rising process, preheat oven to 400 degrees, to insure oven is ready when it is time to bake.
  9. When doubled, bake loaf for 27-30 minutes, or until bread sounds hollow when tapped on bottom (rolls will take 20 minutes).  Cool on rack.  Enjoy this power-packed bread!

1960’s Josephines (a great hors d’ouvres)

Join me on a journey to the mysterious wonder-world of childhood foods with these josephines. which boast of green chillies.  At the end of this entry, I will explore the historical Pakistani  and Indian applications of chillies in their respective cuisines.

We can all relate to the thrilling memories of our particular favorites from mom’s best; these captivated our young hearts with taste thrills in our mouths, as well as simultaneous, soft sensations in our stomachs.  When faced with like foods today, we instantly return to these initial impulses from the treasuries of our early experiences.  Such comes to me double-fold, for not only did my mother supply these rich impressions, but my father-also a great cook-left indelible culinary marks on my soul.  Mom applied her expertise to the hosting of dinner parties, while Dad skillfully prepared food in our family’s restaurant-it was here we ate all our daily meals, while I was growing up.

Both parents were self-taught.  My mother lacked the normal advantages of learning cooking from her mother, who died of cancer when Mom was 11 years old (her father passed on two years later).  Hence being raised by nuns at a boarding school, she didn’t receive the normal, gracious “passing-down” of womanly skills; rather these were hard-won for her.

josephines

Everything Mom put her hand to, however, she mastered, for she knew the importance of “pressing-in” ardently-a trait I learned first-hand.  This included cooking in which she particularly excelled.  I grew up amidst the flurry of her entertaining many guests with gourmet foods.  She was always baking Irish oatmeal bread to go with her many feasts, often with foreign themes; this at a time when America was eating Spam, jello, canned vegetables, and the perpetual, “miraculous” Crisco.  (The history of shortening is in 1880’s Ozark Honey-Oatmeal Cookies, while that of canning can be found at Bean, Corn, and Avocado Salad.)

On the other hand, my grandparents, on my father’s side, lived in a small house just behind our home, allowing for their constant, close presence.  Grandma was a fantastic cook, accomplishing all by a sense of feel, with no recipes needed-a handful of this, a pinch of that.  Nevertheless as with Mom’s maternal experience, Dad didn’t learn his methods from her, but rather his schooling was provided by a gigantic industrial cook book, brought to our restaurant by a traveling salesman in the early 1960’s (see Buzz’ Blue Cheese Dressing).

These heart-imprints, established as a result of my father’s disciplined efforts, literally soar when I presently encounter light buttermilk pancakes, exceptional potato salad, or a good doughnut, for these were institutions in his establishment; thus, such soul foods provide me with a quick transport back to the mid-twentieth century.

For me these Mexican-inspired Josephines carry this same weight, with recollections from Mom’s culinary domain.  Hors d’ouvres were always a part of her feasts; this being one of our favorites.

As mentioned, 1960’s cooking employed lots of canned foods, with this recipe being no exception, as it calls for canned green chillies; originally this vegetable made its way from America to Europe, and beyond, in the fifteenth and sixteenth centuries.

Chilli peppers were first introduced in India by the Portuguese, where they added heat to curries.  Curry is actually an English name, derived from the Tamil word kari, meaning “sauce”; thus, our English word indicates the basic Indian method of preparing food, utilizing their ever-present sauces.

Red and green chilies have long been present in both Hindu Indian and Muslim Pakistani cuisines.  These social groups existed together in Kashmir for most of the 400 years prior to the 1947 formation of Muslim Pakistan; here both cultures relied on the basic dish of rice and either kohlrabi or a vegetable similar to our spring greens, which was flavored with red and green chilies.  The Muslims enhanced this with garlic, while the Hindus added hing (asafoetidfa), distinguishing the two styles of preparing this food.  A more marked difference in their diets, however, resided in the ratio of meat to vegetables, with Hindus eating far more vegetables than meat, while Muslims did the opposite.

This American receipt calls for chillies, long present in world cookery; not being fresh, these reflect the popularity of canned goods in the 20th century.  Enjoy the ease of this hors d’ouvres with its great taste.  Note: my niece Cammie retains our family’s fond memory, by creatively using goat cheese and gluten-free bread here, to meet her dietary needs.  One way or the other, you will never forget this taste-treat!

References:

Reay Tannahill, Food in History (New York: Three Rivers Press, 1988, 1973), p, 271.

James Trager, The Food Chronology (New York: Henry Holt and Company, 1995), pp. 87, 88.

https://en.wikipedia.org/wiki/Chili_pepper

https://cooking.stackexchange.com/questions/65202/what-was-indian-food-like-before-the-arrival-of-the-chilli-from-south-america

https://en.wikipedia.org/wiki/Kashmir

finished product

Josephines  Yields: about 1 1/2 dozen.  Total prep time: 45 min/  active prep time: 20 min/  baking time: 25-30 min.  Note: may make cheese/mayo mixture ahead, to have on hand in refrigerator.

1 c aged, grated cheddar cheese  (It is preferable to not use packaged shredded cheese; Mom always grated Sharp Cracker Barrel; I use imported, aged cheddars.)

1 c mayonnaise  (Best Foods is of high quality.)

1-7 oz can diced green chillies

easy grating of cheese in food processor

Tabasco sauce, about 8 vigorous shakes, or to taste

3/4 tsp salt  (Himalayan, pink, or Real Salt is so important for optimum health; an inexpensive fine grind Himalayan salt is available at Costco.)

1 loaf French bread  (Trader Joe’s sells an ideal, organic 11.5-oz baguette for $1.99; this spread is enough for 2 baguettes.)

  1. Preheat oven to 350 degrees.
  2. Grate cheese by hand, or with grating attachment for food processor (see photo above).
  3. Mix cheese and mayonnaise in a bowl; may store this in refrigerator in a sterile container for months.
  4. Add drained chillies, Tabasco, and salt to cheese mixture; set aside.
  5. bread spread with cheese/mayo mixture

    Split loaf of bread in half lengthwise, place halves on cookie sheet split-side up, and evenly spoon cheese spread on these surfaces (see photo).

  6. Bake in hot oven for 25-30 minutes, or until golden brown (see photo at top of recipe).
  7. Cool slightly, cut,  and serve.  These are dynamite!

Coconut Orange Chicken

coconut orange chicken

My delightful creation boasts of the meat and cream of coconut, contrasted with fresh orange, and melded with the juices of sautéed chicken and onions-flavors which accent each other, as Andrew Dornenburg and Karen Page suggest in Culinary Artistry.  1

Much can be said about the benefits of coconut, with its current widespread demand.  Coconut sugar-with its low glycemic index-is the best choice for baking (see Zucchini Bread, 2017/07/24), while coconut oil is ideal for health-learn more about this highly beneficial saturated fat in my entry Nutty Coconut Pie, 2017/11/13.  Here, however, we will explore the advantages of its milk, cream, and water.

Coconut is the largest and most important of all nuts, which is the stone of a drupe, the fruit of Coco nucifera, large tree-like palms, which are more closely related to grasses than other nut-trees.

These hardy fruits are borne and mature year-round; it takes eleven to twelve months for them to fully develop.  Around five to seven months, they develop coconut water (about 2% sugars) and a moist, delicate, gelatinous meat.  The mature coconut, however, has a less abundant, less sweet liquid, and meat that has become firm, fatty, and white.  2

Coconut milk-as opposed to coconut water-is made by pulverizing good, fresh coconut meat to form a thick paste, which consists of microscopic oil droplets and cell debris suspended in water; this water makes up about half of the paste’s volume.  Then more water is added, and it is strained to remove the solid particles.  Left to stand for an hour, a fat-rich cream layer separates from a thin-skim layer in the milk.  3

For a while, only the canned, skim coconut milk was available at Trader Joe’s.  When I inquired about their coconut cream, which I prefer for cooking, I was told the market was presently so glutted by the popularity of coconut products that the cream wasn’t being produced.  Lately, once again, cans of coconut cream are available there, much to my joy.

Recently friends came for dinner.  Cody was sharing his expertise with my computer, while I in turn was blessing with food; thus, the inspiration for this dish.  It was a win-win situation, for both of us were incapable of doing what the other was providing.

We are all critical members of the body.  With God’s help, we play out our individual parts, as we contribute to the whole.  Each of us is uniquely equipped; thus, the manifold splendor of the perfected body.  Likewise, this same divine genius can be seen in what mother-nature did, bestowing on us these many essential products from the coconut fruit.

References:

  1. Andrew Dornenburg and Karen Page, Culinary Artistry (Hoboken, N.J.: John Wiley & Sons, Inc., 1996), p. 199.
  2. Harold McGee, On Food and Cooking (New York: Scribner, 1984, 2004), p. 508.
  3. Ibid., p. 509.
  4. https://en.wikipedia.org/wiki/Coconut_milk

finished product

Coconut Orange Chicken  Yields: 3-5 servings.  Total prep time: 1 1/4 hr.

12 oz frozen broccoli  (Organic is best, available at Trader Joe’s; our local Grocery Outlet sometimes has it at a better price.)

1 lb chicken tenderloins, 8 lg pieces

6 1/2 tsp oil   (Coconut oil offers ideal flavor and quality.)

1 med yellow onion, cut in even 1/8” slices

Small head of cauliflower  (Organic, orange cauliflower is often available at our local Fred Meyer-Kroger-stores; color is beneficial to health.)

Red or orange bell pepper  (Organic is so important with bell peppers, as they readily absorb pesticides.)

1 lg orange, peeled and divided into small sections  (Organic is best.)

1/3 c unsweetened shredded coconut flakes  (Available in bulk at many stores, very reasonable at our local Winco.)

1-15 oz can of coconut cream (Trader’s usually carries this; coconut skim milk will work as well.)

1 tsp salt, or to taste  (Himalayan, pink, or Real Salt is critical for optimum health; Costco sells an inexpensive fine grind Himalayan salt.)

1/2 tsp freshly ground pepper, or to taste

Steamed rice or quinoa  (See Quinoa Dishes, 2018/01/29.)

  1. produce

    Take broccoli out of freezer, open package, and set aside.  Place chicken in bowl of water to thaw.

  2. Spray all vegetables with an inexpensive, safe, effective produce spray (combine 97% distilled white vinegar with 3% hydrogen peroxide).  Let sit for 3 minutes; then, rinse well.
  3. For caramelizing, chop onions in even 1/8” slices.  Heat 1/2 tsp of oil in a sauté pan, over medium heat; oil is ready, when a small piece of onion sizzles.  Reduce heat to med/low.  Add rest of onion and cook, stirring every several minutes until light color begins to form; then, stir more frequently until onions are dark brown.

    cutting cauliflower

    Place in a bowl and set aside.  While these are cooking, go to next step, but watch onions carefully.

  4. Heat 1 tbsp of oil in an extra large frying pan; salt and pepper poultry well; when small piece of chicken sizzles in oil, add rest of tenderloins.  Cut in bite-size pieces with a spatula as cooking; cook until light pink in center-do not overcook, as they will cook more later on.  Set aside on plate, SAVING JUICES IN PAN.
  5. Cut all cauliflower into small florettes, by first cutting sections off whole cauliflower.  Next remove excess stalk off these sections.  Finally, gently break these smaller sections into bite-size pieces, by pulling the florettes apart with a paring knife, see photo above.
  6. separating orange segments

    Chop pepper into 2”-strips.  Peel orange, break in half, cut halves in half, and divide into small sections (see photo).

  7. Over medium heat, heat left-over juices in large pan, to which 1 tbsp of oil is added.  When a small piece of cauliflower sizzles in pan, add the rest of it, as well as the pepper strips and broccoli.  Stir oils into vegetables; mix in dried coconut and coconut cream (be sure to gently stir the cream in the can first, to avoid a mess when pouring).  Sauté until desired tenderness; may cover with a lid to speed up process. Season with salt and pepper.
  8. Add chicken pieces and orange segments; adjust seasonings; cook until tenderloins are hot (see photo at top of recipe).
  9. Serve over rice or quinoa.  A powerfully good dish!

Beef Vinaigrette

beef vinaigrette on aspic

This is one of my all-time favorite recipes; I look forward to summers when I can indulge in it, for it is a cold dish.  I discovered this treat during my early catering days in Esther B. Aresty’s The Delectable Past, in which she shares the lost joys of the table gathered from her extensive collection of rare old cook books.  1

Aresty updates this delightful, historical receipt for her 1970’s kitchen, to which I have added my inspired touches.  She found this profound dish in Sarah Phillips’ The Ladies Handmaid, 1758, noting that it had limited circulation, and is unknown today to most bibliographers,

Phillips, this early English author, displays her magnetic personality in her recipe book.  In it she encourages her readers that it needs very few arguments to persuade people to prefer a good dinner to a bad one.  Her energetic approach to cooking is best revealed in her remarks on fish preparation: “Rip open the belly. Gut it. Strip it and hack it with a knife.”  2

This inspired, eighteenth century beef recipe is unparalleled, for it graces the best of our tables still today, pleasing without exception during the hot months!

We can learn much about the history of cook books from this receipt, by placing the book of its origin in proper historical perspective, demonstrating how the era it was from brought fine foods to the common man.

Prior to its time, cook books were prevailingly penned only by men in Europe.  Samuel Johnson (1709-1784)-known as Dr. Johnson-was an English lexicographer, critic, author, and conversationalist; he declared mid-century that women could spin very well, but they could not write a good book of cookery.  He, however, did not stop the tidal wave of female authors that were to overtake the writing of books on cooking in England.  This phenomenon actually began as early as 1714, with the advent of Mary Kettlby’s instructions for housewives-as well as cook maids at country inns-in A Collection of Above Three Hundred Receipts in Cookery, Physick and Surgery.  The momentum for feminine authorship merely grew over the years.  3

Cook books and Bibles share the distinction of being the earliest books printed.  Platina, a noted humanist and Vatican librarian, published the first cook book, De Honesta Voluptate, in 1475, just twenty years after the onset of printing with the Gutenberg Bible.  Germany, France, Spain, and England published cookery books shortly thereafter (prior to this, recipe collections were only handwritten).  These printed works could best be labeled “for a prince’s household”, though none were comparable to Platina’s De Honesta Volupate in magnitude, exemplifying the revival of the art of cooking during the Renaissance.  4

A long silence followed the first printing of an English cook book, The Boke of Cookery, 1500.  Change came when this silence was broken at the end of that century: detailed directions for elaborate food preparations were now addressed to the wives supervising better-class homes, rather than to chefs for noblemen, as was the previous precedent; all these books, however, were written by males during this Elizabethan period.  5

But a still greater change came later in the eighteenth century, when English women totally invaded what had previously been a man’s realm: British cook books were now being written by women, as well as being intended for feminine readership.  Prior to this, particularities concerning culinary preparation predominantly belonged to men in Europe: recipes were recorded by male chefs, who prepared these delicacies for nobility.

Writing for the chefs of noblemen in his book Le Cuisinier Francois, 1651, the Frenchman Francois Pierre de La Varenne was the first to publish what was to become a worldwide movement away from heavy medieval cuisine, with its influx of dense spices and almond pastes.  Here he emphasized the subtle accents of mushrooms and truffles, simple sauces made with pan drippings, and the use of butter instead of oil in pastries.  6

Shortly thereafter, there was a further shift found in the culinary sphere in seventeenth century France, with the beginning hints in cook books of fine foods not being just for kings, queens, and noblemen.  Then in the eighteenth century, Manin first and then Menon (the relatively unknown Manet and Monet of French cuisine) promoted what was to become a culinary outreach to the bourgeoisie in their writings.  7

Nevertheless, it was the British female authors who played the predominant part in introducing the greater populace to fine cuisine.  Our delightful beef recipe was created at the height of this male-to-female transformation that took place in culinary England in the 1700s.

Enjoy its many dimensions of flavor, which are produced simply.

References:

  1. Esther B. Aresty, The Delectable Past (New York: Simon and Schuster, 1964).
  2. Ibid., pp. 118, 119.
  3. Ibid., pp. 109, 110.
  4. Ibid., pp. 27, 28, 32
  5. Ibid., pp. 32, 43, 44.
  6. Ibid., pp. 60, 61.
  7. Ibid., pp. 94-98.
  8. https://en.wikipedia.org/wiki/French_cuisine
  9. https://www.ecpi.edu/blog/a-brief-history-of-french-cuisine

beef vinaigrette

Beef Vinaigrette  Yields: 10 servings.  Total prep time: 7 hr, which includes 3 1/2 hr for chilling/  active prep time: 30 min/  cooking time: 3 hr.  Note: may make a day or two ahead.

4 lb beef brisket

1/2 c dry white wine

1 bay leaf

1 small yellow onion, diced

1/4 tsp whole allspice

1/2 tsp dried tarragon (or 1 tbsp fresh)

3 sprigs of parsley

capers for garnish

Aspic

1 3/4 c hot broth from meat

1/4 c cold water

1 individual envelope of unflavored gelatin

  1. prepped meat

    Trim excess fat off brisket; place in a heavy stewing pot, with a tight lid.  Add enough water to come up 1/2” in the pot; then, stir in all other ingredients, except capers and those for aspic (see photo).

  2. Bring to a boil over med/high heat.  Reduce heat to med/low, cover, and simmer for 1 1/2 hours.
  3. At the end of this time, turn meat over, and cook for another 1 1/2 hours; check liquid periodically, adding more water only if needed.  (See photo below of finished product.)
  4. finished brisket

    Remove brisket and place on a plate in refrigerator.  Strain remaining broth.  Measure 1 3/4 c, adding water to make full amount as needed, or if liquid is more than 1 3/4 c, boil it to reduce to given quantity.  Bring the 1 3/4 c broth to a light boil in a small pot; then, remove from heat.

  5. Meanwhile, place 1/4 c cold water in a small bowl, sprinkle gelatin on top, and stir with a spoon.  Dissolve this in hot broth, pour into an 8” x 8” pan, and refrigerate.
  6. After chilling meat for at least 3 hours, cut in slices, keeping them in order to retain the shape of the brisket; set aside.
  7. scraping fat off aspic

    Take pan of solidified aspic out of refrigerator, and scrape fat off top with a table knife (see photo).  Cut in 1″ cubes.

  8. Place aspic cubes on a platter covered with greens; arrange sliced beef brisket on top of aspic; garnish with capers (see initial photo).

1950’s Boiled Raisin Cake

boiled raisin cake

The glorious Big Sky country of Montana was the recent setting for my mother Pat’s memorial, which holds the story of redemption.  This couldn’t have been more special, with family there from all over the state, as well as Washington, California, and Oregon.  It was a blessed reunion of next of kin and old friends, many of whom I hadn’t seen for decades.  My 94-year old mother, who was so eager to be with her Maker and my father, was smiling down from heaven, highly pleased with all our gaiety.

Needless to say, the food at this week’s many meals was the greatest.  My sister Maureen, who follows a ketogenic diet, is highly gifted in creating memorable ailments. (She trains people in ketogenic-style cooking and presently is writing a cook book, which includes beautiful creative desserts; I will promote it when it comes out.)

Today’s boiled raisin cake, however, dates back to my early childhood in the 1950’s; my mother probably found this well-known cake recipe in a popular magazine.  Maureen knows the original instructions by heart, to which I have added a few twists of my own, such as freshly ground flour-this is totally optional, but oh so good!

Pleasing the palate beyond words, this world’s easiest, foolproof cake is mixed in the saucepan in which you boil the raisins.  I couldn’t help but share it at this time, thus honoring my mother.

Death normally brings loss; Mom’s departing, however, promoted life and goodness.  Her long-term desire to be with Jesus and my father “Buzzy Baby” was finally granted; our Redeemer brought great liberty to many with her passing.

Food, friends, and faith were the best description of her earthly sojourn; thus, these attributes also marked her transition to heaven, for my sister Maureen labored to insure their presence at all our gatherings, thus commemorating our beloved mother-nothing was overlooked.  This week-long series of family events highly esteemed this great woman, with the actual memorial, in our village of East Glacier Park, being the height of the glory which was signified by her home-coming.

At this treasured celebration, I was able to reunite with many childhood friends-some of whom I hadn’t seen since the 1970’s.  During the reception, extreme laughter blessed us at one table, as we traversed memory lane, for we were recalling our shared employment at my parent’s restaurant.

So many people who came to memorialize Mom’s life had worked for my parents in their fifty-plus years of restaurant ownership; all were bearing rich, belly shaking stories.  It was at this respected establishment that I first learned my love for food, in which I have a unique approach of educating with health and history.

Here I note that the raisins in this cake receipt were most likely sun-dried on rows of paper in the vineyards for about three weeks, as is their most common form of production in the United States.  There are many thousands of grape varieties, which are of the genus Vitis V. vinifera.  Here in North America, we have about 25 native grape species, where in temperate Asia, there are about 10; the major source of wine and table grapes, however, is native to Eurasia.  About two-thirds of the world’s grapes result in wine; of the rest, about two-thirds are consumed fresh, with the remaining made into raisins. 1

Urbain Dubois published a recipe in his 19th century cook book, in which he ingeniously combined raisins and capers; presently, Jean-Georges Vongerichten has capitalized on this unique paring, enhancing it even further by pureeing it with nutmeg as a sauce for skate (this popular dish is on his restaurant menu). 2

Loving food and adventure, my mother would have appreciated this daring treatment of raisins.  You may experiment with this raisin/caper combination, or just securely rest in Mom’s proven boiled raisin cake.  (I suggest making the latter with white vanilla, which is ideal for white frostings-this uncommon flavoring was my recent gift from friends traveling to Mexico, the home of the world’s most outstanding, dirt-cheap vanilla.)

References:

  1. Harold McGee, On Food and Cooking (New York: Scribner, 1984, 2004), p. 363.
  2. Andrew Dornenburg and Karen Page, Culinary Artistry (Hoboken, NJ: John Wiley& Sons, Inc., 1996), p. 70.
  3. https://calraisins.org/about/the-raisin-industry/

finished cake after final frosting

Boiled Raisin Cake  Yields: 12 servings.  Total prep time: 1 hr & 50 min, with 45 min inactive prep time for cooling raisins, unless you boil them ahead of time, following step one/  active prep time: 20 min/  baking time: 45 min.

3 c flour  (Optional: may grind 2 c organic soft white wheat berries to make 3 c flour.)

2 c raisins

3 c water

1 cube butter

2 lg eggs, beaten

1 tbsp vanilla

2 tsp baking soda

2 tsp baking powder

1 1/2 c sugar  (Coconut sugar has a low glycemic index; for health benefits, see Zucchini Bread, 2017/07/24.)

1 tsp salt  (Himalayan, pink, or Real Salt is critical for optimum health; an inexpensive, fine grind Himalayan salt is available at Costco.)

1 1/2 tsp cinnamon

1 1/2 tsp nutmeg

1 tsp cloves

1 c pecan pieces, optional

Spray oil  (Coconut oil is best for flavor and health; Pam coconut spray oil is available in most stores; our local Winco brand, however, is far cheaper.)

Glaze:

2 c powdered sugar  (Organic is best; Trader Joe’s has 1-lb packages, where Costco has more economical, larger packets.)

1/2 c butter, melted

1/2 c cream  (Organic heavy whipping cream is better for your health.)

1 tsp vanilla

1/4 tsp salt

  1. easy mixing of batter

    In a 3-quart sauce pan, bring raisins to a boil in 3 cups of water over medium heat; cook for exactly 5 minutes; add butter.  Place in a sink full of cold water to cool quickly.

  2. If using fresh ground flour, grind wheat berries now.
  3. Make glaze by mixing above “glaze” ingredients, set aside.
  4. When raisins are cool, preheat oven to 350 degrees.
  5. Add flour and all other “cake” ingredients to pan; blend well; do not over-beat, however, as this toughens cakes and cookies.  IF grinding your own flour, be sure to let batter sit for 45 minutes, as freshly ground flour is coarser and absorbs the liquid more slowly.
  6. Pour batter into 9”x13” pan, which has been sprayed with coconut spray oil.
  7. icing cake the first time

    Bake for 45 minutes, or until a toothpick comes out clean, and cake lightly responds when pressed with finger.

  8. When hot out of oven, immediately poke holes over the whole cake with a toothpick or skewer.
  9. Pour 2/3’s of glaze evenly on cake (see photo).  When cake has cooled, frost with remaining icing; see photo of finished product at top of recipe.
  10. This cake is dynamite, and it gets better as it sits over time!

Herbes de Provence Bread

Herbes de Provence bread

In my last entry on the history of garlic, I sited Provence, France as the place where America’s farm-to-table movement originated.  (Hopefully you were able to partake of my quick chicken soup.)

Here Herbes de Provence is creatively used in an easy, mess-free bread recipe, employing a food processor, which provides outstanding aroma and flavor.

This region’s commercial herb mixture-so prevalent on the market-only dates back to the 1970’s, about the time that Alice Waters started Chez Panisse.  In doing so, she initiated this American culinary (farm-to-table) trend based on fresh, simple foods combined with Provencal cooking methods (for more on this, see Quick Chicken Soup, 2018/05/11).

In their famous Mastering of the Art of French Cooking, 1961, Julia Child, Louisette Bertholle, and Simone Beck state that classical French cuisine utilizes far less herbs than most Americans would suspect; these Europeans traditionally use them as an accent and a complement, never dominating the essential flavors of the main ingredients.  Likewise, their emphasis in this bread is fine. 1

Various regions in France, as with all of southern Europe, have their own unique herbs mixes, according to available plants.  Our Herbes de Provence is considered the youngest member of this family of French mixes, usually referring to the mix of typical herbs from this southeastern Provencal region, though it is also produced in other countries presently.

Whether fresh or dried, these blends, which are not standard, often contain savory, marjoram, rosemary, thyme, and oregano, among other herbs; mixes sold under that name outside France can also include lavender.  The generic name Herbes de Provence doesn’t have Protected Geographical Status, such as I have defined for the balsamic vinegar in my Roasted Beet and Balsamic Chicken Salad.  Therefore, there is no guarantee that the herbs which make up these Franco composites were actually grown in Provence.

Originally their varying herbs were foraged in the wild in this region, and the name was used descriptively for those unspecified combinations; now, however, their vital ingredients often come from abroad.  In the 1970’s, Herbes de Provence mixes began to be formulated by spice wholesalers, such as Ducros in France, which is now a part of McCormick and Company.  Since then, these herbs have been cultivated there by both large producers and small family farms; nevertheless, the largest quantities of these herbal elements are actually imported, e.g., rosemary from Spain, thyme from Morocco, and marjoram from Egypt.

Different producers, including those in America, provide mixtures with unique tastes, which are subtly discerned, though their overall impact is common.  This bread boasts of the outstanding flavor of that herb blend, as found at our handy Trader Joe’s (which contains lavender).  This savory loaf pleases any palate!

References:

Julia Child, Louisette Bertholle, and Simone Beck, Mastering the Art of French Cooking, vol. 1, (New York: Alfred A. Knopf, 1971), p. 18.

https://happybellyfish.com/herbs-de-provence-recipes-history/

https://en.wikipedia.org/wiki/Herbes_de_Provence

grinding wheat berries

Herbes de Provence Bread  Yields: 1 loaf.  Total prep time: 3 hours/  active prep time: 30 min/  inactive prep time: 2 hr/  baking time: 30 min.

1 3/8-1 5/8 c tepid water (105-115 degrees)

1 individual package of dry yeast  (May use 2 tsp of Red Star Active Dry Yeast, which is available inexpensively in 2 lb packages at Costco; this keeps well sealed in the freezer; best if brought to room temperature.)

2 1/4 tsp sugar

3 c whole wheat flour

1 c unbleached white flour  (Optional: may grind 2 2/3 c hard red spring wheat berries to make the total 4 c flour.)

1 tbsp Herbes de Provence  (Available at a good price at Trader Joe’s.)

1 1/4 tsp salt

13-gallon plastic bag plus 3-4 tbsp oil  (Any kind of oil will do for oiling bag.)

Coconut spray oil  (Pam coconut spray oil can be found in most grocery stores; our local Winco brand, however, is much less expensive.)

  1. proofing yeast

    If grinding your own flour, begin to do so now (see photo at top of recipe).

  2. Place 1/4 c lukewarm water-110 to 115 degrees-in a small bowl; stir in yeast and 1/4 tsp sugar.  Let sit in a warm place, until creamy, foamy, and nearly double in size, about 10 minutes (see photo above).
  3. Place flour, Herbes de Provence, 2 tbsp sugar, and salt in an 11-c-or larger-food processor; blend well.
  4. When yeast is proofed, add it and 1 3/8 c tepid water to flour mixture; for ease, may measure 1 1/4 c water, then remove 2 tbsp to make a total 1 3/8 c.  (With fresh-ground flour, however, only 1 1/8 c of water is needed.)  Turn

    dough after first 35-second kneading

    machine on and knead for 35 seconds (see photo); turn off and let dough rest for 4 minutes.  (This resting period cools dough, which is essential as processing increases heat, and too much heat will kill the yeast.)

  5. After pausing for 4 minutes, turn on the processor; knead dough for 35 seconds more (see photo below).  Take out and knead by hand for 5 minutes, or until satiny smooth; see bottom photo for dough after kneading by hand.  (As wet dough readily sticks to hands, rinse them

    dough after second 35-second kneading

    as needed to facilitate easy kneading.  Many store-bought flours are a finer grind; therefore, they absorb the moisture more readily and won’t be so sticky.  Much moisture is absorbed while kneading by hand-this is especially true with fresh-ground flour.  Ideally it should be firm, but supple when finished. These instructions should be foolproof, but IF needed, do the following: if dough remains quite wet and sticky, after kneading by hand for several minutes, slowly add more flour to your board as you knead.  If, however, it is too stiff to knead by hand easily, place it

    dough after kneading by hand

    back in processor, and knead in 1 tbsp water.  If called for, repeat this step until severe stiffness is gone, it is flexible, and kneading by hand is facile; carefully rest dough, so as not to overheat.  Note: dough should be firm and not sticky after final kneading.)

  6. Place prepared dough in a well-oiled 13-gallon plastic bag; let rise in a warm place for 50-60 minutes, or until double.
  7. Form loaf and place in a bread pan sprayed with oil.  Loosely cover with a piece of plastic wrap, which has also been sprayed with oil.
  8. Let rise until doubled, for about 50-60 minutes.  Important: 30 minutes into the rising process, preheat oven to 400 degrees, to insure oven is ready when it is time to bake risen bread.
  9. When doubled, bake loaf for 27-30 minutes, or until bread sounds hollow when tapped on bottom.  Cool on rack.  Enjoy this delightful bread!

Quick Chicken Soup

quick chicken soup

Soup-cooking weather is drawing to a close here in Northwest America, but it is still prevalent in other parts of the world that are reached by my writings.  Here is a quick, delicious receipt, which includes broccoli or asparagus (see my last entry to access this spring vegetable, sautéed with leftover, browned milk solids from ghee).

Much romance surrounds chicken soup; this is often one of our favorites from “mom’s best”-which gently nudged us out of our sick beds.  My earliest recollection of this soup, however, was that of the Campbell’s variety during the 1950’s.

My recipe boasts of lots of garlic, which comes with an interesting history all its own.  According to Sarah Lohman in Eight Flavors, it wasn’t the heavy Italian immigration at the turn of the 20th century that gave our country its love for this plant; rather, its colorful history dates further back to the international influence of the French chef Marie Antoine Careme.  He started his impressive career as a kitchen boy, at the age of eight, shortly after being abandoned by his parents, during the early political upheavals of the French Revolution, in 1792. 1

This man changed Western cuisine.  He replaced the then heavy use of imported spices, employed in the food preparation of the upper class since medieval times, with an introduction of fresh herbs and flavorful plants-such as onions and garlic-which had hitherto solely been found in the poor man’s diet; only local herbs and garlic, however, were used by the lower class, where Carame went afar to gather various ingredients for his extravagant repasts.  Strong emphasis on onions, thyme, bay, basil, and garlic can be seen in Careme’s recipes.  His feasts-elaborate by our means-held a novel focus on freshness, flavor, and simplicity (compared to that of his predecessors).  He is remembered, along with La Varenne, as the founder of haute cuisine. 2

Careme has greatly influenced Western cooking; nevertheless, his impact on our country, at the beginning of the nineteenth century, was only brief.  Here our newly acquired taste for garlic can be seen in Mary Randolph’s Beef-a-la-Mode, found in The Virginia Housewife (1824), which called for two heads of it for a single pot roast. 3  Prior to that, garlic was eschewed on this continent, as represented in Amelia Simmon’s American Cookery, 1796, for she wrote: “Garliks, tho’ ufed by the French, are better adapted to the ufes of medicine than cookery”. 4  Just a generation after Randolph’s garlicky 1824 receipt, the use of this allium became minimal once again, as seen in numerous American cook books of that period. 5

At the turn of the 20th century, massive Italian immigration came to our soil, with Italian Americans representing 10 percent of the US population by 1920.  Neither their culture or food ways were easily assimilated back then; thus, their heavy use of garlic was disdained by main line America, due in part to our earlier aversion to it. 6

Lohman attributes the beginning of the reversal, of our revulsion to this plant, to the heavy influx of American artists living around Paris, following the World War I; nearly thirty million of these sojourners were there during the 1920’s and 30’s, including M.F.K. Fisher and Earnest Hemingway; this artistic population initiated the idolization of garlic in print, because of their exposure to the popular garlic-laden cooking of Provence, where fresh and simple techniques were the direct result of Careme’ influence a hundred years prior. 7

In 1945, the future American legend James Beard-renown cook, television personality, and author-was stationed in Provence; here his culinary techniques were formed and, with them, his passion for garlic.  Thus by his works, this flavorful plant was pushed even further forward in its comeback in the USA.  Note: when Beard was serving in France, we were consuming 4.5 million pounds of it a year; this brought on by the artists.  By 1956, 36 million pounds were being consumed annually, due in large part to Beard picking up the torch lit by Careme.  (Presently the average American consumes about 2 pounds of garlic in a twelve month period.) 8

Several decades hence in 1971, Alice Waters opened Chez Panisse in Berkley, where she brought even more life to what Careme and Beard had started, with her founding of the farm-to-table movement; here she emphasizes locally produced ingredients in her famous French/Italian cuisine, prepared with the simple, fresh, garlic-laden Provencal cooking techniques. 9

Today, unlike the turn of the 20th century, there is a mainstream acceptance of Italian American food with all its original heavy use of this plant; this phenomenon can be clearly seen in some of America’s highest-grossing food chains: the Olive Garden and Domino’s Pizza.  There is even a rise in garlic-themed festivals throughout our country, which tend to promote Italian American inspired classics, such as fettuccine Alfredo (a purely American dish unknown in Italy.)  Nevertheless, our country’s love for garlic doesn’t come from Italy, but rather from the revival of French cuisine and the origins of the farm-to-table movement, established on the innovations of Careme. 10

This pungent allium strongly impacts my soup; enjoy its many dimensions.

References:

  1. Sarah Lohman, Eight Flavors (New York: Simon and Schuster, 2016), p. 155.
  2. Ibid., pp. 149-179;  https://en.wikipedia.org/wiki/Haute_cuisine   https://en.wikipedia.org/wiki/Marie-Antoine_Car%C3%AAme  
  3. Sarah Lohman, Eight Flavors (New York: Simon and Schuster, 2016), pp.159.
  4. Amelia Simmons, American Cookery, 1796, (reprinted, Grand Rapids, Michigan: Wm. B. Eerdmans Publishing Co., 1965), p. 22.
  5. Sarah Lohman, Eight Flavors (New York: Simon and Schuster, 2016), pp. 159-160.
  6. Ibid., pp. 160-163.
  7. Ibid., pp.163-164.
  8. Ibid., pp. 153, 166.
  9. Ibid., pp. 166-169.
  10. Ibid., pp. 150,170, 171.

finished product

Quick Chicken Soup  Yields: 2 1/2 quarts.  Total prep time: 1 1/3 hr/  active prep time: 40 min/  cooking time: 40 min.

1 lb chicken tenderloins  (May substitute breasts or thighs.)

1 tbsp oil  (Avocado or coconut oil is best, as olive oil is carcinogenic when heated to high temperatures.)

1 lg onion, chopped

3 lg carrots, cut in small cubes

1 head of cauliflower, divided into florettes

1 1b asparagus, cut in bite-size pieces  (May use frozen broccoli instead.)

1-liter plus 15-oz can of chicken broth  (Bone broth is ideal; see Tortellini Soup, 2016/10/10, for easy instructions.)

6 extra lg cloves garlic, minced  (May use 3 cubes of frozen garlic from Trader Joe’s for easy prep.)

1 tbsp Herbes de Provence  (Trader’s has a great buy on these.)

1 c rice  (May substitute quinoa, which is diabetic friendly.)

1 tsp freshly ground pepper, or to taste

2 tsp salt, or to taste  (Himalayan, pink, or Real Salt is critical for optimum health; an inexpensive Himalayan salt is available in bulk at our local Winco.)

2 tsp Better Than Bouillon (chicken flavor), or to taste

  1. sweating onions

    Place chicken in a medium saucepan, cover barely with warm water to begin thawing process; if using frozen broccoli, set out to thaw.

  2. Heat oil in a saute pan, add chopped onions, and sweat-cook until translucent-as shown in photo.  Stir occasionally.  Set aside.
  3. Spray vegetables with a safe, effective, inexpensive vegetable spray (combine 97 % distilled white vinegar with 3% hydrogen peroxide); let sit for 3 minutes; rinse thoroughly.
  4. Bring chicken to a boil over medium heat, cook for 10 minutes, or until pink is nearly gone.  Remove tenderloins from cooking water, set both chicken and liquid aside to cool.
  5. Place 1 1/2-liters broth and 1 1/2 cups of water in a stock pot; cover and bring to a boil over medium heat.
  6. dividing cauliflower into florettes

    Chop carrots in small cubes; cut asparagus in bite-size pieces, by first removing tough ends.  Divide cauliflower into small florettes, by cutting small sections away from head; pare excess stem off these portions; then divide each of these sections into small florettes with the tip of a knife (see photo).

  7. Place vegetables and cooked onions in broth.
  8. Add to stock pot: garlic, Herbes de Provence, rice, pepper, and salt (only 2 tsp presently, as the Better Than Bouillon in step 8 will also add saltiness).  Cover and bring to a second boil over med/high heat; then, uncover, lower heat, and simmer for 35 minutes, or until rice is soft.
  9. When rice is finished cooking, cut chicken into bite-size pieces; add both poultry and its cooking liquid to soup.  Mix in Better Then Bouillon, and adjust seasonings to taste.
  10. Serve this light, healthy soup with pride; may freeze leftovers for unexpected company, or for a sick day.

Asparagus (with leftover milk solids from ghee)

sautéed asparagus with ghee

Not knowing any better, I loved canned asparagus in my youth, as canned vegetables dominated America in the mid-twentieth century.  At that time in my life, I was also enamored with Campbell’s tomato soup, when made with milk instead of water.  These foods spelled enchantment to my young, untutored palette.  Time provided exposure to more excellent options; I no longer like canned asparagus or Campbell’s soup.  Over the years, my taste buds have been disciplined to know the best; thus, I have acquired wisdom, which I humbly share with you.

With its 1795 beginnings, canning drastically reformed the world of nutrition, which started with a French confectioner’s inspiration.  This radical change in the culinary world came at a time that government saw upheaval as well, for the French revolutionaries were revolting against monarchies in Europe (for the history of canning refer to Bean, Corn, and Avocado Salad.

Originally, this manufacturing process provided armies with needed preservation of foods, but later its prevailing use distracted the American public, taking them away from healthier, tastier, fresh ailments; this occurred likewise in other cultures.  Canned goods monopolized the cooking of the common man; thus, the preparation of fresh fruits and vegetables was lost for a period.  Even canned meats were favored: Spam was popular in the U.S., while bully beef-minced corned beef in small amounts of gelatin-dominated the United Kingdom and mainland Europe.

Campbell’s is the best known name in the global soup-making industry.  In 1869, Philadelphia, fruit-wholesaler Joseph Campbell partnered with tinsmith-icebox-maker Abram Anderson to open Campbell Soup Company in Camden, N.J.; initially they packed fancy asparagus, small peas, tomatoes, minced meat, condiments, jellies, etc.

The year following its new 1896 partnership, the president of Joseph Campbell Preserve Company hired his 24-year old nephew John T. Dorrance, a brilliant research chemist.  This master of organic chemistry had received a doctorate from the University of Gootingen, having turned down faculty positions at this illustrious school, as well as at Columbia, Cornell, and Bryn Mawr.  Young Dorrance applied his ingenuity to his passionate vision for canned soups, for which he had learned the proper seasoning while working at famous Parisian restaurants.  With his vision of a double-strength “condensed” product, this youthful genius gave America its famous Campbell’s tomato soup.

My vivid, introduction to cooked, fresh spinach is sealed in my brain; it took place at my friend Dulcy’s home in Cut Bank, Montana in 1974.  This steamed dish, which her mother had adorned with hot butter and fresh-squeezed lemon, ignited a holy fire in me.  Exuberantly I tried to convince my mom to repeat this, but she refused, professing her hatred for spinach.  I now understand that her reaction came from an impression left by the nasty canned version, which so colored her sensory perception that she totally blocked out the heaven-sent fresh variety.

Both our palates and souls are thus influenced, absorbing either good or bad information, until we exercise our God-given authority over these perceptions.  Throughout our lifetime, events leave subtle marks on us in either adverse or positive ways, hence imbuing our imaginations with emotion, and consequently dictating our choices often.  We, however, can overcome our inhibitions by purposing to resist these impulses, repeatedly speaking words of life over our circumstances.  In this way, we mold new pathways in our brains.  This is true with all soulish imprints, both those brought by unpalatable foods as well as emotional wounds.  May we stand boldly, mastering all such patterns that limit us.

Here fresh asparagus is the piece de resistance, with which I employ the leftover remains of browned casein residue from simple ghee preparation (see Laban Bil Bayd, 2018/03/26, for easy instructions).  The flavor in butter is most highly concentrated in those milk proteins; therefore, when these are separated in the clarifying process, the very strength of its taste is isolated; browning intensifies this even further.  If you have never experienced a food enhanced with these nutty milk solids, be prepared for copious, mouth-watering sensations.

References:

James Trager, The Food Chronology (New York: Henry Holt and Company, 1995), pp. 283, 345, 354.

http://www.qdg.org.uk/pages/1793-to-1802-103.php

http://www.referenceforbusiness.com/history/Ca-Ch/Campbell-Soup-Company.html

https://en.wikipedia.org/wiki/Bully_beef

https://www.taste.com.au/articles/bully-beef-part-of-australian-history/KYnke1FI

http://jamaicans.com/bullyb/

leftover milk solids from ghee preparation

Asparagus (with leftover milk solids from ghee)  Yields: 2-3 servings.  Total prep time: 15 min, when ghee is prepared ahead, which takes an additional 15 min.

1 lb fresh asparagus, or vegetable of your choice

1 1/2 tbsp of ghee  (See simple instructions at Laban Bil Bayd, 2018/03/26.)

Browned milk solids  (See these, leftover from ghee preparation, in saucepan in above photo.)

Salt, to taste  (Himalayan, pink, or Real Salt is critical for health; an inexpensive fine grind Himalayan salt is available at Costco.)

Freshly ground pepper, to taste

  1. cutting asparagus

    Spray asparagus with a safe, effective, inexpensive vegetable spray (combine 97% distilled white vinegar with 3% hydrogen peroxide); let sit for 3 minutes; rinse well.

  2. Dry spears with a towel.  Cut in bite-size pieces, first removing tough ends (see photo).
  3. preparing ghee for sauteing

    Melt ghee in frying pan, saving separated milk solids for finishing touch (see photo); test for readiness by placing a piece of asparagus in pan; when it sizzles, it is time to proceed.

  4. Add vegetable and sauté until desired doneness; do not overcook.
  5. Stir in browned milk solids; salt generously (see photo at top of recipe).  Be enraptured by this heavenly treat!

Laban Bil Bayd (Lebanese eggs baked in yogurt/garlic/mint sauce)

laban bil bayd and tabbouleh

This last of my Middle Eastern receipts laban bil bayd calls for eggs, baked in a thickened yogurt, which is seasoned with mint and garlic cooked in ghee.  This delightful dish is commonly used as part of the mezze, or the first course of appetizers.  Great recipes follow, for both the ghee and laban bil bayd.

Butter vs Vegetable Oils

Vegetable oils are almost 100% fat, while butter is an emulsion of 80% fat, 15% water, and 5% milk solids; vegetable fats are most commonly used for sautéing, due to their high smoke points, or temperatures at which they burn.  It is misinformation that adding oil to butter raises butter’s smoke point.

Ghee a Form of Clarified Butter

The flavor of butter is important in this recipe; thus, it calls for ghee, with the smoke point of about 400 degrees F (200 C), as compared to 250 degrees F (150 C) for regular butter.

Ghee is a form of clarified butter; ghee and what we typically call clarified butter differ in that the first is heated just a little longer, browning the milk solids.  This produces a subtle nutty flavor and aroma, with great resistance to rancidity.

Clarified Butter Made in Resteraunts

The most common form of clarifying butter, the one used by most restaurants, varies from the more efficient method suggested here for home use, which is actually the preparation of ghee, rather than clarified butter.

Because such large quantities of butter are clarified in commercial kitchens, it is easiest to gently heat the butter to the boiling point of water; the water then bubbles to the surface, where the foaming milk proteins form also.  The water eventually evaporates, the bubbling stops, and the froth dehydrates, leaving a skin of dry whey protein; this skin of dry milk solids is next skimmed off the top.  Finally, the pure butterfat is ladled out, to remove it from the dry casein particles, which have sunk to the bottom of the pan.

Clarified Butter-Ghee-Made at Home

This above technique, however, brings much wasted product when preparing small quantities, because this means of  separating the fat from the top and bottom milk proteins also scoops up the butterfat.  Therefore it is best to follow this quick, traditional method for making ghee, when clarifying little amounts of a pound or less of butter at home.

This takes the above process a step further, by raising the final heat and browning these sunken whey proteins, then separating them from the pure butterfat by straining.  In this way, the resultant clear fat is completely isolated by easily pouring it through a coffee filter, or layers of cheesecloth.

History of Ghee in India

The word ghee in Sanskrit means “bright”.  In India, it was traditionally made from butter churned from soured, whole cow or buffalo milk, known as yogurt-like dahi; this preliminary souring improved both the quantity and flavor-quality found in this clarifying process.  Today, Indian industrial manufacturers usually start this procedure with cream; nevertheless, it is said that sweet cream produces flat-tasting butter, which affects the character of the ghee.

Ghee in World Cuisines

Ghee is prevalent both in South Asian and Middle Eastern cuisines.  My first encounters with it were in my early catering and teaching days during the 1980’s, when I was preparing East Indian foods, such as curries and dal (lentils).

How Best to Prepare and Use Ghee

Presently I like to make large batches of it, for storing in my refrigerator where it keeps for months.  Thus, it is readily available for frying eggs, searing meats and vegetables, making sauces-such as hollandaise-and popcorn, as well as using it as dips for lobster, crab, and artichokes.  It greatly enhances the taste of all these foods.

Note: it is especially helpful to utilize high grade butter-such as Kerry butter from Ireland-in making ghee for a hollandaise sauce or dip for shellfish, as the flavor will be better.  This is due to the higher butterfat content in European butters (82-86%), contrasted with 80-82% in that of its American counterpart.  (For more on the health qualities of fats and grass-fed ghee, see Balsamic Eggs .)

Join me in the great discovery of cooking with ghee, by first making this simple, seemingly innocuous egg dish that surprises with it powerful pleasure!

References:

Harold McGee, On Food History (New York: Scribner, 1984, 2004), pp. 36, 37.

https://www.seriouseats.com/2015/08/how-to-clarify-butter.html

https://www.seriouseats.com/recipes/2015/08/clarified-butter-recipe.html

https://altonbrown.com/clarified-butter-and-ghee-recipes/

finished product

Laban Bil Bayd (Lebanese eggs baked in yogurt/garlic/mint sauce)  Yields 6 servings.  Total prep time: 45-60 min (the length of time depends on if you prepare ghee with recipe)/  active prep time: 25-40 min/  baking time: 20 min.

Note: may make third of the recipe to serve two, using a 5-oz carton of plain Greek yogurt.


1/4 c ghee, or clarified butter  (Prepared versions are available at Trader Joe’s and Costco; may follow step 2, to quickly make your own, out of grass-fed butter-in 15 minutes.)

2 lg cloves garlic, minced

finished ghee

1/4 c fresh mint, chopped  (May substitute 2 tsp dried mint.)

2 c plain Greek yogurt  (Greek yogurt makes this recipe great; it is important that milk products are whole and organic for optimum health.)

1 lg egg white, beaten to froth

2 tsp corn starch

1 1/2 tsp salt  (Himalayan, pink, or Real Salt is critical for optimum health; an inexpensive fine grind Himalayan salt is available at Costco.)

White pepper, to taste

6 eggs

  1. foam subsides, after initial rising

    Preheat oven to 400 degrees.

  2. May use a prepared version of clarified butter (an 8-oz jar is available for $3.99 at Trader Joe’s, but this is NOT grass-fed).  Better yet, for a homemade ghee: prepare a strainer, with a coffee filter in it, and place in a heat-proof dish.  Set aside.
  3. Over medium heat, shaking pan, melt 8-16 oz of high quality, unsalted butter (grass-fed Kerrygold is important-available most reasonably at Costco).  Note: 8 oz has less wastage.
  4. When melted, cook until an even layer of white whey proteins forms on top (see photo below).
  5. Continue cooking until milk solids break apart, and foam subsides (see above photo); temperature will be about 190 degrees-it is not necessary to have a thermometer though.  At this stage you have clarified butter.  Note: if foam is starting to brown deeply and quickly, your pan is not heavy enough to make ghee; remove from heat and immediately strain this clarified butter in a coffee-filter-lined strainer.
  6. To proceed with ghee, cook butterfat until a second foam rises high in pan, and there is just a hint of golden color at edge; bubbles will have become dense and small (see photo in list of ingredients).  This will take 2-3 more minutes, and temperature will reach 250 degrees.  Watch carefully as dry casein particles, settled on bottom of pan, will brown quickly.
  7. Immediately gently strain butterfat into a heat-proof dish, through a coffee filter placed in a strainer (see photo at very bottom).  Transfer into an airtight container to keep out moisture.  This lasts for months, when stored in the refrigerator.
  8. ghee at first rising of foam

    Chop mint-if using fresh-and garlic.

  9. Measure ghee (samneh) into a small saucepan, heat on med/low, add mint and garlic, and cook until garlic is golden brown.  Stir this frequently, watching carefully so as not to burn.  Meanwhile proceed to next step.
  10. Beat egg white until frothy (see photo below); an electric mixer hastens this process.
  11. Place yogurt in a heavy saucepan, adding salt, cornstarch, and foamy egg white, to which a final beat is given (if making a smaller recipe of only two servings, be sure to use just one third of whites).  CAREFULLY STIR IN THE SAME DIRECTION, until thoroughly combined.
  12. egg whites beaten to froth

    Continuing to stir in the same direction, cook over medium heat until it starts to boil.  Lower heat and simmer gently until thick, about 3 minutes.  Greek yogurt thickens more quickly than regular yogurt; if making a smaller portion, this will thicken very fast!

  13. Pour hot yogurt in an oven-proof dish (or evenly divide into

    separated browned milk solids, along with golden butterfat

    individual oven-proof bowls).  Spread out to completely cover the bottom of dish.  Break eggs on top of this mixture, spacing them evenly if using a larger dish.  Pour flavored ghee over eggs.  Bake for 15-20 minutes, until eggs are hard (see photo of finished product at top of recipe).  Serve immediately for an incredible palate-pleasing experience!