Quinoa Dishes

salad topped with cooked quinoa

Our bodies are the temples of God; only through his grace, do we have the capacity to care for these holy houses with good diet and healthy exercise.  For years, such attendance was beyond my natural ability, but now I highly esteem the enabling gift from God, which provides me with the means to execute both these disciplines effectively.

Clearly I recall the days, when weighing 226 pounds, walking caused painful rubbing together of my fleshy thighs.  Brokenhearted, after repeated failures and fresh firm resolve, I would yet again reach toward the “easy” goal of a 20-minute walk, 3 times a week.  I could never achieve this, try as I might.

Lo and behold, my challenge has been reversed: now I have to be careful not to obsess about exercise, as I so love walking aerobically, for this invigorates me, stimulating a marvelous sense of well-being in my soul.

My trustworthy instruction book, the Bible, warns that there are advantages in physical exercise, but these are limited, as they pale in sight next to the gains acquired by putting spiritual development first.  Thus, we must approach workouts with great wisdom, so they neither own us, nor escape us.

My days are jam-packed, for I am gratefully fulfilling my ordained achievements with my food history writings and other ministry.  The result is a thrilling existence, in which I can run out of time at the end of a day, leaving me with critical choices, with which I have to prioritize.

Our gracious Father has granted me a tool to do such: there is a winter wonderland scene at the Tualatin Commons, the man-made lake near my home.  All the trees surrounding this body of water are dressed in bright, white lights (the floating Christmas tree was taken down after the New Year).  This has become my piece de resistance, which early in my day I start anticipating: will this pleasure be mine at twilight?  Only supernatural help allows me to accomplish the needed organization to allow this longed-for walk.

Discipline in ordering my day is critical; by necessity, exercise has become secondary to my fulfilling the higher purpose of my calling.  Often I recall how this valued ambulation used to be such a burden, causing sores on my overweight thighs, but now I crave walking.  I didn’t bring this miracle about; my great Healer affected it in me over time.  I am literally his walking miracle!

Not only has my exercise been refined, but healthy eating has come to me supernaturally, as well.  Slowly I have attained excellent eating disciplines; incorporating quinoa (KEEN-wah) in my diet is one such development.  This is a cereal grain, sometimes referred to as a seed; all grains, legumes, and nuts are seeds.

Quinoa is a power-food that is native to northern South America; it was domesticated originally as food for livestock around 5000 B.C., near the Lake Titicaca basin of Peru and Bolivia-I spent a night on this pitch black, remote lake, the largest inland body of water in the southern hemisphere, which doesn’t have electricity.

Quinoa was a staple with the Incas, second only to the potato in importance, and is still in the forefront among their indigenous descendants the Quechua and Aymara people.  It is a grain from a plant called Chenopodium quinoa, which is a member of the same family as beets and spinach.

Like many ancient grains, this seed was almost lost: in 1532, the Spanish explorer Francisco Pizarro destroyed quinoa fields, in his attempt to annihilate the Incan culture; this crop, however, survived in the high Andean mountains.  Quinoa was reintroduced to the modern world in the 1970’s and 80’s.

This high-fiber, complete-protein food, rich in numerous vitamins and minerals, produces a starch gel, similar to that of risotto, giving it a kind of silky texture, according to Andrew Dornenburg and Karen Page in Culinary Artistry; they further state that its earth tones highly compliment the mineral and earthy components of lobster-try experimenting with this combination.

Here, however, I quickly prepare it in two savory dishes.  This pseudo cereal-not a member of the grass family, therefore not a true cereal-can also be cooked as a breakfast food; serve it with dried fruit, honey, and an alternative milk, such as almond or hazelnut.

My discovery of quinoa has blessed me immensely; may it benefit you  likewise.

References:

Harold McGee, On Food and Cooking (New York: Scribner, 1984, 2004), pp. 451-483.

https://en.wikipedia.org/wiki/Quinoa

http://www.ancientgrains.com/quinoa-history-and-origin/

https://www.smithsonianmag.com/arts-culture/quinoa-the-mother-of-grains-1-57670322/

Andrew Dornenburg and Karen Page, Culinary Artistry (Hoboken, NJ: John Wiley & Sons, Inc.), pp. 142, 143.

toasted yellow quinoa

Simple Cooked Quinoa  Yields: 3-5 servings, as a main course or side dish respectively.  Total prep time: 30 min/  active prep time: 15 min/  cooking time: 15 min.  Note: double this for healthy leftovers; this is especially good added to green salads (see photo above).

1 c quinoa  (Tri-color or red organic quinoa is preferable-color is important in diet.)

1-15 oz can of chicken, vegetable, or beef broth

1/2 tsp salt  (Himalayan, pink, or Real Salt is critical for optimum health; a fine grind Himalayan salt is available very cheaply at Costco.)

  1. Toast the grain in a hot, dry frying pan over medium heat, for about 6-10 minutes, stirring constantly as color starts to change; yellow quinoa will turn light brown in color (see above photo), while red quinoa  turns deep red.  This enhances the flavor of the dish remarkably!  Meanwhile go to next step.
  2. While quinoa is beginning to toast, pour broth in a 1 1/2-quart saucepan (or 3-quart pan, if doubling recipe).  Stir in salt and bring to a boil over medium heat; when liquid boils, add toasted seed and bring to a second boil. Reduce heat, cover, and simmer for 15 minutes; red quinoa may take longer to cook.  When done, water will be absorbed and quinoa will be soft and somewhat translucent.
  3. Serve immediately.  Refrigerate any leftovers to reheat for an entrée, or to add to a green salad (see first photo).
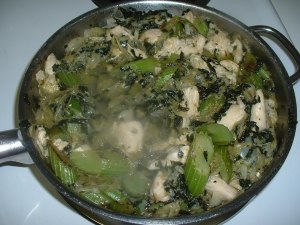
carrots and quinoa

Carrots and Quinoa  Yields: 4-6 servings, as a main course or side dish respectively.  Total prep time: 45 minutes.

1 med yellow onion, cut in even 1/8 inch slices

4 1/2 tsp oil  (Coconut or avocado oil is best, as olive oil is carcinogenic, when heated to high temperatures.)

8 med carrots, or other vegetable  (Organic multi-colored carrots are available at Trader Joe’s; color is important in diet.)

1 c quinoa  (Red or tri-color is good.)

1-15-oz can chicken, vegetable, or beef broth

1/2 tsp salt  (Himalayan, pink, or Real Salt is critical for premium health; an inexpensive fine grind Himalayan salt is available at Costco.)

  1. red quinoa as it is beginning to change color

    To caramelize onions, cook slowly over medium heat in 1/2 tsp of oil, stirring every several minutes, until a light color starts to form; then, stir every minute, until dark brown.  Be sure to use a small amount of oil; too much oil will require a much longer cooking time, as will crowding the pan.

  2. Spray carrots with a safe inexpensive, effective vegetable spray (combine 97% distilled white vinegar with 3% hydrogen peroxide); let sit 3 minutes; rinse well.
  3. Bring broth to a boil in a covered 1 1/2–quart saucepan, over med/high heat; add salt.  (Use a 3-quart pan is doubling recipe.)
  4. Toast quinoa in a hot dry frying pan, over medium heat, stirring constantly as color starts to change.  This takes about 6-10 minutes-yellow quinoa will turn light brown, while red quinoa will become deep red (see photo above).
  5. To preserve vitamins just under skin, scrape carrots with a sharp knife, instead of peeling; slice thinly.  (Meanwhile keep checking the onions.)
  6. finished product

    Add toasted quinoa to boiling broth, cover, and reduce heat to med/low.  Allow to simmer until all the liquid is absorbed and quinoa is soft and somewhat translucent (this takes about 15 minutes for yellow quinoa, while red quinoa may take longer).

  7. Heat remaining 4 tsp oil in an empty frying pan.  Add sliced carrots, cover, and steam until soft, stirring occasionally.
  8. Blend onions into carrots; mix cooked quinoa into vegetables.  Serve hot (see above photo).

Pasta and Spinach, with Lemon Sauce

pasta and spinach, with lemon sauce

Sauces have been used to modify and accentuate food throughout history, transcending all cultures.  Here we will examine ancient Rome, for it offers-in the strictest sense of recipes-the earliest cook book De Re Coquinaria, which is perhaps erroneously believed to have been written by the gourmet Apicius in the first century A.D.  This discrepancy is made evident by Athenaeus, who compiled the anthology The Deipnosophists, circa 230 A.D.  This latter book is regarded as one of the leading sources of information about ancient times, and its author knew all about Apicius as a gourmet, but didn’t attribute a cook book to him.  Regardless of the exact authorship of De Coquinaria, it supplies the rich basis of a worthy record of early cooking techniques.

With it come glimpses into the eating habits of the well-to-do, including sumptuous recipes, such as those for feasts.  Note that contrary to established beliefs, the everyday Roman dining was simple: breakfast (jentaculum) was bread with a few olives or raisins; lunch (prandium) mostly consisted of leftovers, cold meat, or eggs; the daily main meal (cena) also reflected less extravagance-this latter was more elaborate only in households with an excess of slaves.

Even more than the fussy dishes concocted for guests, plain foods, like grain pastes, beans, and bread, required spices and strong sauces to transform them, with their disproportionate quantities of starch.  This same rule is illustrated by the most intense of the world’s repertoire of sauces, such as the soy mixtures of China, the chili pastes of Mexico, and the curries of India-derived from the South Indian name kari meaning sauce.  Here the common man basically developed sauces as seasonings for bulky carbohydrates, which both absorb and dilute them; on the other hand, the solid masses of fish and meat scarcely incorporate liquid at all.

In Food in History, Reay Tannahill states that all the qualities that give a cuisine its identity change in a society that can afford to eat meat and fish daily, with their staying sauces.  (Such peoples utilize extensive creativity in sauce-making, the primary element of good cooking.)  Thus, Tannahill suggests that the whole essence of cuisine may have thus changed in the rural society that was transfigured into Imperial Rome.

Showy receipts were prepared for company by that ancient culture. The full dinner party in Roman times was considered to be nine people, reclining on three couches, around a U shape table.  These guests leaned on their left elbow, while eating with the fingers of their right hand.  This was a messy activity; they washed themselves from top to toe before a meal, probably needing to do so after as well.  By necessity, the dipping sauces for their flesh foods required a sturdy substance for easy eating; such thickening was achieved by adding wheat starch or crumbled pastry.

The use of liquamen (or garum) was predominant in Roman cookery.  This clear, golden, fermented fish sauce was made commercially, by leaving out a mixture of fish and salt in the sun for two to three months (eighteen months for larger fish).  Its presence in most recipes not only added strong flavor, which the Romans loved, but in turn, masked milder rancidity, so prevalent in their foodstuffs.

Imperial Rome grew to be a quarter of the size of modern Paris, unlike the other great, small urban centers of Sumer, Egypt, and Greece, which were small by comparison; this made transport of perishable foods, which were stockpiled in warehouses, very slow.  With no refrigeration, food spoilage presented a large problem; thus, the powerful, fishy/salty flavored liquamen found its way into almost everything.

The recipes of antiquity were sketchy, with little more than a list of ingredients.  Their sauces, as mentioned above, often called for wheat starch and crumbled pastry as thickeners, for there was no roux.  Interestingly enough, roux was NOT the invention of 17th-century classical French cuisine, as is generally accepted; indeed, two printed German recipes remain employing this, which date back to late medieval times, 150 years before roux began revolutionizing cooking.

This paste roux-a combination of flour and butter cooked to varying degrees for different recipes-is the binder in four out of five of the leading mother sauces: brown sauce (espagnole), white sauce (veloute), milk-based béchamel, and traditional sauce tomat (the fifth is hollandaise).  These five mother sauces were formalized in a code by Auguste Escoffier in Le Guide Culinaire (1903); they act as the basis of most sauce creations, chocolate being an exception.

Our lemon recipe, a béchamel, is time-efficient, for I feel a need to respect the modern sense of rush, which makes many afraid of a brown sauce that in a careful kitchen can simmer for up to ten hours.  Enjoy this delightful dish prepared in less than 30 minutes!

References:

Esther B. Aresty, The Delectable Past (New York: Simon and Schuster, Inc., 1964) pp. 14, 15, 18, 20.

Reay Tannahill, Food in History (New York: Three Rivers Press, 1988, 1973), pp. 82, 83, 89, 90.

Bee Wilson, Consider the Fork (New York: Basic Books, 2012), p. 202.

Harold McGee, On Food and Cooking (New York: Scribner, 1984, 2004), pp. 616-618.

https://www.thekitchn.com/do-you-know-your-french-mother-sauces-211794

https://www.britannica.com/biography/Auguste-Escoffier

weighing pasta

Swift Pasta and Spinach, with Lemon Sauce  Yields: 2 servings (as a main course),  or 4 servings (as a side dish).  Total prep time: 25 minutes.  Note: may use gluten-free pasta.

2/3 cup  shallots, chopped small

1/3 cup or 1/3 medium onion, chopped small  (If desired, may use more onions and less shallots; a total of 1 cup, of both together, is needed.)

2 med/lg garlic cloves  (For easy prep, substitute 1 cube frozen garlic from Trader Joe’s.)

3 tbsp fresh lemon juice-2 small lemons  (May add optional zest of half a lemon.)

5-6 oz of pasta

5 tsp butter

2 tsp flour  (May substitute potato or rice flour for gluten-free version.)

2 tsp oil  (Coconut or avocado oil is important for health, as olive oil is carcinogenic when heated to high temperatures.)

1/2 cup heavy whipping cream  (Must be heavy cream, or it will curdle.)

Salt and white pepper, to taste  (Real Salt, Himalayan, or pink salt, is critical for optimum health; a fine grind Himalayan salt is available very cheaply at Costco.)

Fresh spinach

  1. hand-held wooden lemon squeezer

    Boil 2 1/2 quarts of water over med/high heat in a covered saucepan-add about a teaspoon each of salt and any kind of oil.

  2. Chop small the shallots and onions; measure and set aside.  Mince garlic, if using fresh.
  3. Roll lemons on counter, pressing down hard with hand to loosen juices in meat; squeeze and measure lemon juice; set aside.  (See above photo of hand-held juicer, ideal for easy juicing.)
  4. When water is boiling, turn heat down to medium, add pasta and cook for 7 minutes, or until al dente.  Drain in a colander when done.
  5. Meanwhile, melt 2 tsp of butter in a small saucepan over med/low heat; stir in flour with a wire whisk; cook briefly for about 1 minute-traditionally, roux for a béchamel shouldn’t change in color at all.
  6. finished lemon sauce

    Heat 1 tbsp butter and oil, in a medium-size sauté pan, over medium heat.  Add shallots and onion; cook until translucent, stirring frequently.  Mix in garlic; if garlic is fresh, cook for about 30 seconds more, just until aroma arises, or saute shallot/onions just until cube is dissolved, if using frozen.

  7. Add heavy cream, lemon juice, and roux to onions/shallots/garlic; stir constantly until sauce is thickened; see photo.
  8. Toss with prepared pasta, serve on a bed of spinach, enjoy!

Ahi Tuna, Peppered with Lemon Sauce

ahi tuna with lemon sauce

Ahi or yellowfin tuna is of the genus Thunnus and the species albacares; it is not to be confused with albacore or longfin tuna (Thunnus alalunga), even though the French use their word albacore for this yellowfin, while the Portuguese use albacora.  Note: the English albacore or longfin, of the species alalunga, is the basis for the United States tuna-canning industry.

Wikipedia sites the Hawaii Seafood Buyers Guide as stating that the enormous yellowfin tuna (with its Hawaiian name ahi) is popular in raw seafood dishes, especially sashimi, as well as being excellent for grilling, where it is often prepared seared rare.  Its buyers recognize two grades, “sashimi grade” and “other”, with variations of quality in “other”.

In sushi and sashimi, yellowfin or ahi is becoming a replacement for the near commercially extinct southern bluefin tuna (Thunnus maccoyii); presently the latter is probably the most valuable and prized fish worldwide.

On September 11, 2013, smithsonian.com referred to Japanese chefs as revering this bluefin like the Italians might a white truffle or the French oenophile might a bottle of 1945 Bordeaux.  It goes on to state that its high standing, along with that of the other tuna species such as the yellowfin and bigeye, has not always been recognized in Japan, for in the 19th century it was called neko-malagi, meaning “fish that even a cat would disdain”.  Indeed, this beef-red fish is smelly and strong-tasting.

The wide-spread acceptance, of this once essentially worthless seafood, is actually a product of a marketing scheme of the Japanese airline industry.  The story starts with the tuna sport fishing craze prevalent in the 1940’s, 50’s, and 60’s, along the Atlantic coast of the U.S. and Canada; these 400-plus-pound bluefins were being caught for fun, weighed, and photographed; then, they were either sent to landfills, sold for pet food, or thrown back into the ocean dead.

With the dawn of the 1970’s, Japanese cargo planes brought electronics to America; these same planes took advantage of the cheap New England tuna carcasses for their return flights.  Not wanting to go back empty, they ingeniously purchased these dirt-cheap bluefins, which in turn produced profits of thousands of dollars each in their homeland.

What made this country welcome this previously detested fish?  (The Smithsonian article qualifies bluefin as being not so good, with a tangy iron flavor and a texture that melts in your mouth, which amateurs love; this is opposed to the crunchier, more subtly flavored muscles tissues of animals like squid, clams, various jacks, flounder, and sea bream, which are highly favored by traditional sushi connoisseurs.)  The reasoning behind today’s widespread acceptance of bluefin can be traced back to the newly acquired taste for beef in Japan’s diet in the 70’s.  Concurrent with the electronic boom, this national appreciation for strong flavored beef brought about their subsequent open-mindedness to the dark, red flesh of tuna as well.

When I moved to Tokyo in 1980, I experienced this red meat wave; hence in 1982, after my return home, I was inspired to seek the approval of Montana governor Ted Schwiden, for my becoming an “ambassador” to this Oriental country; my proposal was to sell the then popular Montana beef, with my historical Montana dinner, entertaining our state’s clients overseas (see “About” for more on this).

This advancing beef rage in the Orient set the stage for the universal acceptance of bluefin, for it prepared Japan’s taste buds for the inundation of this tuna by their airlines; in turn, this rich, dark fish’s popularity then spread back across the ocean to America; and “by the 1990’s, the bluefin tuna was wanted almost desperately world-wide”, according to the Smithsonian.

Now it is facing commercial extinction, with yellowfin or ahi taking its place.  As the magazine states, traditional sushi sophisticates, however, do not always appreciate bluefin; some even consider it junk fish, as it was once known.  Yet the general public perhaps foolishly values this tuna, in a way which is extremely opposite to that of the mid 20th century, when it was sent to landfills along the Atlantic coast.

In America, we love to grill ahi tuna, the frequent substitute for bluefin, as well as serving it raw.  This outstanding receipt, which is prepared in minutes, affords a mouth-watering lemon sauce to compliment this firm fish.

References:

https://en.wikipedia.org/wiki/Yellowfin_tuna

https://www.floridamuseum.ufl.edu/fish/discover/species-profiles/thunnus-albacares/

https://www.smithsonianmag.com/arts-culture/from-cat-food-to-sushi-counter-the-strange-rise-of-the-bluefin-tuna-5980010/

medium/rare ahi

Ahi Tuna, Peppered with Lemon Sauce  Yields: 3 servings.  Total prep time: 30 min, or less.  Note: for an even quicker 10 min preparation, do step 5 only, omitting the lemon sauce, as well as all the ingredients, except the tuna, seasonings, and 2 tbsp oil.  On the other hand, you may double the sauce, allowing easy leftovers for next week’s Swift Pasta and Fresh Spinach with Lemon Sauce (1/8/18).

2 tsp butter

2 tsp flour

3 tbsp fresh lemon juice  (2 small lemons needed; may add optional zest of half a lemon.)

3 tbsp shallots, chopped small

2 medium garlic cloves, minced  (For easy prep, substitute 1 cube frozen garlic from Trader Joe’s.)

1-1.5 lb ahi tuna steaks  (Economical,  frozen, wild-caught ahi is often available in 1 lb bags at our local Grocery Outlet; may also use 3 fresh steaks, which tend to be 1.5” thick; these take longer to cook, weighing more.)

1 1/4 tsp salt  (Real Salt, Himalayan, or pink salt is so important for optimum health; a Himalayan salt is available very inexpensively, in bulk at our local Winco.)

1/4 tsp cayenne pepper

2 1/2 tsp freshly ground pepper

2 tbsp oil  (Coconut or avocado is best for health, as olive oil is carcinogenic, when heated to high temperatures.)

1/2 c heavy whipping cream  (Must be heavy cream, or it will curdle.)

  1. Heat serving plates in oven, turned on warm.
  2. cooked roux

    Next prep roux, by melting butter in a small sauce pan over medium heat; mix in flour; while stirring constantly with a wire whisk, cook until moisture is absorbed,  about 1 minute; for this sauce color of roux shouldn’t change much (see photo); set aside.

  3. Juice lemons by first rolling them on counter, pressing down hard with hand; this loosens the meat for easy juicing; set measured juice aside.
  4. Mince garlic; chop shallots in small pieces; place in separate dishes.
  5. Rub tuna with salt, cayenne, and freshly ground pepper, which have been mixed together in a small dish.
  6. Heat oil in heavy-bottom frying pan, over medium/high heat.  Gently place steaks in hot oil and cook to desired doneness; set on warm plates in oven.  (Tuna steaks will vary in thickness; sear tuna until golden brown, turning only once; 5 oz steaks will need about 1 minute per side for medium/rare; fresh tuna, which is about 1.5” thick, takes about 2 minutes on each side for rare, while 2.5 min and 3 min per side respectively for medium/rare and medium.  DO NOT OVER COOK, or it will be extremely dry.)
  7. After putting cooked tuna in warm oven, turn heat down to medium under pan and deglaze it with 2 tbsp water, wine, or chicken or fish stock.  Cook minced shallots in hot juices, just until they turn translucent, about 1 minute; stir in garlic.
  8. lemon sauce

    Finish sauce by adding heavy cream, lemon juice, and optional zest to shallots/garlic.  Blend in roux, stirring continuously with a wire whisk, until sauce is thickened (see photo).

  9. Pour sauce over fish and serve immediately.  (For a quicker version, may omit the sauce and just serve seared ahi, by following step 6 only.)
  10. Enjoy this splendor, which is the fastest gourmet meal I know!

Turkey with Shallots, Cauliflower, and Bell Pepper

turkey with shallots, cauliflower, and bell pepper

It’s that time of year again for turkey,  Learn about the history of this bird and access a great recipe using either leftover roasted fowl or its ground version, which comes in one pound packages at any food market; the latter makes this dish accessible year-round.

Background of Turkey

Turkey is in the genus Meleagris, which is native to the Americas; the Mexicans domesticated it by 800 BC.  It was either introduced to Southwest U.S., or tamed here independently, by 200 BC; these indigenous people used its feathers for ceremonies, as well as in making robes and blankets; they didn’t, however, consume it as a meat until around 1100 AD.

Cortes Brought Turkey to Spain

This bird arrived in Europe in 1523-24, when the Spanish conquistador Hernando Cortes brought certain foods back from Mexico; in Spain, it was known as gallopavo (peacock).  There is some confusion concerning the exact derivation of its subsequent name turkey; most likely this was taken from our American bird’s mistaken resemblance to the African guinea fowl, which the Europeans knew as turkey fowl, as these were imported from Turkey.

England Adopted Turkey

Many believe that English navigator William Strickland introduced this food to England; indeed a tribute was made to him in 1550, in that he was granted a family coat of arms, including a “turkey-crop in his pride proper”; this coat of arms, with its turkey crest, is still in use today.

Christmas “Goose Clubs” Established in England

Until recent times, this bird was considered an extravagance in Europe, where native grouse and pheasant were cheaper alternatives.  In the 19th century, the English working class aspired to partake of goose for their holiday celebrations; Christmas “goose clubs” were established in England in the 1800’s, so these impoverished people could insure the necessary savings for their festive meal.

“The Christmas Carol” Goose Replaced by Turkey Today

One of the first mentions in literature, of turkey becoming this celebratory roast, is Charles Dickens’ vivid portrayal in A Chistmas Carol: a resultant, decadent Christmas dinner occurred, when the reformed Ebenezer Scrooge replaced Bob Crachit’s meager goose with a massive turkey.  Nevertheless, only since World War II, as growing conditions for turkey became less expensive, has this developed into the holiday fowl of choice in England.

Turkey Would Have Been a Better National Bird

In U.S. history, Benjamin Franklin was disappointed when turkey was not selected for our national bird; he argued that it is a true original native, whereas the eagle can be found in all countries.

“Heritage” Birds

With our present heightened fascination in high cuisine, “heritage” birds are gaining in popularity.  These are traditional breeds, much like Strickland and Dickens encountered, which can trace their ancestry to the earliest domesticated animals.  They have a ratio of dark to white meat of about 50/50.

Broad Breasted Whites have been sold predominantly in grocery stores for decades; these were bred to have a ratio of 65% white meat to 35% dark, while weighing up to 50 pounds; the maximum weight of a wild turkey is 25 pounds, which is also the upper weight of the traditional heritage birds.  These latter come with such colorful names as Bourbon Red, Royal Palm, and Midget White; even with their gamy taste, people are willing to pay $9, or more, per pound to partake of this delicacy, while Broad Breasted Whites are often given away free, as promotional deals, at local supermarkets nowadays.

You may call me penurious, but I made this dish with all-natural Foster Farms ground turkey, which is close to $3 a pound; my recipe, however, is great for Thanksgiving leftovers, whether they be of a Broad Breasted White or a heritage breed.

References:

  1. James Trager, The Food Chronology (New York: Henry Holt and Company, Inc., 1995), pp. 86, 87, 180.
  2. http://www.history.com/news/hungry-history/turkey-talk-the-story-behind-your-thanksgiving-bird
  3. http://www.historyextra.com/article/premium/turkeys
  4. https://en.wikipedia.org/wiki/Turkey_(bird)

flavorful onions caramelized with vinegar

Turkey with Shallots, Cauliflower and Green Pepper  Yields: 5-6 servings.  Total prep time: 50-60 min.

5 tsp oil  (Coconut or avocado oil is best for health; olive oil is carcinogenic, when heated to high temperatures.)

1 med yellow onion, cut in even 1/8” slices

4 oz shallots, chopped in 1” pieces

1 tbsp butter

1 lb natural ground turkey  (May use leftover roasted turkey, broken in bite-size pieces.)

Salt to taste  (Real Salt is critical for good health; available in nutrition center at local supermarket.)

Fresh ground pepper to taste

2 lb cauliflower  (Yellow or orange cauliflower is sometimes available, in the organic section, at our local Fred Meyer-Kroger-stores.)

1 lg bell pepper  (In particular, it is important that peppers be organic, as they readily absorb pesticides.)

3-4 tbsp flavored vinegar  (I used elderberry vinegar, which I purchased in Montana.)

  1. For caramelizing, peel and cut onion in even 1/8” slices.  Heat 1 tsp oil in a large sauté pan over medium heat; when a small piece sizzles in oil, reduce heat to medium/low; add rest of onions and slowly cook, stirring every 2 minutes, until color begins to form.  (It is important to not crowd pan, or add too much oil, as

    cutting shallots in 1″ pieces

    this will slow down the cooking process.)  When a light golden color is beginning to form, start stirring every minute, until dark brown.  Deglaze pan of onions-scrape fond, browned, cooked-on-juices, off bottom of pan with a spatula-by adding 1-2 tbsp of the vinegar (see above photo of caramelized onions with vinegar).  Go to the next steps, while onions are cooking.

  2. Spray cauliflower and pepper with an inexpensive, effective produce spray (combine 97% distilled white vinegar with 3% hydrogen peroxide in a spray bottle); let sit for 3 minutes; rinse well.
  3. Peel shallots, cut large ones in 1” pieces, and set aside (see photo above).
  4. In another frying pan, melt butter; add shallots; and cook over medium heat, until they are translucent.  Add raw turkey, salt and pepper generously, cook until pink is gone-see photo below.  (If your turkey was previously frozen, there will be lots of juices, but if cooking fresh-ground, you may need to deglaze hot pan with 1-2 tbsp of vinegar; if using roasted turkey pieces, just stir these into shallots-do not cook.)  Set turkey/shallots aside in a large bowl.
  5. cooked turkey and shallots

    Cut peppers into 1” x 3” strips, set aside.

  6. For ease in dividing the cauliflower into bite-size florettes, first break chunks of cauliflower off the head; next, cut off all excess stalk from these bigger sections; then, make small knife-cuts in the stems of these pieces, gently pulling apart small florettes with fingers; set aside separately in a bowl.
  7. Heat 1 tsp of oil over medium heat in the above, empty meat pan; when a  piece sizzles in hot oil, add the remaining peppers; cook until somewhat soft, but still crisp.  Deglaze hot pan, with a tbsp of vinegar-may have to deglaze with water instead, for only a total of 3-4 tbsp of vinegar should be used for all deglazing, in entire recipe; vinegar adds delightful flavor, but too much is overpowering.  Put peppers in with bowl of meat.
  8. When onions are done, mix together thoroughly with meat/shallots/peppers.  Heat last tbsp of oil in this pan, over medium heat; after a small piece sizzles in hot oil, add rest of cauliflower; salt and pepper florettes, distributing oil evenly among them.  Add 1/4 c water, cover pan, and cook until soft, stirring occasionally.
  9. finished product

    Blend turkey and vegetables into soft cauliflower, adjust seasonings, and heat thoroughly (see photo).  Serve with anticipation!

Spicy Sausage with Tomatoes and Turnips

spicy sausage with tomatoes and turnips

Nothing pleases the palate as much as tomatoes fresh from the garden; read below details concerning how they traveled from America to Europe to the whole world; then, experience this great tomato recipe.

How I love this time of year, as it explodes with their bounty.  Nevertheless, at times the question is what to do with them all.  When faced with this dilemma recently, I mixed this fruit with turnips and my favorite Aidells Spicy Mango with Jalapeno Chicken Sausages, both of which I had on hand; thus, this relatively quick and easy recipe evolved.  Enjoy.  (For another delicious Aidells sausage recipe, see Sausage with Zucchini and Eggplant .)

Where Tomatoes Originated

We think Italian cuisine, when tomatoes are mentioned, as we readily do with references to sweet and hot peppers, eggplant, potatoes, turkeys, and corn (in particular polenta).  None of these foods, however, were present as part of this country’s heritage, until after the discovery of America.  1

The tomato, Lycopersicon esculentum, along with its relatives the potato, chilli, and tobacco, are part of the nighingshade family; tomatoes were domesticated first in Mexico, long before Christopher Columbus’ arrival here.  2

Cortez Brought Tomatoes Back To Spain

In 1519, twenty-seven years after Columbus’ first voyage, this fruit was officially discovered in Mayan towns by Spanish adventurer Hernando Cortez.  In 1527, conquistadors brought it back to Spain, along with the avocado and papaya.  3

Tomatoes Spread Throughout Europe

Nearly three decades hence, in 1554, an Italian chronicle listed the first identifiable description of this yellow cherry tomato as pomo d’oro (golden apple).  By the end of the 16th century, both red and yellow tomatoes were present in European gardens, but only as exotic ornamental plants.  There was a long period in which great suspicion was attached to them throughout this continent, due to their close resemblance to a deadly nightingshade.  Circumstances of the French Revolution, at the end of the 18th century, however, established them as an acceptable food.  4

Italy Leads The Way In Eating Tomatoes

Outside of Mexico, Italy was first to heartily incorporate this fruit in its food preparation; inadvertently it became a leader in this adaptation.  The story unfolds with the French region Provence, whose cuisine was closely related to its Italian neighbor; these men from Provence formed the Marseillaise legion during the French Revolution.  Being richly exposed to Italian cooking, these soldiers had adopted the Italian “love apple”, as it was called, for it was considered an aphrodisiac.  In turn, this Marseillaise legion introduced this treasure to the Parisian troops, who took it back to their great city; thus, skepticism concerning tomatoes ceased in Paris.  Acceptance followed throughout Europe and subsequently the whole world.  5

The week after next, I will post a Spanish recipe Ropa Vieja, from a 19th century American cook book, with more information on the history of tomatoes.  This is an omelette using our prized fruit and leftover meat; it doesn’t get any simpler, but oh so taste-provoking!

References:

  1. Ilaria Gozzini Giacosa, A Taste of Ancient Rome (Chicago and London: The University of Chicago Press, 1994), p. 11.
  2. Harold McGee, On Food and Cooking (New York: Scribner, 1984, 2004), p.329.
  3. James Trager, The Food Chronology (New York: Henry Holt and Company, 1995), pp. 86, 88, 96, 97.
  4. Ibid.
  5. Esther B. Aresty, The Delectable Past (New York: Simon and Schuster, 1964), pp. 129-130.

Spicy Sausage with Tomatoes and Turnips  Yields 4-6 servings.  Total prep time: 1 hr.  Note: leftovers taste even better, as flavors meld.

5 1/2 tsp oil  (Coconut or avocado oil is best; olive oil is carcinogenic when heated to high temperatures.)

1 medium yellow onion, cut in even 1/8″ slices

12 oz Aidells Spicy Mango with Jalapeno Chicken Sausages  (May use any hot sausage of your choice, though this particular Aidells sausage is ideal; available at many supermarkets, including our local Winco and Fred Meyer-Kroger-stores.)

preparing turnips

1 lb turnips, cut in small 1/2″ dice

1 1/4 lb fresh tomatoes, chopped

3/4 tsp dried oregano  (Trader Joe’s has an excellent organic dried oregano for $1.99!)

1 tsp dried basil  (Also available reasonably at Trader’s.)

1 tsp salt  (Himalayan, pink, or Real Salt is critical for optimum health; a fine grind Himalayan salt is available at Costco for $4.95 for 5 lbs.)

1 tsp fresh ground pepper

cooking turnips

Avocado slices  (These are high in potassium and other powerful nutrients.)

  1. Spay vegetables with an effective, inexpensive spray (combine 97% distilled white vinegar and 3% hydrogen peroxide); let rest for 3 minutes; rinse really well.
  2. To caramelize onions, melt 1/2 tsp oil in a sauté pan over medium heat; when a piece of onion sizzles in pan, lower heat to med/low; add rest of onions (do not crowd or they will sweat, taking much longer to caramelize). Stir every several minutes, until they began to change color; then, stir every minute, until dark brown; set aside.  Watch carefully while proceeding to next steps.
  3. In another frying pan, heat 2 tsp oil over medium heat; when small piece of sausage sizzles in pan, add the rest; cook quickly until browned, watching closely so as not to burn; place in a bowl, carefully saving juices in pan.
  4. Deglaze hot pan with 2 or more tablespoons of water (scrape fond, cooked-on juices, off bottom); set pan aside.
  5. Peel turnips, dice in small 1/2″ cubes, place in a large bowl, see photo in list of ingredients.
  6. Over medium heat, heat 1 tbsp more of oil in the above pan with juices. When a piece of turnip sizzles, stir in the rest, coating well with oils.  Cook covered until soft, about 10 minutes; stir every few minutes, deglazing pan each time you stir, by adding 2-4 tbsp of water; this additional water will steam the turnips; see above photo.  (Be sure to cover while cooking.)
  7. cooking tomatoes

    Meanwhile chop tomatoes; set aside in a bowl.

  8. Mix tomatoes into soft turnips; sauté uncovered, over medium heat, until they are cooked down-about 15 minutes-at which time a chunky sauce will be formed (see photo). When tomatoes initially begin cooking, stir in oregano, basil, salt, and pepper.  Be sure to cook this uncovered.
  9. Mix in sausage and onions after a somewhat-thick sauce has formed, having chunks of tomato in it; adjust seasonings (see photo).
  10. finished product

    Serve topped with avocado slices, for added health benefits.

Kale, Leeks, and Chicken

kale, leeks, and chicken

A friend from my church has a very large garden; sharing its bounty is her joy.  Last summer’s series on simplified kale receipts was inspired by her gracious contributions (for recipes, see Cooking with Kale    and  Cooking with Kale Made Extra Easy).

My mind creates recipes according to what is in my larder, which usually boasts of provision supplied by church members.  Lately Goldie has been bringing her organic kale again, as well as leeks and celery; this mouth-watering chicken dish resulted.

For a wedding present last year, I gave a marriage supper, complete with a cooking class, to newlyweds in our congregation (see Thai Coconut Lime Flounder,)  My desire was to release the gift of excellent nutrition in them.  Several weeks ago, we celebrated their holy matrimony again, with a new set of instructions and dinner following, rejoicing over God’s goodness in our lives.

The first time I coached Dina, she exhibited such courage in overcoming her unfamiliarity with food preparation.  Hope, however, grew this recent session, for she has grown exponentially in her eager steadfastness in the kitchen.

This teaching includes my chicken dish, using my recent acquisition of kale, shallots, and leeks.  These steps are straightforward, though they are time-consuming, with the preparation of leeks and kale, but oh the benefits of health and taste!

Leeks are one of the world’s oldest vegetables, which are more delicate in flavor than either onions or shallots; they are considered highly nutritious, with cancer fighting attributes, as well as antiseptic, laxative, and diuretic properties, among many other health-promoting values.  This vegetable is particularly strong in vitamins K and A (when eaten raw, one 3.5-ounce serving contains 52 % daily requirement of vitamin K and more than 29% that of vitamin A).  Though research on this particular Allium is hitherto limited, it can well be assumed that its health benefits are comparable to those proven in its closely related onion and garlic cousins.  Its notable amount of flavonol kaempferol, in its substantial polyphenol content, thereby combats many health problems related to oxidative stress and chronic low-level inflammation; among these are rheumatoid arthritis, obesity, and type 2 diabetes; thus, this recipe is beneficial to Dina, whose husband is presently overcoming diabetes.  For an additional recipe and more on its history, go to Zucchini Chicken with Leeks and Shallots .

Enjoy making today’s clear, detailed chicken recipe for leeks, shallots, and kale; my next entry will expound on the colorful history of leeks, with a delectable soup.

References:

www.foodfacts.mercola.com/leeks.html

www.whfoods.com/genpage.php?tname=foodspice&dbid=26

www.historic-uk.com/HistoryofWales/TheLeek-National-emblem-of-the-Welsh/

finished product

Kale, Leeks, and Chicken  Yields: 5-6 servings.  Total prep time: 1 1/2 hr (lengthy, but well worth it with these simple, detailed directions).

1 1/2 lbs chicken tenderloins, about 8-10 lg pieces  (Natural is best; available reasonably in Trader Joe’s freezer.)

2 lg carrots, optional

3 lg stalks of celery

1-1 1/2 lbs of kale

chopping leeks

4 leeks, white and light green part, 3/4 lb trimmed  (The best leeks are fresh-not more than a week old-and 1 1/2 “in diameter.)

5 lg cloves of garlic, minced  (3 cubes of frozen garlic from Trader Joe’s is much easier.)

4 tbsp butter

8 tsp oil  (Coconut or avocado oil is best, as olive oil is carcinogenic, when heated to high temperatures.)

1-2 tbsp fresh thyme, removed from stems, and coarsely chopped

Salt  (Himalayan, pink, or Real Salt is critical for optimum health; a fine grind Himalayan salt is available at Costco for $4.99 for 5 lbs.)

Fresh ground pepper

  1. Place chicken in a large bowl of warm water to thaw, set aside.
  2. Spray all vegetables with an inexpensive effective spray, by combining 97% white distilled vinegar and 3% hydrogen peroxide; let sit 3 minutes.  While waiting, if using fresh garlic, mince it now.  Rinse sprayed vegetables in a sink full of water three times.
  3. Cut celery diagonally in 1″ pieces.  Scrape optional carrots with a sharp knife (this preserves vitamins just under the skin); slice thinly at a diagonal.  Set both aside together in a bowl.
  4. Prepare leeks by first discarding outer leaves; cut off the dark green at the top and root hairs on bottom, leaving the white and light green part.  Cut each leek in half lengthwise; rinse well; then, cut each half in 2″ pieces, by placing leek cut-side up on board.  Finally, slice these 2″ lengths, cut-side up on board,

    cutting ribs out of kale

    into thin strips (see photo above).  Place pieces in a large container.  For final cleaning, rinse strips well with water, stirring with hand; then, drain in a colander.  This is known as the chiffonade-cut.

  5. Melt butter over medium heat in a sauté pan; as soon as a small piece sizzles in pan, add half the leeks, coating strips well with the hot butter. Reduce heat to low; cook down in pan, to make room for the rest of leeks, distributing oils well with each addition.  When all leeks are in pan, add garlic and slowly cook, covered, over low heat, stirring occasionally.
  6. straight-edge blade of food processor for chopping

    Cut ribs out of kale with a sharp knife (see above photo). May chop by hand, or quickly chop greens mechanically, by using the straight-edge blade of a food processor (see photo).  Turn processor on and place kale pieces in feeder tube (see photo below); set aside.

  7. Place thawed chicken on paper towel, salt and pepper GENEROUSLY.  Heat 1 tbsp of oil in a large frying pan over medium heat; when a small piece of chicken sizzles in oil, add the rest of the tenderloins; cook until light pink inside (do not overcook, as these will cook more later); cut tenderloins in bite-size pieces, removing them to a large bowl.  CAREFULLY SAVE JUICES IN PAN.
  8. Add 1 tbsp of oil to these juices; mix in half the kale, distributing oils evenly.  Over medium heat, cook this vegetable down until there is room to add more; mix in oils with each addition, until all is in the pan; cook covered, until limp, about 10 minutes, stirring occasionally.  As needed, deglaze pan (scrape fond, cooked-on juices, off bottom with a spatula, after adding 2 or more tbsp of water).  Remove to bowl of meat when done.
  9. placing kale in feeder tube of processor

    Meanwhile gently peel thyme off stems, chop coarsely with a sharp knife, set aside.

  10. Put last 2 tsp of oil in hot pan after kale is removed; add carrots and celery; mix well; cook until tender, stirring every couple of minutes.  Meantime go to next step.
  11. Blend 1-2 tbsp chopped thyme, 1/2 tsp salt, and 1/2 tsp pepper into leeks; stir in chicken/kale; continue cooking over low heat, until all is hot.  Add this mixture to pan of celery, when tender.  Adjust seasonings.  One final time, scrape bottom to deglaze pan, using the juices from the added leek mixture.  Serve with confidence!

Natural Sausage with Zucchini and Eggplant

natural sausage with zucchini and eggplant

At this time of year, we are wondering what to do with all the zucchini.  Using natural sausage and Chinese eggplant, I transformed this ordinary vegetable, which is actually a fruit, into a memorable dish.

Garlic and Aidells’ Spicy Mango with Jalapeno Chicken Sausages give this common garden plant a dramatic bite, with a sweet aftertaste.  Eggplant is a perfect accompaniment to zucchini, and caramelized onions compliment all.  This is a simple, mouth-watering treat indeed.

My pastors are bringing their prolific zucchini to our services now, and I am thrilled. Our church body experiences this benefit every growing season.

Throughout the year, we experience the results of what this couple’s hands accomplish in the realm of the Spirit, but during harvest time we reap what these same faithful hands produce in natural soil.  Their charitable action is steadfast, and it can be concretely seen in the vegetables and fruits, with which they fed our physical bodies.

This particular squash reproduces rapidly; it can quickly grow beyond what is satisfactory.  When it gets over-sized: it contains too much water, its seeds are large and tough, there aren’t enough recipes to utilize this inundation.  (Learn more about its biology and history at Zucchini Bread, 2017/07/31.)

Our pastors watch this fruit/vegetable prudently; thus, readily picking it before it grows beyond its prime-whenever possible.  Our church is like a prototype of their healthy garden.  Pastors Monte and Dawn care for us like prized plants: watering with the word, observing diligently, pruning with exceptional wisdom and love.  We are indeed well-tended.

I can’t express gratitude enough that our Lord saw fit to place me under their protection; it is here that I became equipped to fulfill my purpose as a food historian.  I invite you to access this bread of life at our church website alfc.net

Meanwhile eat heartily, by cooking this delicious recipe.

Aidells’ Spicy Mango with Jalapeno Chicken Sausages

Natural Sausage with Zucchini and Eggplant  Yields: 4-5 servings.  Total active prep time: 45 min.

2 1/3 tbsp oil  (Coconut or avocado oil is best; olive oil is carcinogenic when heated to high temperatures.)

1 med yellow onion, cut evenly in 1/8″ slices

12 oz natural sausage, cut diagonally  (Aidells’ Spicy Mango with Jalapeno Chicken Sausages are the best here; available at most local supermarkets.)

1 lb Chinese eggplant, cut in 1/2″ cubes  (See photo below.)

4 lg cloves of garlic, minced  (For convenience, use 2 frozen cubes of garlic from Trader Joe’s.)

1 tsp salt, or to taste  (Himalayan, pink, or Real Salt is critical for optimum health; a fine grind Himalayan salt is available at Costco for $4.95 for 5 lbs.)

3/4 tsp freshly ground pepper, or to taste

chopping eggplant

2 carrots, thinly sliced at a diagonal

1 1/2 lbs of zucchini, cut in 1/2″ cubes

  1. Clean vegetables, using an inexpensive, effective spray of 93% distilled white vinegar and 3% hydrogen peroxide; let sit 3 minutes and rinse well.  Meanwhile go to next step.
  2. In a sauté pan, heat 1/2 tsp of oil.  When a small piece of onion sizzles, add all onions and caramelize over med/low heat, stirring every 2 minutes until color starts to form; then, stir every minute, until dark brown.  When finished, deglaze pan with 2 tbsp or more of water (scrape the fond, or cooked-on juices, off the bottom of pan with a spatula); then, add to the bowl of meat described below.  Watch onions carefully, while performing the next steps.
  3. Cut vegetables and meat, as described in the above list of ingredients; set all aside in separate bowls.  Mince garlic, if using fresh.
  4. finished product

    Heat 2 tsp of oil in another frying pan over medium heat.  When a piece of sausage sizzles in pan, add the other sausage slices and brown quickly, watching carefully, so as not to burn.  Place in a large bowl, carefully saving juices in the pan.

  5. When meat is removed, heat 2 tsp more of oil, with the left-over juices. Add eggplant, mix oil in well, and deglaze pan (scrape off fond left over by meat with 2 tbsp or more of water added to hot pan).  Cook covered until soft, stirring every couple of minutes; deglaze pan again; transfer eggplant to the bowl of meat.
  6. Heat 2 tsp of oil in same pan, add carrots, and cook for 3 minutes, or just until tender, stirring occasionally.  Mix zucchini into carrots; cook covered until limp, stirring several times.
  7. When vegetable is done, blend in garlic, salt and pepper; cook until you can smell the garlic.  (If using frozen garlic, make sure it is melted and distributed well.)  Mix in meat, onions, and eggplant; adjust seasonings; heat thoroughly.  Serve with delight.

Spicy Cold Noodles made w/ Ezekeil 4:9 Sprouted Grain Pasta

spicy cold noodles

This is one of my all-time favorite recipes, which I have been making every summer for 35 years.  It first blessed me, when I taught it to my students in Billings, Montana, during one of my plentiful cooking classes in the 1980’s.

I don’t exactly remember where I got it, but believe it came in a newspaper clipping sent by my mother, for she was good at supplying me with quaint receipts from the media, during my early catering/teaching career.  Many choice dishes were thus provided, which still grace my table today.  This specific one highly pleases the palate, though it deviates slightly from its authentic roots.

Korean vs Chinese Spicy Cold Noodles

There are both Korean and Chinese spicy cold noodles; both nationalities use sesame and chili oils, soy sauce, vinegar, garlic, and sugar in their mixes.  The Korean variation includes gochujang, a spicy pepper paste.  The Chinese sauce differs in that it calls for sesame paste and peanut butter, giving it an emulsified effect; it is tart, fiery, and slightly sweet.

My particular 1980’s account is from China, though it is Americanized with red wine vinegar instead of rice vinegar, which wasn’t readily available in Montana during the 1980’s.  This version doesn’t have the ever-present peanut butter and chili oil, but is still spicy hot with an abundance of garlic.  It is a memorable burst of flavors.

Spicy Cold Noodles from Szechuan

China is a vast land of varying cuisines.  Just before I left Billings, one of my students, a travel agent, was engaging me to teach these regional culinary truths, while accompanying her on a tour of a number of China’s leading provinces.  My sudden move to Portland, Oregon, in February of 1986, interrupted those plans to go abroad; nevertheless that early research still rests with me.  One of the provinces, which I was studying, was Szechuan-the home of this post’s recipe.

Various Types of Noodles throughout China

Noodles are common throughout this vast country; among the many variations are Chongquing hot noodles, Wuhan hot and dry noodles, Henan stewed noodles, and Beijing style Zhajiang noodles.  The latter dish reaches far beyond the Hebei Province; it is made with pork gravy, which varies greatly from southern to northern China.

The cuisine of Szechuan, also known as Chuan or Sichuan, not only produces these spicy cold noodles, but is famous for dandanmian-dandan-noodles as well; they too have a spicy sauce, and also contain preserved vegetables.  Both these dishes are street foods in Sichuan; they are served everywhere, even in small food stands on the street.

Low Glycemic Ezekiel 4:9 Sprouted Grain Pasta

I used poetic license, in that I chose pasta that is a complete protein and a natural, low glycemic food; thus, these delicious noodles are diabetic friendly.  This brand “Ezekiel 4:9 Sprouted Grain Pasta” contains the six grains and legumes, which are mentioned in this Old Testament scripture.  As published on their box, these half-dozen organic foods are germinated in pure filtered water; therefore, beneficial enzymes are activated, causing sprouting and releasing powerful nutrients, which otherwise would lay dormant.  Diabetics who can’t tolerate carbohydrates have reported good luck with this pasta, which makes this rich repast possible for them (be sure to consult with your doctor).

Join me on a trip to China with this select, health-promoting receipt!

ingredients for spicy cold noodles

Spicy Cold Noodles  Yields: 4-5 servings.  Total prep time: 30 minutes, plus several hours for chilling.  Note: may omit the chicken for a vegan recipe.

1 1b chicken, or 5 tenderloins, thawed  (All natural is best; available reasonably at Trader Joe’s.)

10 oz dry pasta  (Ezekiel 4:9 Sprouted Grain Fettuccine is a complete protein pasta, which is low glycemic, diabetic friendly, and high in fiber; may choose to use a spaghetti pasta.)

1 1/3 tbsp sesame oil

2 tbsp garlic, chopped

1/4 c sesame paste, or tahini  (Trader Joe’s makes a good organic one.)

3 tbsp hot brewed tea

3 tbsp soy sauce  (Organic tamari is best for your body.)

3 tbsp red wine vinegar  (May also use rice vinegar.)

2 tsp sugar

Salt to taste  (Himalayan, pink, or Real Salt is critical for optimum health; an inexpensive fine grind Himalayan salt is available at Costco.)

  1. Thaw chicken in a bowl of warm water.  Fill a stock pot with 4 quarts of water; bring to a boil over med/high heat.
  2. Meanwhile peel garlic cloves; cut cloves in halves or thirds; measure 2 tablespoons worth of pieces.  (This amount gives a lot of

    emulsifying tahini and tea

    bite, may use more or less to taste.)  Place garlic in a food processor and press the pulse button repeatedly, to form a med/coarse grind; stop and scrape down sides once; set aside.  (May also chop with a sharp knife, if you don’t have a processor.)

  3. Place tenderloins in boiling water; turn down heat to medium; do not add salt.  Cook for about 4 minutes, or just until pink is gone; do not overcook.  Remove from water when done and place on a plate in refrigerator.  SAVE BROTH.
  4. Brew tea.  Place sesame butter in a large bowl, add hot tea, stir until emulsified, or smooth and creamy (see photo).  Blend in garlic, soy sauce, vinegar, and sugar; set aside.  (If chicken is finished cooking while you are preparing sauce, proceed to step 5, and then come back to sauce.)
  5. Bring broth-to which you have added 1 tsp of sesame oil-to a rapid boil over med/high heat in the stock pot.  Add pasta and turn down heat to medium (do not add salt, as this toughens the noodles).  Stirring occasionally, cook for approximately 6-7 minutes, or until al dente-slightly chewy.  Drain pasta and immediately submerge in cold water to stop cooking process, set aside.
  6. Cut chicken in bite-size pieces, add to sauce, and season with salt.  Toss together with pasta.
  7. Serve chilled.  Yum!


1960’s Portuguese Pork

Portuguese pork roast

My gift of hospitality was birthed during my youth in the mid-twentieth century, for then I watched my mother host elaborate dinner parties.  As an excellent cook, she prepared glorious feasts, often with international themes; this 1960’s recipe for Portuguese pork blessed guests repeatedly.  While in college, I meticulously copied her treasured receipts and began my own journey, fostering nourishment of body and soul.

In 1982, God converted this inherent gift into my lifetime work.  Then I began catering meals and teaching a profusion of cooking classes, utilizing researched historical recipes.  One of these classes was on my mother’s Portuguese foods, on which I expanded, incorporating the salad Ensalada Iberica and dessert Figos Recheados, my next weeks’ posts.

Slowing down, smelling the roses, feeding ourselves and others are important traits. In doing such, let us choose pleasure in even the simplest of foods.  These pleasures seem amplified. when someone else prepares the meal; thus, their charity reaches our hearts regardless of what is served.  Macaroni and cheese can thrill us, when made with love by a friend.

There is an element of courage, which results in unexpected joy, when we graciously receive ailments we aren’t sure of.  While living in Billings, Montana, a friend invited me to celebrate Easter with her.  Upon arrival I discovered we were partaking of rabbit; I was challenged in eating this, especially on this holiday!  Expressing gratitude, I bravely proceeded and found it palatable, as long as I didn’t concentrate on it being Easter.  Though I have never again experienced this meat, fond memories flood my mind whenever it is mentioned.

Let us be strong in both giving and receiving benevolent fellowship; use my series of proven receipts to host this cultural affair for your loved ones, or better yet invite someone newly acquainted.

In Culinary Artistry, Andrew Dornenburg and Karen Page note strong compliments to pork; among the most vibrant are vinegar, garlic, black pepper, oranges and onions-all of which are present in this detailed dinner.   Enjoy my creative repast!  1

  1. Andrew Dornenburg and Karen Page, Culinary Artistry (Hoboken, NJ: John Wiley & Sons, Inc., 1996), p. 159.

chopping jalapeno peppers

Portuguese Pork  Yields: 8-10 servings.  Inactive prep time for marinating: 1 day/  active prep time: 30 min/  cooking time: 3 1/2 hr.

4 lb pork loin roast

1 1/3 c water

1 c cider vinegar  (Trader Joe’s carries an inexpensive raw version, which has great health benefits.)

5 med/lg cloves of garlic, minced

3 tepino peppers  (If desired, use jalapeno peppers, which are milder.)

Salt and pepper  (Himalayan, pink, or Real Salt is critical for optimum health; a fine grind is available at Costco for $4.95/5 lb.)

1 c sliced green olives  (May serve additional in a bowl at table.)

Baked yams  (Yams and sweet potatoes are different varieties of the same vegetable, they are interchangeable.)

  1. Place water and vinegar in a 9 1/2″ x 7 1/2″ x 3″ pan, or 3-quart baking dish).
  2. Mince garlic, add to vinegar mixture.
  3. Cut peppers in half lengthwise, scoop out seeds with a spoon, chop fine, and add to vinegar mixture (see photo).  Note: be sure to wash hands thoroughly, as burning will result from touching eyes, if you don’t.
  4. Place pork in marinade and marinate in refrigerator for at least 24 hours, turning roast halfway through, at about 12 hours.
  5. Preheat oven to 300 degrees.  Before placing in oven, turn roast again, salting and peppering the top well.  Bake for 1 3/4 hours.  Proceed immediately to next step.
  6. Wash yams and pierce several times with a fork.  Cover with foil; place top of foil on potato, where sealed, face-up in the oven while baking; this keeps juices from leaking out.  Start baking these at the same time you begin roasting the meat; bake for about 3 hours, as the oven is only set at 300 degrees.
  7. After baking for first 1 3/4 hours, turn roast for the last time.   Once more, salt and pepper the top well.  Bake for another 1 3/4 hours.
  8. When cooking is complete, remove roast from oven, cool for 15 minutes.  Toward the end of this time, take yams out of oven and place on plates; next, cut pork in thick slices and arrange on dishes; top with sliced olives.  (It is good to serve additional olives in a small bowl at table.)
  9. This pork is superb with the Portuguese salad Ensalada Iberica and dessert Figos Recheados, my next weeks’ posts.

1880’s Escalloped Salmon

ingredients for escalloped salmon

Maria Parloa blessed us with a recipe for escalloped fish in Miss Parloa’s New Cook Book, which Washburn-Crosby Co. published in 1880.  This company’s successor General Mills brought her proven receipts back to America, by republishing them in their Special Silver Dollar City Edition of this book, at an unknown date during the twentieth century.

Both these companies are known for their production of Gold Medal flour, which they successively produced; thus, this product has been on the market for nearly two and a half centuries.  (For more details on Miss Parloa, Washburn-Crosby Co., General Mills, and 19th century American cooking, see 1880’s Clam Chowder-2017/01/30, 1880’s Minced Cabbage-2017/04/24, and 1880’s Ozark Honey-Oatmeal Cookies-2017/10/30.)

This 19th century cook book was one of many written by Maria Parloa, who was an important figure in the gastronomical world of her day.  She taught an abundance of classes at her own two schools, as well as the Boston Cooking School, the home of Fannie Farmer’s Boston Cooking School Cook Book, which was forerunner to the renowned Fanny Farmer Cook Book.

In Miss Parloa’s New Cook Book, Parloa shared modern techniques and included 93 “essential” utensils for the kitchen, which boasted of such items as an apple corer, melon mold, and squash strainer.  Her writings catered to the affluent, for she recommended that a dinner for twelve need cost no more than $25, this at a time when an unskilled worker made about $1 per day.

In this book’s preface, the author’s desire for clear, complete, and concise directions is set forth, but these are vague compared to our present standards.  Her instructions, however, have far greater detail than those in many of the contemporary cook books of her day.

This recipe called for five pounds of fish, that which was normally required to sustain a family of six at the main, mid-day meal; by contrast, this same amount provided for twelve guests at a dinner party, as these hospitable affairs were always profuse in delectable dishes.  My directive only calls for one pound of salmon for four people in this creamy recipe, because this is a rich food for our relatively sedentary bodies; in these former days people were highly active, requiring many more calories than we do today.

As with this outmoded receipt, things call for adaptation; we must learn to adjust to the essential needs of any given time.  Our living God perpetually covers us in all instances of unforeseen change, bringing healthy modification, if we ask believing.  At times this process is slow; thus, patience is critical for success.

This is a joyful race we are running; nothing is too difficult for us!  We simply align our hearts to the “recipe” our Father is dictating at each turn, purposing to not be alarmed when our five pounds of fish becomes one pound, or with equal intention, staying calm when it reverses back to five pounds.

Recently I enjoyed escalloped salmon with friends that I hadn’t seen for a long time; our reunion was marked with excellence in both fellowship and food.  This dish is a winner for special occasions, especially when served with next week’s entry, teaching Miss Parloa’s minced cabbage.

References:

Special Silver Dollar City Edition of Maria Parloa’s Miss Parloa’s New Cook Book (Boston: Estes and Lauriat, 1880); this was published by General Mills at an unknown date during the 20th century.

James Trager, The Food Chronology (New York: Henry Holt and Company, 1995), p. 310.

https://en.wikipedia.org/wiki/Maria_Parloa

https://www.lib.umich.edu/blogs/beyond-reading-room/happy-172nd-birthday-miss-parloa

Click to access c2500.pdf


baked escalloped salmon

1880’s Escalloped Salmon  Yields: 4 servings.  Total prep time: 1 hr & 15 min/  active prep time: 45 min/  baking time: 30 min.  This is adapted from a recipe in General Mills’, 20th century Silver Dollar City Edition of Maria Parloa’s Miss Parloa’s New Cook Book (Boston: Estes and Lauriat, 1880).

Note: this may be prepared ahead of time following steps 1-8; when doing so, reheat this refrigerated dish for a total of 1 hr before serving.  The original recipe calls for white fish; I, however, find this exceedingly bland in flavor, where salmon is perfect.

1/4 c bread crumbs  (May purchase ready-made, or grind 2 slices of stale bread in a dry food processor.  Make extra, as these freeze well; for stale bread, leave pieces out for about 8 hours.)

1-1 1/2 lb salmon fillet  (A minimum of 1 lb is needed if fillet is boneless and skinless, more if there are bones and skin.)

1 tsp salt, or to taste  (Himalayan, pink, or Real Salt is best for optimum health; a fine grind Himalayan salt is available at Costco for $4.95/1b.)

1 c whipping cream  (Heavy whipping cream is best health wise.)

1/8 c water

1 tbsp flour

1/8 tsp white pepper, or to taste

Steamed rice, cooked according to directions on package

  1. Preheat oven to 325 degrees.
  2. If salmon fillet is large, cut in pieces that will fit in a 3-quart saucepan.  Place in pan and cover with salted water (add 1/2 tsp salt); bring to a boil over medium heat.  Cook until center of thickest part of salmon is opaque, when pierced with a fork.  Saving broth, remove fish from liquid and cool.  Reduce broth to about 1/4 c over high heat.
  3. If preparing your own bread crumbs, grind 2 pieces or more of stale bread in dry food processor, pressing pulse button repeatedly until crumbs are fine.  Set aside 1/4 c-freeze extras.
  4. Heat cream over medium heat in a small saucepan, only until a soft boil is formed, stirring frequently; watch carefully.  As soon as it comes to a bare boil, reduce heat to med/low.
  5. While heating cream, dissolve flour in water.  With a wire whisk, stir flour mixture into softly boiling cream, to which you have added 2 tbsp of reduced broth; cook until sauce is thick, beating frequently.  Season with 1/2 tsp salt and white pepper.  Taste and adjust seasonings; set aside.
  6. Start rice, following directions on package (wait if you are preparing salmon ahead).
  7. Butter a small, 1-quart baking dish; place a light layer of sauce in bottom of dish.
  8. Skin and carefully debone fish, placing bite-size pieces in baking dish on top of layer of cream, as you debone it.  When all the salmon is thus prepared, press down on fish to make compact; cover the top with the remaining cream sauce.  (If you are making this ahead of time, place dish in refrigerator; in which case an hour-twice as long- will be needed to bake cold fish; start rice when you place refrigerated salmon in oven.)
  9. Just before placing this in oven, spread bread crumbs on top of sauce.  If a skim has formed on top of cream, gently break apart with a spoon; this makes surface wet again, so crumbs can stick.  Then bake for 30 minutes in preheated oven; all the flavors will meld.
  10. Serve with 1880’s Minced Cabbage, which is next week’s entry.